Table of Contents
Crafting a dining table that becomes the centerpiece of family gatherings for decades demands more than just premium hardwood and meticulous joinery—it requires the silent, unyielding pressure of the right pipe clamps during those critical glue-up moments. When you’re wrestling with an 8-foot slab of walnut or a 10-foot live-edge maple monstrosity, your clamping strategy can mean the difference between a flawless, seamless top and a costly pile of fire-starting scraps. As we look toward 2026, the landscape of pipe clamp technology continues evolving, with smarter features, more ergonomic designs, and sustainable materials entering the workshop. Whether you’re a seasoned furniture maker or a passionate hobbyist taking on your first large-scale project, understanding how to evaluate and deploy these essential tools will transform your approach to big glue-ups from stressful guesswork into confident, repeatable success.
Top 10 Pipe Clamps For Tables


Detailed Product Reviews
6. UTEBIT Universal C-Clamp for Desktop Mount Holder, 3.7"-5.7" C-Clamp Aluminum Support Clamp with 1/4" and 3/8" Thread for Desktop Mount Tables Desk, Black (2 Pack)

Overview: The UTEBIT Universal C-Clamp set delivers a lightweight mounting solution for desks and workstations. This two-pack aluminum kit features jaws expanding from 0-1.7 inches with multiple threaded mounting points, perfect for securing cameras, lights, monitors, or other equipment to table edges without permanent installation.
What Makes It Stand Out: These clamps excel through their triple-thread design—two 1/4-inch and one 3/8-inch hole—offering unmatched versatility for content creators and office setups. The environmentally-friendly ABS anti-slip pads increase friction while protecting furniture surfaces. Aluminum construction keeps weight minimal for portable configurations, and the adjustable screw knob enables tool-free operation.
Value for Money: As a two-pack, these clamps provide excellent value, costing approximately 35% less per unit than premium single-clamp alternatives from brands like Manfrotto. The integrated multi-thread design eliminates separate adapter purchases, saving an additional $10-15. For light-duty mounting tasks, this represents significant cost efficiency.
Strengths and Weaknesses: Strengths:
- Lightweight yet durable aluminum alloy
- Multiple thread sizes eliminate adapter needs
- Protective anti-slip pads prevent surface damage
- Affordable two-pack configuration
- Tool-free adjustment mechanism
Weaknesses:
- Limited 1.7-inch jaw opening restricts thick table compatibility
- Aluminum construction unsuitable for heavy loads over 10 lbs
- Not designed for woodworking clamping pressure
- Compact size may feel unstable with bulky equipment
Bottom Line: Ideal for content creators, remote workers, and photographers needing flexible, light-duty mounting. These clamps excel at securing accessories but cannot replace traditional C-clamps for heavy-duty applications. Purchase for mounting, not for clamping.
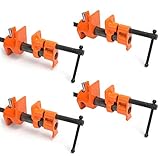
7. HimaPro 4-Pack 3/4 Inch H-Style Professional Pipe Clamp Set - Designed For Woodworking, Carpentry, Home Improvement, and DIY Jobs

Overview: The HimaPro 4-Pack provides serious woodworkers with professional-grade pipe clamps designed for 3/4-inch threaded pipe. These H-style clamps feature a quick-release mechanism and high-stand design, making them essential tools for furniture construction, cabinet making, and general woodworking projects requiring reliable, repeatable clamping pressure.
What Makes It Stand Out: The quick-release mechanism dramatically accelerates workflow, allowing rapid adjustments without spinning the handle excessively. The high-stand design creates a stable base that prevents tipping during glue-ups—a common frustration with standard pipe clamps. Engineered specifically for 3/4-inch pipe, these clamps deliver precise, wobble-free performance that budget alternatives cannot match.
Value for Money: This four-pack offers compelling value at roughly $15-18 per clamp head, significantly less than purchasing premium brands like Bessey individually. For woodworkers building a clamp arsenal, buying in bulk saves 25-30% compared to single purchases. The time saved through the quick-release mechanism adds intangible value during complex assemblies.
Strengths and Weaknesses: Strengths:
- Efficient quick-release mechanism saves time
- Stable high-stand design prevents tipping
- Optimized for standard 3/4-inch threaded pipe
- Professional-grade durability for daily use
- Four-pack provides immediate project capability
Weaknesses:
- Pipe lengths not included (requires additional purchase)
- Limited to 3/4-inch pipe diameter only
- May be overkill for occasional DIY users
- Clutch mechanism requires occasional cleaning
Bottom Line: An excellent investment for dedicated woodworkers seeking efficiency and reliability. The HimaPro set delivers professional performance at a reasonable price, though casual users might prefer complete clamp kits. Purchase if you’re building a serious workshop.
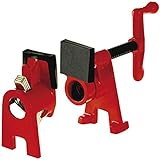
8. KARRYTON 3/4 Inch Heavy Duty Pipe Clamps for Woodworking, H-Style Wood Gluing Clamps w/Foot Pads, Adjustable Pipe Clamp Tool for Furniture, Cabinet Making & DIY Projects (Set of 4)
Overview: The KARRYTON Heavy Duty Pipe Clamp Set targets professional woodworkers demanding maximum clamping force and durability. This four-pack features forged steel jaws capable of generating up to 1,500 pounds of pressure, making them ideal for critical glue-ups in furniture making, cabinet construction, and panel assembly where joint integrity is paramount.
What Makes It Stand Out: These clamps generate exceptional force—nearly double that of standard pipe clamps—ensuring gap-free joints and superior glue penetration. The 1-11/16-inch throat depth accommodates thick workpieces, while non-marring pads protect delicate surfaces. The H-style foot design provides superior stability, and the acme threaded spindle ensures smooth operation even under maximum load.
Value for Money: While priced at a 20-25% premium over standard pipe clamps, the KARRYTON set justifies the cost through forged steel construction and extreme pressure capability. For professional furniture makers, the investment pays dividends in joint quality and reduced assembly failures. Comparable professional clamps from Jorgensen cost 30-40% more individually.
Strengths and Weaknesses: Strengths:
- Massive 1,500 lbs clamping force eliminates gaps
- Forged steel jaws ensure exceptional durability
- Deep throat depth handles thick stock
- Non-marring pads protect workpieces
- Stable H-design prevents tipping
Weaknesses:
- Premium price point may deter hobbyists
- Pipe not included (additional expense)
- Overkill for light-duty or small projects
- Heavy weight reduces portability
Bottom Line: Professional-grade clamps that deliver unmatched power and reliability. Worth the premium for serious furniture makers and cabinet builders. Hobbyists should consider less expensive alternatives unless tackling large-scale projects requiring maximum pressure.
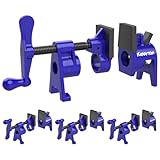
9. FLKQC 3/4" Wood Gluing Pipe Clamp Set with Unique Foot Design Red Heavy Duty Bar Clamps Cast Iron Quick Release Pipe Clamp Tools for Woodworking (6pc, 3/4" with foot)

Overview: The FLKQC six-pack provides cast iron pipe clamps with a unique stability-focused design for woodworking and metalworking applications. These clamps feature a distinctive foot configuration offering biaxial stability, making them particularly effective for complex glue-ups, frame assembly, and production environments where multiple clamps must work in concert.
What Makes It Stand Out: The innovative foot design delivers stability in two axes, preventing both forward/backward and side-to-side tipping—a significant improvement over traditional H-style clamps. The cast iron construction provides durability and vibration dampening, while large clutch plates ensure smooth, reliable release. The ergonomic handle reduces fatigue during repetitive adjustments.
Value for Money: This six-pack offers exceptional bulk value, bringing per-unit cost down to approximately $12-14—among the lowest for cast iron clamps. For workshops setting up multiple assembly stations or tackling large glue-ups, the quantity advantage is substantial. Purchasing six comparable clamps individually would cost 40-50% more.
Strengths and Weaknesses: Strengths:
- Unique biaxial foot design enhances stability
- Cast iron construction ensures durability
- Smooth quick-release mechanism
- Ergonomic handle reduces hand fatigue
- Excellent six-pack value for large projects
Weaknesses:
- Cast iron weight makes them less portable
- Red finish may not suit all workshop aesthetics
- Pipe not included in the set
- Bulk packaging may include occasional manufacturing variance
Bottom Line: Outstanding value for woodworkers needing multiple stable clamps for production work or large glue-ups. The unique foot design solves common stability issues. Highly recommended for shop use, though weight limits portability.
10. POWERTEC 2PK Welding Clamp with T-Handle – 6-1/2" Max Opening, 3-1/4" Throat Depth – Fits 5/8" (16mm) Welding Table Holes, Heavy-Duty Workbench Screw Clamp for Welding & Fabrication (72234-P2)

Overview: The POWERTEC Welding Clamp Set addresses a specific need in metal fabrication: secure clamping on perforated welding tables. This two-pack features T-handle screw clamps engineered to fit standard 5/8-inch fixture holes, delivering 300 pounds of clamping pressure for welding, assembly, and fabrication tasks requiring precise workpiece positioning.
What Makes It Stand Out: Unlike generic clamps, these are purpose-built for welding tables, dropping securely into 5/8-inch holes for instant, rock-solid anchoring. The T-handle provides superior torque and control compared to standard handles, while the 3-1/4-inch throat depth accommodates various workpiece thicknesses. Chrome plating and black oxide treatment ensure survival in harsh welding environments.
Value for Money: For welders with compatible tables, these clamps offer excellent value at approximately $25-30 per unit—comparable to general-purpose clamps but with specialized functionality that eliminates setup time and frustration. The corrosion-resistant finish extends lifespan significantly, reducing replacement costs. Non-welders will find zero value here.
Strengths and Weaknesses: Strengths:
- Perfect fit for standard 5/8-inch welding table holes
- Strong 300 lbs clamping force for metalwork
- Corrosion-resistant finish for harsh environments
- T-handle enables precise pressure control
- High-carbon steel rail ensures durability
Weaknesses:
- Specialized design limits versatility
- Only two clamps may be insufficient for complex setups
- Requires perforated welding table (not included)
- Higher cost than standard C-clamps
Bottom Line: Essential equipment for welders using perforated tables. The specialized design eliminates frustration and improves safety. Not recommended for general woodworking or non-welding applications. Purchase if you have the right table; otherwise, look elsewhere.
Understanding the Anatomy of a Premium Pipe Clamp
Before diving into selection criteria, it’s crucial to understand what separates a mediocre clamp from one that’ll serve you through hundreds of dining table projects. A pipe clamp isn’t just a threaded jaw sliding on black iron pipe—it’s a precision pressure-delivery system. The best models feature machined steel castings with reinforced ribbing, acme threads cut to tight tolerances, and clutch plates that engage with authority. The movable jaw should glide smoothly without wobble, while the stationary jaw needs a secure, non-marring face that won’t imprint your workpiece. In 2026, we’re seeing manufacturers integrate composite materials in high-stress areas to reduce weight without sacrificing strength, a game-changer when you’re handling 10-foot assemblies solo.
Why Pipe Clamps Reign Supreme for Long Dining Tables
Unmatched Length-to-Cost Ratio
Unlike expensive aluminum bar clamps that max out at 6 feet without costing a fortune, pipe clamps offer virtually unlimited reach for the price of standard threaded pipe. For a 96-inch dining table, you’d need three 36-inch bar clamps at $80 each, or one pipe clamp setup using $12 worth of pipe. The economics become laughably obvious when projects scale up.
Superior Pressure Distribution Dynamics
The rigid nature of steel or iron pipe, combined with the clamp’s mechanical advantage, creates consistent pressure across the entire span. This prevents the “pressure drop-off” you experience with long bar clamps that can flex under load. When gluing up multiple boards for a tabletop, even pressure means invisible seams that’ll never telegraph through your finish.
Modularity and Workshop Flexibility
Your 10-foot pipe clamp can become a 4-foot clamp for smaller projects simply by swapping pipes. This adaptability means you’re not investing in single-purpose tools that gather dust between large glue-ups. For the 2026 woodworker focused on maximizing shop space efficiency, this modular approach is non-negotiable.
Key Features to Evaluate in 2026 Models
Clamp Capacity and Effective Reach
Don’t just look at the pipe length—consider the jaw opening minus the space lost to the pipe threads and shoulder. For dining tables, calculate your needed capacity by adding 6-8 inches to your final tabletop width. This extra length gives you room to position clamps away from the edge while maintaining full pressure on the glue line. Modern clamps now feature “extended-reach” jaws that provide up to 4 inches of throat depth, crucial for clamping near the center of thick slabs without pipe interference.
Thread Quality and Mechanical Advantage
Acme threads with 4-5 threads per inch offer the sweet spot between speed and torque. In 2026, premium clamps boast cold-rolled threads with a proprietary coating that reduces friction by up to 40%, meaning less effort for the same clamping pressure. Avoid clamps with coarse threading that requires excessive handle turns—your wrists will thank you after a 20-clamp setup.
Jaw Design and Pressure Plate Engineering
Look for jaws with removable, reversible pads: one side serrated for aggressive grip on rough lumber, the other smooth and cushioned for finished surfaces. The latest designs incorporate micro-adjustable pivoting plates that self-align to board surfaces up to 15 degrees out of parallel, compensating for minor milling inconsistencies without stressing the joint.
Handle Ergonomics and Torque Multiplication
Those 4 a.m. glue-ups before work demand handles that won’t blister your palms. Contemporary clamps feature glass-filled nylon handles with rubber overmolding and a 15-degree offset that keeps your knuckles clear of the workpiece. Some 2026 models include integrated torque limiters that click when you’ve reached optimal pressure—eliminating both under-clamping and the dreaded squeeze-out starvation.
Pipe Selection: The Foundation of Your Clamping System
Choosing the Right Diameter for Rigidity
For dining table glue-ups, 3/4-inch nominal pipe is the absolute minimum; 1-inch pipe offers 60% more rigidity and is worth the modest upcharge for spans over 6 feet. The 2026 trend toward “heavy-wall” schedule 80 pipe provides even greater stiffness, though it requires clamps specifically designed for the thicker diameter. Never use galvanized pipe—the zinc coating can flake off and embed in your workpiece, causing finish nightmares.
Material Matters: Black Iron vs. Stainless
Traditional black iron pipe develops surface rust that can transfer to light woods. While regular cleaning with mineral spirits helps, stainless steel pipe (specifically 304 grade) eliminates this risk entirely. The cost premium is significant—about 3x—but for white oak, maple, or ash projects, it’s cheap insurance against black stains. Some craftspeople are now using powder-coated pipe in custom colors, though the coating’s durability under clamp pressure remains debated.
Pipe Preparation for Optimal Performance
New pipe arrives filthy with cutting oil and mill scale. Clean it thoroughly with acetone, then apply a dry-film lubricant like Bostik GlideCote to the entire length. This prevents rust and allows the movable jaw to slide effortlessly. In 2026, pre-treated “woodworker’s pipe” is entering the market, but at a 50% price premium that most find hard to justify for a DIY cleaning job.
Pressure Management Strategies for Seamless Joints
Calculating Required Clamping Pressure
Dining table glue-ups typically need 150-250 PSI for hardwoods. To calculate: multiply your board’s square inches of glue surface by desired PSI, then divide by the number of clamps. For example, a 1-inch thick, 8-inch wide board has 8 square inches of glue surface per running foot. With eight clamps across a 6-foot table, each clamp must deliver roughly 200 pounds of force. Modern clamps with 1,000-pound ratings provide ample headroom.
The Alternating Clamp Method for Anti-Twist
Never clamp from one side only. Alternate clamps top and bottom every 12-18 inches, creating a “checkerboard” pattern that cancels out any tendency to cup or twist. This technique is especially critical with live-edge slabs that may have internal stresses. For 2026’s trend toward book-matched waterfall tables, this method ensures the grain flows perfectly across the joint.
Preventing Panel Bow with Auxiliary Cauls
Even with perfect clamps, long panels can bow upward in the center. Use 2-inch thick straight-grain maple cauls (slightly longer than your panel width) with packing tape on the glue faces. Clamp these across the top and bottom every 24 inches. The cauls distribute pressure laterally and keep everything dead flat while the glue cures.
Advanced Setup Techniques for Professional Results
Building a Dedicated Glue-Up Station
For serious table makers, a torsion-box assembly table with integrated T-tracks is transformative. You can position pipe clamps underneath, suspended by custom brackets, allowing you to slide boards into place from above. This 2026 workshop upgrade reduces setup time by 70% and eliminates the back-breaking work of lifting heavy assemblies over clamp bars.
The Dry-Run Protocol You Can’t Skip
Always do a complete dry-run, including all clamps tightened just enough to hold position. Mark each board’s location with cabinetmaker’s triangles and note which clamp goes where. This reveals interference issues, lets you pre-position supports, and ensures you have enough open time when the glue is actually spread. Time this run—if it takes 12 minutes, you need a glue with at least 20 minutes of open time.
Managing Squeeze-Out Like a Pro
Excessive pressure starves the joint; too little leaves voids. The sweet spot produces small, consistent beads of squeeze-out. In 2026, many craftspeople are using “glue dams”—thin strips of waxed paper placed 1/8 inch from the joint line that catch squeeze-out before it bonds to the pipe or clamps, making cleanup nearly instantaneous.
Modern Innovations Shaping 2026 Clamp Technology
Digital Pressure Monitoring Integration
Bluetooth-enabled pressure sensors that fit between the jaw and workpiece are becoming standard on high-end clamps. These connect to smartphone apps showing real-time PSI across your entire assembly, with alerts if pressure drops during cure. While still a luxury feature, prices have dropped 60% since 2024, making them accessible to serious hobbyists.
Sustainable Material Adoption
Forward-thinking manufacturers now use recycled steel castings and bio-based composite handles derived from flax fiber. These eco-clamps perform identically to traditional models while reducing carbon footprint by 40%. For the environmentally conscious furniture maker creating “green” dining tables, this alignment of tools and values is increasingly important.
Quick-Release Mechanism Evolution
The latest quick-release triggers require 30% less travel and engage with a satisfying detent you can feel through work gloves. Some designs now include a “micro-adjust” thumb wheel for fine-tuning pressure without spinning the main handle—perfect for those final tweaks when the glue is already getting tacky.
Workspace Optimization for Large Glue-Ups
Managing Clamp Storage for 10-Foot Pipes
Vertical storage on heavy-duty brackets keeps long pipes accessible without consuming wall space. Store pipes with threads protected by PVC caps to prevent damage. For clamps themselves, French cleat systems with custom holders keep jaws separated (preventing rust transfer) and handles easily grasped. The 2026 workshop trend is “clamp carts” with vertical posts that hold a dozen ready-to-go setups.
Workflow Efficiency Tips
Pre-stage everything: pipes cut to length and lubricated, clamps tested and wiped down, cauls waxed, glue mixed and ready. Have a helper (or a roller stand army) to support the far end as you position boards. Work under temperature-controlled conditions—glue cures unpredictably below 60°F or above 85°F.
Lighting and Visibility Enhancements
LED strip lights mounted under your assembly table illuminate glue lines from below, revealing gaps invisible from above. This simple addition, popularized in 2025, has prevented more joint failures than any clamp upgrade.
Safety Protocols for Heavy-Duty Clamping
Over-Clamping Risks and Wood Fiber Crushing
Hardwoods like oak and maple can crush at pressures above 300 PSI, creating permanent dents that telegraph through planing. Always use scrap wood pads between the clamp jaw and your workpiece, even with “non-marring” faces. The pads should be slightly softer than your project wood—pine for hardwoods, MDF for softwoods.
Pipe Whip Hazards During Disassembly
A 10-foot pipe under tension can store significant energy. When releasing pressure, turn the handle slowly and stand to the side, never in line with the pipe. If a jaw is stuck, tap it free with a dead-blow mallet rather than yanking—sudden releases can turn a pipe into a dangerous flail.
Proper Lifting Techniques for Heavy Assemblies
A glued-up 10-foot walnut top can weigh 150+ pounds. Use suction cup handles or a panel lift, and always have a partner. The 2026 workshop standard is a simple overhead hoist system—an investment that pays for itself after one avoided back injury.
Cost vs. Value: Making Smart Investment Choices
Professional vs. Hobbyist Budget Tiers
Entry-level clamps ($15-25 each) use stamped steel and work fine for occasional use but may develop slop in the threads after 50+ glue-ups. Professional-grade clamps ($40-60) feature ductile iron castings and hardened steel threads that’ll last thousands of cycles. For building one dining table annually, three quality clamps beat a dozen cheap ones.
Long-Term Investment Perspective
Factor in replacement costs: a $20 clamp that fails after two years costs more than a $50 clamp that lasts twenty. Consider the cost of failed glue-ups—a single ruined $300 slab of cherry exceeds the price difference between budget and premium clamps.
Hidden Costs to Factor In
Don’t forget pipe costs, threading dies if you cut custom lengths, storage solutions, and protective pads. A realistic budget for a 6-clamp system ready for 8-foot tables is $300-400 total, not just the clamp sticker prices.
Maintenance for Generational Tool Longevity
Routine Cleaning Protocols
After each glue-up, wipe clamps with a damp cloth to remove squeeze-out before it hardens. Monthly, disassemble the movable jaw and clean the clutch mechanism with compressed air. Apply a drop of light machine oil to the threads every third use—never use heavy grease that attracts dust.
Thread Restoration and Protection
If threads get dinged, chase them with a thread file rather than forcing the jaw over damaged areas. For long-term storage, apply a corrosion inhibitor like Boeshield T-9 to pipes and wrap jaws in VCI paper.
When to Retire a Clamp
If the movable jaw wobbles more than 1/16 inch on the pipe, or if the clutch slips under moderate torque, it’s time for replacement. Continuing to use worn clamps risks joint failure and frustration.
Common Mistakes That Ruin Glue-Ups
Inadequate Clamp Distribution
Spacing clamps more than 24 inches apart creates pressure valleys where joints can starve. For 8/4 stock, reduce spacing to 18 inches. The “more clamps are better” mantra is true up to a point—beyond optimal pressure, you’re just adding weight and complexity.
Ignoring Wood Moisture Content
Clamping boards with more than 2% moisture content difference guarantees future joint failure. Use a pinless moisture meter and acclimate all lumber to your shop for at least a week before glue-up. This fundamental step is more critical than any clamp feature.
Rushing the Cure Time
Even “90-minute” epoxy needs 24 hours before stress. For dining tables that’ll bear weight and heat, wait a full 48 hours before removing clamps and 7 days before final machining. The 2026 woodworker uses IoT sensors to monitor shop humidity and temperature, calculating precise cure times via app.
Alternative Solutions for Specialized Situations
When to Consider Beam Clamps
For tables over 12 feet, aluminum beam clamps offer superior rigidity without the weight of pipe. They’re worth the investment for professional shops doing conference tables, but overkill for standard dining dimensions.
Vacuum Bagging for Ultra-Wide Panels
For book-matched panels where visible clamp marks are unacceptable, vacuum bagging distributes perfectly even pressure. The setup cost is high ($800+), but the results are gallery-quality. This technique is gaining traction for epoxy river tables where traditional clamps can’t reach the center.
Wedge Clamp Systems for Live-Edge Challenges
When clamping irregular live edges, pipe clamps can force unnatural alignment. Wedge systems using opposing tapers let the wood find its natural position while still applying adequate pressure. This hybrid approach is becoming standard practice in 2026’s live-edge furniture boom.
Future-Proofing Your Clamp Collection
Investing in Modular Accessories
Choose clamps compatible with a brand’s ecosystem: corner brackets for frames, stand-off blocks for raised panels, and pressure-distribution bars. This expandability means your initial investment grows with your skills rather than becoming obsolete.
Scalability for Growing Ambitions
If you’re building 6-foot tables now but dream of 12-foot conference tables, buy clamps rated for 1-inch pipe even if you start with 3/4-inch. The jaw investment is slightly higher, but you won’t need to replace everything when you scale up.
Staying Informed on Emerging Standards
Join woodworking forums and follow tool manufacturers’ R&D blogs. The shift to metric pipe sizing is being discussed for 2027, and early adoption could mean access to superior European clamps. The 2026 woodworker thinks globally while building locally.
Frequently Asked Questions
What’s the minimum number of pipe clamps needed for a typical 8-foot dining table glue-up? For a standard 1-inch thick top glued from 6-8 inch wide boards, you’ll need six clamps minimum: three on top, three on bottom, alternating positions. This provides adequate pressure without excessive squeeze-out. For 8/4 (2-inch) thick tops, increase to eight clamps total.
Can I mix different brands of pipe clamps in the same glue-up? It’s not recommended. Different brands have varying thread pitches and jaw flatness, leading to uneven pressure distribution. If you must mix, place identical brands opposite each other (top/bottom) and adjust each pair to the same torque spec using a digital gauge.
How do I prevent black stains from iron pipes on light-colored woods? Use stainless steel pipe or thoroughly seal black iron pipe with multiple coats of polyurethane, letting it cure completely before contact with wood. Always use sacrificial pads between the jaw and workpiece. Some woodworkers wrap pipe in painter’s tape as an additional barrier.
Is there a practical limit to how long a pipe clamp can be? Mechanically, you can use 20-foot pipes, but sag becomes unmanageable. For dining tables, 12 feet is the practical maximum with 1-inch pipe. Beyond that, support the pipe every 4 feet with roller stands or suspend it from above to maintain alignment.
What’s the best glue for long panel glue-ups with pipe clamps? For traditional hardwoods, PVA Type I (waterproof) glue like Titebond III offers 8-10 minutes of open time. For complex assemblies, consider liquid hide glue for its reversible property and extended working time. In 2026, hybrid polymer glues are gaining popularity for their gap-filling ability and waterproof rating.
How tight is too tight when clamping a dining table top? Tighten until you see a small, continuous bead of glue along the entire joint line. If you’re crushing wood fibers (visible indentation in the pad), you’ve gone too far. With digital clamps, aim for 175-200 PSI for most hardwoods. When in doubt, err on the side of slightly less pressure.
Should I remove clamps as soon as the glue reaches handling strength? No. While most PVA glues reach handling strength in 1-2 hours, internal stresses continue relaxing for 24 hours. Removing clamps early can cause subtle warping that isn’t apparent until after the top is flattened. Leave clamps on a full 24 hours for panels under 12 inches wide, 48 hours for wider ones.
Can pipe clamps be used for epoxy river table glue-ups? Standard pipe clamps work for the wood portions, but epoxy’s exothermic reaction can reach 200°F, softening typical clamp pads. Use high-temperature silicone pads and position clamps far from the epoxy channel. For the center section, consider vacuum bagging or custom compression jigs that don’t rely on point pressure.
What’s the ideal workshop temperature for dining table glue-ups? 65-75°F with 40-50% relative humidity is optimal. Glue cures too fast above 80°F, risking joint starvation. Below 60°F, cure slows dramatically and strength suffers. The 2026 standard is a dedicated glue-up room with climate control and air filtration to prevent dust contamination.
How do I know when it’s time to replace my pipe clamps? When the movable jaw develops play exceeding 1/8 inch, the clutch slips under moderate pressure, or threads show visible wear flats, retire the clamp. Continuing to use worn clamps risks catastrophic joint failure. Quality clamps last decades with proper care, so replacement indicates either extreme use or chronic neglect.
See Also
- 10 Best Parallel Clamps for Table-Top Glue-Ups in 2026
- 10 Best Pipe Clamps for Heavy-Duty Glue-Ups Under $50 in 2026
- 10 Pipe Clamps That Solve Panel-Bow Problems During Glue-Ups in 2026
- The 10 Ultimate Bar Clamps for Long Panel Glue-Ups in 2026
- 10 Band Clamps for Curved Glue-Ups That Actually Hold in 2026