Table of Contents
There’s nothing quite as frustrating as watching a $80 sheet of Baltic birch plywood turn into expensive firewood because your freehand rip cut veered off course. We’ve all been there—clamping a straight piece of lumber as a guide, eyeballing the distance, and hoping for the best. The result? A wavy edge that needs endless sanding or, worse, a complete do-over. But here’s the truth: you don’t need a table saw that costs as much as a used car to make factory-perfect rip cuts. Circular saw edge guides have evolved from simple straightedges to precision-engineered systems that can deliver table-saw accuracy anywhere you can set up a pair of sawhorses.
The secret lies in understanding what separates a flimsy aluminum strip from a rock-solid guiding system that becomes an extension of your tool. Whether you’re a weekend warrior building built-ins or a professional trim carpenter working on site, the right edge guide transforms your circular saw from a rough-cutting beast into a precision instrument. This guide dives deep into the mechanics, features, and techniques that will elevate your ripping game without forcing you to rearrange your entire garage for a stationary tool.
Top 10 Circular Saw Edge Guides
Detailed Product Reviews
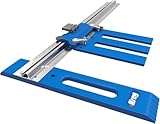
1. Kreg KMA2400 Rip-Cut Circular Saw Guide - Cutting Tool - Guide is Best for Regular (Side-Blade) Circular Saw - Ensure Compatibility Before Use - Woodworking Tools for Home Improvement

Overview:
The Kreg KMA2400 transforms your circular saw into a precision edge-guided cutting system for accurate rip cuts. Designed for standard side-blade circular saws, this portable guide eliminates repetitive measuring and marking, delivering table saw-like accuracy from your existing corded or cordless tool. It’s an ideal solution for woodworkers seeking professional results without investing in stationary equipment.
What Makes It Stand Out:
The universal sled accommodates both left and right-bladed saws, making it exceptionally versatile for shared workshops. Its portable design brings precision to job sites, while the large handle maintains consistent material contact. The system works with most standard circular saws and even accepts jig saws, offering flexibility that single-brand guides cannot match.
Value for Money:
Priced in Kreg’s premium tier, this guide justifies its cost by eliminating the need for a table saw for many ripping tasks. DIYers and professionals with compatible saws will recoup their investment after a few projects through time savings and reduced material waste. It’s a smart alternative to expensive dedicated equipment.
Strengths and Weaknesses:
Strengths include broad compatibility, portability, and precision. The sled clamps securely to most saws with metal blade guards. Weaknesses: incompatible with plastic upper blade guards or bulky odd-shaped guards that prevent flat mounting. While it works with worm drive saws, compatibility isn’t guaranteed for all models.
Bottom Line:
An excellent investment for serious woodworkers with standard circular saws. Verify your saw’s compatibility before purchasing. For suitable tools, it delivers impressive precision and convenience in a portable package.
2. Edge Rip Guide for Ryobi P508 Circular Saw 204585001

Overview:
This edge rip guide is a genuine OEM replacement part specifically engineered for the Ryobi P508 circular saw. It restores your tool’s original precision cutting capabilities, providing a stable guide for straight, consistent cuts without repeated measuring. If you’ve lost or damaged your factory guide, this offers a direct replacement solution.
What Makes It Stand Out:
As an official Ryobi part (#204585001), it guarantees perfect fit and alignment with zero modifications required. The installation is straightforward, maintaining the original tool’s engineering integrity. This purpose-built design ensures the same precision Ryobi intended, unlike universal adapters that may compromise performance.
Value for Money:
Priced affordably as a replacement component, this guide offers excellent value for Ryobi P508 owners. Compared to universal guides requiring adapters, this factory part ensures optimal functionality at a fraction of new saw cost. It’s economical insurance for maintaining your tool’s precision.
Strengths and Weaknesses:
Strengths include perfect compatibility, durable construction, and simple installation delivering smooth, precise results. The major weakness is exclusive compatibility with only the Ryobi P508—it’s useless for any other saw model. This single-purpose design limits versatility for multi-brand workshops.
Bottom Line:
Essential purchase for Ryobi P508 users needing a replacement guide. It excels at its singular purpose but offers zero flexibility. Anyone else should look elsewhere; this is a model-specific component, not a universal solution.
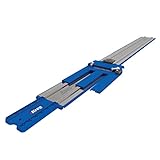
3. Kreg KMA2685 Rip-Cut Circular Saw Guide - Cutting Tool - Guide is Best for Regular (Side-Blade) Circular Saw - Ensure Compatibility Before Use - Woodworking Tools for Home Improvement
Overview:
The Kreg KMA2685 converts your circular saw into a precision edge-guided tool for accurate rip cuts. Similar to its Kreg siblings, this model focuses on standard side-blade circular saws, offering woodworkers a portable alternative to stationary table saws for breaking down sheet goods and making repeatable cuts.
What Makes It Stand Out:
The universal sled works with both left and right-bladed saws, providing workshop flexibility. Its portable design makes it ideal for on-site work, while the large ergonomic handle ensures steady material contact. The system includes clear cutline indicators to position cuts accurately without guesswork or additional marking.
Value for Money:
Positioned in Kreg’s premium tier, the KMA2685 justifies its cost by delivering professional-grade accuracy without requiring a table saw investment. For homeowners and contractors with compatible saws, it provides exceptional ROI by enabling precision work that would otherwise require expensive, space-consuming equipment.
Strengths and Weaknesses:
Strengths include excellent portability, user-friendly operation, and compatibility with most standard circular saws. However, it explicitly does not work with worm drive saws due to base/motor housing interference. Additionally, plastic upper blade guards may prevent proper sled clamping and alignment, requiring pre-purchase verification.
Bottom Line:
A solid choice for woodworkers using standard sidewinder circular saws. Verify your saw’s compatibility, especially regarding worm drive designs and guard materials. For suitable tools, it delivers impressive precision and convenience that justifies the Kreg premium.
4. Kreg KMA4700-E Straight Edge Guide XL - 8 Ft - For Circular Saw - For Cross Cut & Rip Cut - Aluminum Guide Rails - Carpentry Tools & Accessories

Overview:
The Kreg KMA4700-E Straight Edge Guide XL is an 8-foot aluminum guide rail system that transforms circular saws, jig saws, and trim routers into precision cutting tools. Designed for both rip and cross cuts on large panels, this extended guide provides professional-grade accuracy for substantial workpieces without requiring repositioning.
What Makes It Stand Out:
The impressive 8-foot length handles full sheet goods in a single pass, dramatically improving efficiency and cut quality. Its anti-slip clamping system secures firmly to materials, while the cutline indicator ensures perfect alignment. Unlike shorter guides, this XL version tackles large-scale projects that would typically require a panel saw.
Value for Money:
As a premium Kreg product, the initial investment is substantial but justified for serious woodworkers. It eliminates the need for expensive panel saws or large table saws. Professionals will recoup costs quickly through time savings and reduced material waste from miscuts, making it a smart long-term investment.
Strengths and Weaknesses:
Strengths include exceptional length, versatile tool compatibility, and rock-solid stability. The aluminum construction remains lightweight yet rigid. Weaknesses: the 8-foot length requires ample storage space, and the price may deter casual DIYers. It’s also overkill for small-scale projects or limited workshop space.
Bottom Line:
Ideal for professionals and serious hobbyists regularly cutting full sheet goods. If you have the space and budget, it’s an indispensable tool for achieving flawless long cuts. Casual users should consider shorter, less expensive alternatives that better match their project scale.
5. Adjustable Cutting Machine Base Guide, Innovative Clamp Circular Saw Guide Electric Circular Saw Milling Positioning Clamp Precision Wood Cutting Guide Pros & Hobbyists

Overview:
This adjustable cutting machine base guide is a versatile precision tool for professionals and DIY enthusiasts. Engineered for 4-8 inch cutting machines including marble saws and dust-cutting tools, it features an innovative clamping system that converts standard circular saws into precision-guided instruments for demanding applications.
What Makes It Stand Out:
The bidirectional anti-shift buckle with enhanced locking mechanism provides superior stability compared to conventional guides, self-adjusting during operation for consistent accuracy. Ergonomic grip handles maximize comfort during extended use, while the flexible adjustable distance feature allows precise positioning for various cutting requirements from delicate inlays to heavy-duty ripping.
Value for Money:
Offering advanced features typically found in premium brands at a competitive price point, this guide delivers professional capabilities without the premium cost. The wide compatibility range (145-208mm saws) eliminates the need for multiple proprietary guides, making it economical for multi-tool workshops seeking versatility.
Strengths and Weaknesses:
Strengths include innovative anti-shift technology, excellent ergonomics, broad compatibility, and durable industrial-grade construction. The lightweight yet robust design enhances portability. Weaknesses: being a lesser-known brand, long-term durability remains unproven compared to established names like Kreg. The generic marketing copy raises questions about customer support and replacement parts availability.
Bottom Line:
An impressive value proposition for pros and hobbyists seeking advanced features on a budget. If you’re willing to trust a newer brand, the performance features are compelling. For those prioritizing proven reliability and established support networks, stick with traditional manufacturers.
6. Swanson Tool Co CG100 Anodized Aluminum 100 inch Cutting Guide with joiner bar, (2) C-clamps and (4) thumb screws

Overview: The Swanson CG100 delivers exceptional reach with its 100-inch cutting capacity, assembled from two 50-inch anodized aluminum sections. This system accommodates circular saws, routers, sabre saws, and utility knives, making it a versatile addition to any workshop. The low-profile design ensures minimal interference with tool bases, while the included C-clamps and thumb screws provide secure work surface attachment.
What Makes It Stand Out: The joiner bar system stands out by offering maximum length without sacrificing portability. Unlike single-piece guides that are cumbersome to store, the two-piece design breaks down for easy storage while maintaining accuracy when assembled. The universal compatibility with multiple tool types eliminates the need for separate guides, and the included C-clamps mean you’re ready to work immediately.
Value for Money: This guide delivers strong value for those needing 100-inch capacity at a mid-range price point. While cheaper guides exist, few offer this length and versatility in one package. The anodized aluminum construction ensures longevity, making it a worthwhile investment compared to replacing shorter or plastic guides over time.
Strengths and Weaknesses: Strengths include exceptional length, multi-tool compatibility, durable anodized aluminum build, and space-saving breakdown design. The included C-clamps add immediate utility. Weaknesses involve slower setup compared to modern quick-lock systems, potential alignment issues at the joiner connection if not properly secured, and the C-clamps may mar delicate workpieces.
Bottom Line: The Swanson CG100 excels for users who prioritize maximum cutting length and versatility. It’s ideal for breaking down full plywood sheets while storing compactly. If you don’t mind traditional clamping methods, this guide offers professional-grade capacity without the premium price tag.
7. Kreg KMA2700 Accu-Cut – Circular Saw Track – Make Straight, Cross, Rip & Angled Cuts Easily
Overview: The Kreg Accu-Cut transforms ordinary circular saws into precision track-guided tools. This 48-inch track system features a universal sled that attaches to most circular saws, enabling splinter-free, accurate cuts across various applications. Designed for portability, it allows woodworkers to achieve table saw precision anywhere.
What Makes It Stand Out: The universal sled’s ambidextrous design accommodates both right- and left-handed circular saws, a feature many competitors lack. Anti-slip guide strips and an integrated starting block ensure smooth, controlled cuts without edge damage. Kreg’s reputation for precision woodworking tools adds confidence, and the system’s portability makes it ideal for job sites.
Value for Money: Priced in the premium range, the Accu-Cut justifies its cost through precision features and build quality. While more expensive than basic straight edges, it eliminates the need for a table saw in many situations. For serious DIYers and professionals, the accuracy and versatility offset the initial investment compared to cheaper, less reliable alternatives.
Strengths and Weaknesses: Strengths include excellent precision, universal saw compatibility, portability, splinter-free cuts, and intuitive operation. The anti-slip strips hold the track securely without clamps in many situations. Weaknesses are the limited 48-inch length for full sheet goods, higher price point, and restriction to circular saws only—routers and other tools cannot use this system.
Bottom Line: The Kreg Accu-Cut is a top-tier solution for woodworkers seeking portable precision. It excels for those who primarily use circular saws and value splinter-free results. If your budget allows and you don’t need 100-inch capacity, this track system delivers professional accuracy that justifies every penny.
8. Peachtree Woodworking Supply ProGrip Aluminum Edge Clamp Set of 3-24 36 50, Ideal for Cutting Large Sheets of Plywood & Dado Slots, Circular Saw Straight Edge Guide Clamps and Edge Saw Guide

Overview: The ProGrip set provides three self-clamping straight edges in 24, 36, and 50-inch lengths. This versatile kit eliminates the need for separate C-clamps, offering a streamlined solution for guiding circular saws, routers, and utility knives. The lightweight aluminum tube construction ensures rigidity while remaining portable.
What Makes It Stand Out: The self-clamping mechanism is the star feature—simply slide and lock the adjustable jaw against your workpiece edge. Having three lengths in one package provides unmatched versatility for various projects without purchasing separate guides. The low-profile tube design allows easy tool clearance, and the set excels at cutting dados and plywood sheets.
Value for Money: This three-piece set offers exceptional value, essentially providing three guides for the price of one premium track. The convenience of integrated clamping saves time and eliminates extra hardware costs. For DIYers and hobbyists, this represents one of the best cost-per-use ratios in the category.
Strengths and Weaknesses: Strengths include the convenient self-clamping design, three useful lengths, lightweight portability, low-profile construction, and excellent value. The set works with multiple tool types. Weaknesses involve potential flexing over longer spans compared to solid rails, limited maximum length for full sheet goods, and the tube design may not feel as robust as heavy-duty alternatives.
Bottom Line: The ProGrip set is perfect for DIYers and woodworkers who value convenience and versatility. The self-clamping feature speeds up workflow significantly. While not ideal for heavy-duty professional use, it delivers impressive functionality across three sizes, making it a smart purchase for most home workshops.
9. BORA 100" NGX Clamp Edge, Straight Cut Guide for Circular Saws, Aluminum, Includes 50-Inch Clamp Edge & 50-Inch Extension for 100-Inch Cutting Length, 544100

Overview: The BORA NGX 100-inch system represents the modern evolution of cutting guides, combining exceptional length with advanced features. This professional-grade guide assembles from a 50-inch base and extension, featuring integrated T-tracks, a quick-lock lever system, and heavy-duty aluminum construction. It’s engineered for precision and efficiency.
What Makes It Stand Out: The built-in T-track system sets this apart, allowing instant attachment of accessories, stops, and custom jigs. The quick-lock lever enables one-handed clamping in seconds, dramatically faster than traditional C-clamps. The heavy-duty aluminum extrusion provides superior rigidity across the full 100-inch span, ensuring no flex or bowing during critical cuts.
Value for Money: Positioned at the premium end, the NGX justifies its price through time-saving features and professional build quality. The T-track functionality adds versatility unavailable in basic guides. For professionals who value efficiency and precision, the investment pays for itself in saved time and material waste reduction.
Strengths and Weaknesses: Strengths include the rapid quick-lock clamping, integrated T-track system, exceptional rigidity, ergonomic design, and seamless extension connection. The system handles full plywood sheets with professional accuracy. Weaknesses are the higher price point, significant storage space requirements, and potential overkill for casual users who don’t need 100-inch capacity.
Bottom Line: The BORA NGX 100-inch is the professional’s choice for cutting guides. It excels in efficiency, precision, and versatility. If you’re a serious woodworker or contractor who regularly breaks down full sheets, this system is worth every dollar. Casual DIYers may find the 50-inch version more practical.
10. BORA 50” NGX Circular Saw Guide Rail, Clamp Edge for Circular Saws, Great for Straight Cross-Cutting Plywood Sheets and Routing Dados, 544050

Overview: The BORA 50-inch NGX guide delivers professional-grade features in a more manageable size. This compact track system features the same quick-lock lever and T-track integration as its 100-inch counterpart, but excels at cross-cutting plywood and routing dados. The heavy-duty aluminum construction ensures durability and precision in a portable package.
What Makes It Stand Out: The one-sided adjustability is a game-changer, allowing users to set, clamp, and cut from a single position without walking around the workpiece. The quick-lock lever provides instant, reliable clamping pressure with one hand. Integrated T-tracks enable customization with stops and accessories, transforming this from a simple guide into a versatile workbench upgrade.
Value for Money: This 50-inch model hits the sweet spot between price and functionality. It offers premium BORA features at a lower cost than the 100-inch version while handling most common sheet goods tasks. For woodworkers who don’t regularly cut full-length rip cuts, this provides professional efficiency without the premium length cost.
Strengths and Weaknesses: Strengths include rapid one-handed clamping, convenient one-sided operation, integrated T-track, robust aluminum build, and excellent portability. The system works flawlessly for cross-cuts and dados. Weaknesses include the 50-inch length limiting full-sheet rip capacity, and the price remains higher than basic clamp guides.
Bottom Line: The BORA 50-inch NGX is the ideal choice for woodworkers seeking premium features without maximum length. It excels in convenience and precision for typical project sizes. If you primarily cross-cut plywood and don’t need 100-inch capacity, this guide offers professional performance that will transform your workflow and results.
Understanding Circular Saw Edge Guides: The Basics
At its core, a circular saw edge guide is a straight, rigid reference surface that controls your saw’s path during a cut. Unlike a freehand approach where you’re constantly correcting course, a quality guide removes human error from the equation. The system typically consists of three components: the guide rail itself, a clamping mechanism to secure it to your workpiece, and often an adapter plate or shoe that interfaces directly with your specific circular saw model.
The physics is beautifully simple. By creating a zero-tolerance path for the saw’s base plate to ride against, you eliminate lateral movement. But the execution? That’s where engineering makes all the difference. A premium guide doesn’t just provide a straight line—it accounts for blade drift, minimizes tear-out, and maintains absolute rigidity even when you’re ripping a full 8-foot sheet of material. Think of it as turning your portable circular saw into a radial arm saw that travels along a fixed path.
Why Rip Cuts Without a Table Saw Demand Precision
Rip cuts—cutting parallel to the wood grain—present unique challenges that crosscuts simply don’t. When you’re slicing along the length of a board, any minor deviation multiplies over distance. A 1-degree error over 24 inches results in a cut that’s nearly half an inch off at the end of an 8-foot sheet. This isn’t just about aesthetics; it directly impacts joinery, edge-banding, and structural integrity.
Without a table saw’s fence system, you’re fighting three enemies simultaneously: the saw’s natural tendency to follow wood grain (especially in species like oak or ash), the torque reaction from the spinning blade, and the subtle flex in the saw’s base plate. A proper edge guide doesn’t just show you where to cut—it actively resists these forces. The difference between a $30 guide and a $150 system often comes down to how well it handles these physics challenges without requiring you to become a human clamp.
Types of Circular Saw Edge Guides Explained
Basic Clamp-On Straight Edges
These are the entry-level workhorses—essentially extruded aluminum or steel channels with integrated clamping mechanisms. You measure from the blade to the edge of your saw’s base plate (the “offset”), mark that distance from your cut line, align the guide, and clamp it down. They’re simple, reliable, and work with virtually any circular saw. The best versions feature micro-adjustment capabilities and anti-slip coatings that grip your material without marring it.
Track Saw Systems
While technically a different category, track saw guides deserve mention because many circular saws can adapt to them. These are proprietary aluminum tracks with anti-slip strips and splinter guards that mate with specific saw bases. The key advantage is the saw locks into the track, preventing it from wandering even if you push sideways. The downside? You’re often locked into that manufacturer’s ecosystem, and adapter plates for non-track saws can introduce slight play.
DIY Custom Guides
The homemade approach typically involves ripping a perfectly straight edge on a piece of 1/2" plywood or MDF, then attaching a cleat that overhangs the edge to create a reference surface. While cost-effective, the accuracy depends entirely on your initial setup. Many woodworkers build a 4-foot and 8-foot version, sealing the edges to prevent moisture warping. The real advantage is customization—you can add measurement scales, integrated clamping systems, or even dust collection ports.
Adjustable Factory-Made Guides
These premium systems feature built-in measurement scales and adjustment mechanisms that eliminate the need to measure offset manually. You simply set the guide to your desired cut width, lock it, and the guide positions itself correctly. They often include dual-edge designs that let you flip the guide for left or right-handed cuts without recalibrating. The complexity means more moving parts, but the time savings on repetitive cuts is substantial.
Magnetic Guides
A newer category uses powerful rare-earth magnets to adhere directly to steel studs or metal-topped workbenches. For metal framing or welding shop applications, they’re unbeatable for speed. However, they offer zero advantage on wood or composite materials, making them a niche solution rather than a universal one.
Key Features That Separate Quality Guides from Budget Options
The devil lives in the details when evaluating edge guides. First, examine the straightness tolerance—quality manufacturers will specify this, often guaranteeing within 0.005" over 4 feet. Budget options might not list this spec at all, which is a red flag. The extrusion quality matters too; look for guides with reinforced ribs or I-beam construction that resists flexing when clamped across a wide span.
Measurement scales are another differentiator. Cheap guides use stickers that peel and fade. Professional-grade systems have laser-etched or anodized scales that won’t wear off. Some even feature dual scales—one for the actual cut line, another for the guide edge—eliminating mental math. The clamping mechanism should engage with a single motion and provide visible pressure indicators so you know it’s secure without over-tightening.
How to Choose the Right Guide Length for Your Projects
Length selection follows a simple rule: buy for the maximum rip you anticipate, but consider storage and portability. An 8-foot guide handles full sheet goods but won’t fit in a Honda Civic. A 4-foot guide is more manageable but requires flipping the sheet for long rips, introducing potential alignment errors.
Smart compromise? A modular system. Some manufacturers sell 4-foot sections that connect end-to-end with precision alignment pins. This gives you 8-foot capacity when you need it and compact storage when you don’t. For most furniture makers, a 50-60 inch guide covers 90% of needs—long enough for cabinet sides but short enough to transport. If you exclusively work with sheet goods, bite the bullet and get the 8-footer; the time savings will pay for itself in three projects.
Material Matters: Aluminum, Steel, or Composite?
Aluminum dominates the market for good reason. Aircraft-grade 6061-T6 aluminum offers an exceptional strength-to-weight ratio, natural corrosion resistance, and won’t warp. The best guides use anodized aluminum that’s hardened and features a low-friction surface that lets your saw glide smoothly. Avoid lower-grade 6063 architectural aluminum—it bends more easily and can dent if dropped.
Steel guides, typically tool steel or carbon steel, provide ultimate rigidity and magnetic properties (handy for metalworking). They’re heavier, which can be a benefit (added stability) or drawback (portability). The real issue is rust; even coated steel will eventually corrode in humid shops unless meticulously maintained.
Composite guides, usually carbon fiber or high-density polyurethane, are the new kids on the block. They’re lightweight, thermally stable, and won’t ding your workpiece if you bump them. However, they lack the mass for self-damping vibrations, and some composites can creep (slowly deform) under sustained clamping pressure. They’re best for fine woodworking where every ounce matters, not rough construction.
Clamping Mechanisms: The Foundation of Accuracy
A guide is only as good as its clamps. The classic C-clamp style provides massive holding power but requires two hands and can obstruct the saw’s path. Modern quick-release clamps use cam-action levers that lock with one hand and automatically square the guide to the workpiece. Look for clamps with rubberized faces that grip without crushing softwoods or leaving marks.
For sheet goods, consider guides with spaced clamping points every 12-16 inches. This distributes pressure evenly and prevents the guide from bowing inward under clamp force. Some advanced systems use vacuum clamping—battery-powered suction cups that adhere to smooth surfaces without any manual clamps. While slick for finished panels, they fail on rough-sawn lumber or dusty surfaces.
The Zero-Clearance Edge: Your Secret Weapon Against Tear-Out
Tear-out—the splintering of wood fibers as the blade exits the cut—ruins expensive veneer plywood and delicate hardwoods. A zero-clearance edge eliminates this by supporting the fibers right up to the blade kerf. Many premium guides feature a replaceable plastic or composite strip that you cut through on first use, creating a custom-fit edge.
This strip does double duty: it prevents tear-out and acts as a visual indicator of exactly where the blade will cut. When it wears or you switch to a different blade thickness, simply replace it. Some guides achieve this with a sacrificial edge you attach yourself—a strip of hardboard or MDF that you trim in place. While effective, this adds setup time and requires periodic replacement.
Anti-Slip Technology: Keeping Your Guide Stationary
Even the straightest guide fails if it shifts mid-cut. Anti-slip technology has evolved far beyond simple rubber feet. Modern guides use dual-material strips—high-friction rubber on the bottom for grip, low-friction polymer on top where the saw rides. Some employ micro-suction technology that grips smooth surfaces without adhesive.
For rough lumber or vertical applications, look for guides with through-holes for screws or brad nails. This lets you physically anchor the guide to waste areas of your workpiece, guaranteeing zero movement. Just ensure the holes are precisely positioned so they don’t interfere with the saw’s path or measurement scales.
Integration Features: Does Your Guide Play Well with Others?
The best edge guides don’t live in isolation. Check for T-slots or mounting rails that accept accessories like stop blocks, angle gauges, or dust collection shrouds. Some systems integrate with router plates, turning your guide into a dual-purpose tool for both sawing and routing dadoes.
Compatibility with your existing clamps is another consideration. Many guides accept standard 3/4" bench dog clamps or F-style clamps, giving you flexibility. If you’re invested in a particular tool ecosystem (say, a modular track system), ensure your edge guide can connect to those components. The goal is building a system, not collecting isolated tools.
DIY Edge Guides: When to Build vs. Buy
Building your own guide makes sense for three scenarios: you need a custom length not commercially available, you want integrated features like built-in measuring tapes, or you’re on a tight budget. A basic 8-foot guide costs under $20 in materials—half a sheet of 1/2" MDF and some straight lumber.
However, the hidden cost is time and precision. You’ll need a known-straight reference (like a factory edge on good plywood) to build against, and you’ll spend hours ensuring everything is square and true. For occasional use, DIY is fine. For daily production work, the consistency and time savings of a manufactured guide justify the expense. The break-even point is roughly one major project per month—any more frequent, and buy; any less, and build.
Setup and Calibration: The Make-or-Break Process
Even the finest guide yields garbage cuts if set up poorly. Start by verifying your circular saw’s base plate is actually flat and square to the blade. Many saws ship with slightly warped plates that will ride unevenly against any guide. Use a straightedge and feeler gauges to check for gaps.
Next, measure your blade-to-edge offset precisely. Don’t rely on factory specs—they assume a specific blade diameter and ignore washer variations. Make a test cut in scrap, measure the actual distance, and write this number permanently on your saw. When setting up, mark your cut line, then use a marking gauge set to this offset to transfer the guide position. Always position the guide on the keep side of the cut; if it shifts slightly, you lose waste material, not your workpiece.
Advanced Techniques for Perfect Rip Cuts Every Time
Scoring cuts are your best friend in tear-out-prone materials. Set your blade depth to just 1/16" and make a light pass along your guide. This severs the wood fibers cleanly. Then reset to full depth and make your final cut—the blade follows the scored path, and tear-out virtually disappears.
For ultra-narrow rips under 2 inches, use a sacrificial push stick that rides between the guide and saw. This keeps your fingers away from the blade while maintaining pressure against the guide. Some woodworkers attach a secondary fence to their guide, creating a channel that traps the saw base plate—this eliminates any possibility of wandering, though it requires precise calibration.
Common Mistakes That Ruin Rip Cuts (And How to Avoid Them)
Blade drift is the silent killer. If your saw’s blade isn’t perfectly parallel to the base plate edge that rides against the guide, the blade will try to cut a curved path, binding and burning. Test this by making a shallow cut in MDF and inspecting the kerf—it should be perfectly uniform. Most saws have adjustment screws to correct this; consult your manual.
Insufficient material support causes the cut to pinch the blade as you finish. Always extend your workpiece beyond the cut line with sacrificial foam insulation or additional lumber. This supports the cutoff piece until the blade completely exits, preventing binding and dangerous kickback. Never let the cutoff drop freely—it will splinter the last two inches of your cut.
Maintenance and Care: Protecting Your Investment
Store guides vertically on wall-mounted racks, never flat on a shelf where they can sag under their own weight. Clean the guiding surface weekly with isopropyl alcohol to remove pitch and sawdust buildup that increases friction. Check clamping mechanisms monthly for wear; replace rubber pads at first sign of hardening or cracking.
For aluminum guides, apply a dry lubricant like silicone spray to the surface where the saw rides—never oil-based products that attract dust. Steel guides need a light coat of paste wax to prevent rust. Composite guides should be kept out of direct sunlight, which can cause UV degradation over years. A simple canvas storage bag prevents dings and keeps dust off between uses.
Cost vs. Value: Investing Wisely in Your Edge Guide System
Entry-level guides ($30-$60) get you straight cuts but lack durability. Expect to replace them every 2-3 years with heavy use. Mid-range options ($80-$150) offer better materials, replaceable parts, and accuracy guarantees. This is the sweet spot for serious hobbyists and semi-pros.
Premium systems ($200+) provide modularity, integrated measuring, and compatibility with other tools. For professionals, the time saved on setup and the ability to handle any material justify the cost. Consider your project volume: if you’re ripping more than 50 linear feet per week, step up to at least the mid-range. The accuracy will save enough material to pay for itself within months.
Safety Protocols Specific to Guided Circular Saw Cuts
Never bypass the saw’s blade guard—even with a guide, it’s your last line of defense. Ensure the guide doesn’t force you to remove riving knives or anti-kickback pawls. When ripping narrow strips, use a push shoe with a heel that hooks the workpiece’s end, keeping your hand 6 inches from the blade at all times.
Check that your guide clamps don’t interfere with the saw’s motor housing or handle travel. A binding saw can jerk backward violently. Always position yourself slightly to the side of the cut line, never directly behind the saw. If kickback occurs, the tool will launch backward along the guide path, and you don’t want to be in that trajectory.
Frequently Asked Questions
What’s the difference between an edge guide and a track saw system?
An edge guide is a passive straightedge your saw rides against freely. A track saw system actively captures the saw’s base plate in a dedicated channel, preventing any lateral movement. Track saws offer superior anti-splintering and dust collection but lock you into a specific tool ecosystem. Edge guides are more versatile and work with any circular saw, though they require more operator skill to maintain consistent pressure.
Can I use any circular saw with an edge guide?
Nearly any sidewinder or worm drive saw works with standard clamp-on guides. The key requirement is a flat, stable base plate. Compact or mini circular saws may have too small a base for stable guidance. Check that your saw’s motor housing clears the guide’s clamping mechanism at full depth of cut. Some saws with unusually wide base plates may need a guide with adjustable width capacity.
How do I prevent tear-out when ripping plywood veneers?
Use a sharp, high-tooth-count blade (60-80 teeth for 7-1/4" saws) and make a scoring pass first. Set your edge guide up with a zero-clearance strip, or attach painter’s tape along the cut line to support the fibers. Cut with the good face down, as tear-out typically occurs on the exit side. Some woodworkers swear by cutting from both sides—score from the bottom, finish from the top—but a quality guide with proper technique makes this unnecessary.
What’s the maximum length I can rip with an edge guide?
Technically, there’s no limit if you support the guide properly. For continuous rips longer than your guide, use joining plates to connect multiple sections. The practical limit is material handling—maneuvering a 12-foot sheet alone is dangerous. For most users, an 8-foot guide handles 95% of sheet goods. For longer rips, consider a track saw system designed for modular extension, or build a custom 12-foot guide from steel channel.
Are DIY guides as accurate as store-bought?
They can be, but achieving that accuracy requires starting with a known-straight reference and meticulous construction. Most DIY guides fail not in straightness but in stability—they flex or the cleat isn’t perfectly square. Commercial guides use extrusions and machining tolerances that are hard to replicate in a home shop. If you build one, use 1/2" baltic birch plywood and a straight piece of aluminum angle iron for the guiding edge, not just a ripped board.
How much should I spend on a quality edge guide?
For weekend warriors, budget $80-$120 for a mid-range aluminum guide with decent clamps. This hits the accuracy and durability sweet spot. Professionals should invest $150-$250 in a modular system with replaceable parts. Below $50, you’re gambling with straightness and longevity. Above $300, you’re paying for brand prestige more than functional improvement unless you need specialized features like vacuum clamping.
Can I rip narrow strips safely with an edge guide?
Yes, but below 2 inches wide requires extra precautions. Use a sacrificial push stick that maintains pressure against the guide while keeping your hand clear. Some guides offer a narrow-rip attachment that extends the reference surface. Always use a zero-clearance insert to prevent the thin strip from falling into the blade well. Consider ripping a wider board first, then resawing the strip off that—it’s safer than trying to rip a 1-inch strip directly from a large sheet.
Do I need special blades for guided cuts?
Not special, but specific. Use a blade designed for the material—fine-tooth for plywood, ripping blade for solid wood. The key is blade condition. A dull blade will deflect and bind, fighting the guide. Check blade parallelism to your saw’s base before each project. For guided cuts, a thin-kerf blade reduces cutting resistance and material waste, but ensure your saw’s arbor lock can handle the reduced mass.
How do I calibrate my edge guide for perfect accuracy?
Make a test cut in scrap material, then measure the actual result versus your intended dimension. Adjust the guide’s position by half the error, recut, and verify. For guides with built-in scales, use a dial indicator to set the scale’s zero point against a known reference. Do this whenever you change blades or switch between materials with different densities. Write your saw’s exact blade-to-edge offset on the tool itself with a permanent marker—never rely on memory.
Can edge guides work on curved or beveled cuts?
Standard straight guides are for linear cuts only. For curves, you need a different tool entirely. However, some guides offer angle adjustments for bevel cuts up to 45 degrees. The challenge is maintaining contact as the saw tilts—look for guides with a tall fence or adjustable shoe that keeps the base plate registered. For compound bevels (angle + bevel), you’re better off with a track saw system designed for that complexity. Most edge guides excel at 90-degree cuts and struggle with bevels beyond 30 degrees.
See Also
- 10 Circular Saw Guides That Ensure Perfect Rip Cuts in 2026
- 10 Best Circular Saw Guides for Angle Cuts Without a Miter Saw in 2026
- 10 Circular Saw Guides That Guarantee Straight Cuts Without Clamps in 2026
- 10 Affordable Circular Saw Guides That Deliver Pro Cuts in 2026
- Stop Burning Wood with the 10 Best Circular Saw Blades for Rip Cuts