Table of Contents
If you’ve ever tripped over a pile of bar clamps or spent twenty minutes hunting for that one elusive parallel clamp buried beneath a mountain of workshop debris, you’re not alone. Clamp storage has long been the Achilles’ heel of even the most organized woodworkers. But here’s the exciting reality: 2026 is ushering in a new era of intelligent, space-conscious workshop design where clamp storage isn’t just an afterthought—it’s a strategic advantage. The evolution from crude nail-in-the-wall solutions to sophisticated, ergonomic systems reflects how modern woodworkers are rethinking every square inch of their creative spaces.
The modern workshop is no longer just a room with tools; it’s a carefully orchestrated environment where efficiency, safety, and accessibility converge. As clamp designs themselves become more specialized and your collection inevitably grows, the storage solutions you choose today will determine your workflow efficiency for years to come. Whether you’re working in a compact garage shop or a sprawling professional studio, understanding the principles behind effective clamp organization will transform your relationship with these essential tools. Let’s explore the innovative approaches that are defining clamp storage in 2026 and beyond.
Top 10 Clamp Storage


Detailed Product Reviews
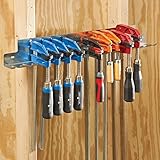
1. Shop Fox D4333 Clamp Rack Set, 3-Pack

Overview: The Shop Fox D4333 offers a straightforward wall-mounted solution for organizing three common clamp types. This set includes dedicated racks for F-clamps (15 capacity), pipe clamps (9 capacity), and parallel clamps (12 capacity), making it an entry-level organization system for woodworking enthusiasts looking to declutter their workshop walls.
What Makes It Stand Out: This set’s primary distinction is its clamp-type-specific design. Rather than a one-size-fits-all approach, each rack features geometry tailored to securely hold different clamp profiles. The inclusion of three distinct rack types in a single package provides immediate versatility for users with mixed clamp collections, eliminating the need to purchase separate organizers.
Value for Money: Positioned as a mid-range option, the D4333 delivers solid value for hobbyists and semi-professional woodworkers. While not the cheapest solution available, the specialized designs justify the modest premium over universal racks. Comparable individual racks would cost 30-40% more when purchased separately, making this bundle economically sensible for those needing all three types.
Strengths and Weaknesses: Pros: Dedicated designs for optimal fit; decent capacity for each clamp type; simple installation; immediate organization solution. Cons: No dimensional specifications provided; likely uses lighter-gauge materials than premium options; non-modular design limits expandability; lacks mobility for dynamic workshops.
Bottom Line: The Shop Fox D4333 is a practical choice for woodworkers seeking a no-fuss, wall-mounted organization system. It excels as an entry-level solution but may leave growing workshops wanting more expandability. Ideal for hobbyists with moderate clamp collections who prioritize simplicity over modularity.
2. Steelex D3605 Clamp Buddy Storage Caddy

Overview: The Steelex D3605 transforms clamp storage from static wall systems into a mobile, high-capacity solution. This freestanding caddy accommodates over 200 clamps of various types, featuring locking swivel casters and adjustable cross-bars. With dimensions of 19x51 inches (front) and 19x42 inches (back), it’s designed for serious woodworkers and professional shops where clamp mobility and massive storage are paramount.
What Makes It Stand Out: Unmatched mobility defines this product. The locking swivel casters allow users to transport an entire clamp collection directly to project sites, while adjustable cross-bars accommodate everything from small bar clamps to massive parallel clamps. Its industrial-grade capacity in a relatively compact footprint makes it unique among mobile storage solutions.
Value for Money: Though positioned at the premium end of the market, the D3605 justifies its price through sheer capacity and versatility. Competing mobile solutions typically hold half as many clamps at similar price points. For professionals billing by the hour, the time saved retrieving clamps pays for itself. However, hobbyists may find the investment excessive for their needs.
Strengths and Weaknesses: Pros: Exceptional 200+ clamp capacity; superior mobility with locking casters; adjustable configuration; professional-grade construction; consolidates all clamps in one unit. Cons: Large footprint unsuitable for small shops; premium pricing; lacks wall-mounted security; casters may require maintenance in dusty environments.
Bottom Line: The Steelex D3605 is the ultimate solution for professional workshops prioritizing mobility and capacity. It’s overkill for casual hobbyists but indispensable for busy professionals who need their clamp arsenal wherever the job demands. If you have the floor space and a large collection, this is your best investment.
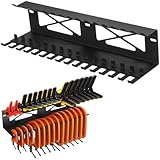
3. Fulton Woodworking Tools F-Clamp Modular Clamp Rack •Easy and Quick to Align •Pre-Drilled 16 inch on Center •3 Pack

Overview: Fulton’s modular clamp rack system revolutionizes wall storage through intelligent engineering. This three-pack provides 48 inches of total storage with pre-drilled 16-inch on-center mounting that aligns perfectly with standard wall studs. The heavy-duty steel construction features precision-milled modular tabs that interlock like puzzle pieces, allowing seamless expansion and customizable configurations for workshops of any size.
What Makes It Stand Out: The tabbed modular design is genuinely innovative. Unlike static racks, these connect with zero guesswork, enabling users to create continuous runs or stacked configurations. The opposing tabs on both ends provide ultimate flexibility—you can mount racks linearly for long clamps or vertically for space efficiency. Heavy-duty steel construction ensures durability that surpasses typical stamped metal alternatives.
Value for Money: This system delivers exceptional value for growing workshops. While priced slightly above entry-level options, the expandability justifies every penny. Purchasing additional packs creates a cohesive system rather than a collection of separate units. The included mounting hardware and stud-ready design eliminate extra expenses, making it more economical than piecing together individual components.
Strengths and Weaknesses: Pros: Innovative modular tab system; heavy-duty steel construction; flexible layout options; stud-ready 16" spacing; included hardware; expandable design. Cons: Requires permanent wall installation; initial setup demands precise measurement; may be over-engineered for minimal clamp collections; limited mobility once mounted.
Bottom Line: Fulton’s modular system is the smartest choice for serious woodworkers planning for growth. Its expandability and robust construction make it a one-time investment that adapts to your evolving needs. While not the cheapest option, its thoughtful design and durability make it the best long-term value for dedicated workshops.
4. Shimeyao Clamps Rack Organizer Wall Mount Spring C Clamps Holder Tool Storage 16.7 x 4.5 x 3 Inches for Small Tools Garage Shed Pegboard Workshop Home
Overview: The Shimeyao organizer targets a specific niche: small C-clamps and spring clamps. Measuring just 16.7 x 4.5 x 3 inches, this compact carbon steel rack mounts easily on walls, toolboxes, or pegboards. Its powder-coated finish resists rust and corrosion, making it suitable for garages, sheds, and workshops where space is at a premium and smaller clamps tend to create drawer clutter.
What Makes It Stand Out: This rack’s specialization is its strength. Unlike universal systems that poorly accommodate small clamps, the Shimeyao features precisely spaced slots that securely grip C-clamps and spring clamps without letting them slide out. The one-piece, no-assembly design with pre-drilled mounting holes enables installation in under five minutes, a stark contrast to multi-component systems.
Value for Money: As a budget-conscious specialty item, it delivers outstanding value for those specifically organizing small clamps. Its durable construction at a low price point makes it accessible to DIY enthusiasts and professionals alike. However, its limited scope means you’ll need separate solutions for bar and pipe clamps, potentially increasing total organization costs.
Strengths and Weaknesses: Pros: Perfectly sized for C-clamps and spring clamps; compact footprint; heavy-duty carbon steel; powder-coated finish; true no-assembly installation; versatile mounting options. Cons: Limited to small clamp types; modest capacity unsuitable for large collections; not designed for heavy F-clamps or parallel clamps; single-unit purchase limits expandability.
Bottom Line: For organizing C-clamps and spring clamps, this is the most efficient solution available. Its compact size, durability, and specialized design make it ideal for supplementing larger clamp storage systems or for users whose work primarily involves smaller clamps. A no-brainer purchase if this fits your clamp profile.
5. Blulu 2 Pcs F-style Clamp Holder 16 Inch F-style Clamp Storage Tool Rack Organizer Wall Mount for Shed Garage Pegboard Workshop Home

Overview: The Blulu 2-pack provides targeted storage for F-style clamps, offering a total capacity of 27 clamps across two 16.54-inch holders. This system accommodates three size categories—8 small, 8 medium, and 9 large clamps per pair—making it ideal for woodworkers who rely heavily on F-clamps. Constructed from heavy-duty metal with a powder-coated finish, these racks mount securely to walls, pegboards, or tool carts.
What Makes It Stand Out: The size-tiered design is particularly clever. Rather than uniform slots that waste space, the varying slot widths maximize density while protecting clamp threads and handles. The dual-pack configuration lets users mount holders at different heights or locations, creating an ergonomic workflow. Its heavy-duty construction rivals premium brands at a more accessible price point.
Value for Money: This two-pack offers compelling value for F-clamp enthusiasts. Purchasing dedicated F-clamp storage separately often costs 50% more for equivalent capacity. The durable powder-coated finish ensures longevity, preventing the rust that plagues cheaper alternatives. While limited to F-clamps, its specialization means no wasted features or space.
Strengths and Weaknesses: Pros: Size-specific slots optimize capacity; heavy-duty metal construction; powder-coated rust resistance; flexible dual-pack mounting; no assembly required; accommodates multiple clamp sizes. Cons: Exclusively for F-clamps; 27-clamp capacity may be insufficient for large collections; lacks modularity for future expansion; mounting hardware quality unspecified.
Bottom Line: If F-clamps dominate your workshop, this is the most efficient storage solution available. The size-tiered design and durable construction make it a smart investment for both DIYers and professionals. While not a universal system, its targeted approach delivers maximum efficiency for its intended purpose. Highly recommended for F-clamp heavy users.
Understanding Your Clamp Inventory Before Choosing Storage
Before investing in any storage system, you need to conduct a comprehensive audit of your clamp collection. This foundational step prevents the common mistake of purchasing a solution that works for your current needs but fails to accommodate growth.
Categorizing Clamp Types and Sizes
Start by grouping your clamps into logical categories: bar clamps, parallel clamps, pipe clamps, F-style clamps, C-clamps, spring clamps, and specialty clamps like band or strap clamps. Each category has unique storage requirements based on weight distribution, jaw opening, and handle orientation. Parallel clamps, for instance, demand support along their entire length to prevent bar warping, while spring clamps can nest together in compact bins. Measure the maximum length of your longest bar clamp and the jaw depth of your deepest parallel clamp—these dimensions become your non-negotiable storage parameters.
Assessing Frequency of Use and Accessibility Needs
Be brutally honest about which clamps you reach for daily versus those used only for specialized projects. Your go-to 24-inch bar clamps deserve prime real estate at waist to shoulder height, while that massive 50-inch monster can live in less accessible overhead storage. Consider creating a heat map of your workshop workflow—where do you typically assemble projects? Where do you do glue-ups? Storage positioned within a pivot-turn of these zones dramatically reduces fatigue and increases productivity.
Wall-Mounted Rail Systems: The Flexible Foundation
Wall-mounted rails have evolved from simple 2x4s with pegs to engineered aluminum extrusions with infinite adjustability. These systems capitalize on vertical wall space while keeping clamps visible and within easy reach.
Key Features to Evaluate in Rail Systems
Look for rails with integrated channels that accept T-bolts or specialized hooks, allowing you to reposition holders without drilling new holes. The best systems feature dual-track designs—one for heavy parallel clamps and another for lighter F-style clamps. Check the rail’s weight rating per linear foot; premium systems in 2026 can support 300+ pounds when properly anchored. Consider rails with built-in level indicators and micro-adjustment capabilities to ensure perfect alignment across multiple sections.
Installation Best Practices for Maximum Load Capacity
Never mount rails directly to drywall, even with anchors. Locate wall studs using a high-quality stud finder that detects both wood and metal framing. For masonry walls, use wedge anchors rated for at least four times your expected load. Space mounting bolts every 16 inches maximum, and always use backing plates to distribute clamp weight across a larger surface area. In 2026’s smart workshops, consider rails with integrated load sensors that alert you when approaching weight capacity via workshop management apps.
Overhead Storage Racks: Maximizing Vertical Space
Ceiling-mounted solutions transform wasted air space into valuable storage real estate, perfect for long bar clamps and infrequently used specialty clamps. Modern overhead systems prioritize safety and accessibility in ways previous generations never considered.
Weight Distribution and Safety Mechanisms
The primary concern with overhead storage is preventing catastrophic failure. Seek systems with redundant support cables—if one fails, a secondary system prevents clamps from raining down. Quality racks feature individual clamp cradles rather than open troughs, preventing clamps from shifting and becoming unbalanced. Calculate your total load, then add a 50% safety margin. In 2026, look for racks with automatic tensioning systems that maintain cable tautness as loads change.
Accessibility Innovations for Overhead Systems
Gone are the days of teetering on a step stool to retrieve clamps. Modern overhead racks incorporate pull-down mechanisms similar to attic stair systems, bringing clamps to you. Some premium systems feature motorized lowering with remote control operation, while manual versions use counterbalanced pulleys requiring minimal effort. Consider the lowered height—will the system clear your workbench and allow comfortable clamp removal? The best designs lower to chest height, rotate for selection, and retract with a gentle push.
Mobile Clamp Carts: Workshop Mobility Revolution
Mobile clamp carts have become increasingly sophisticated, evolving from simple plywood boxes on casters to ergonomic, multi-tiered workstations that follow you through the shop. These solutions shine in multi-purpose spaces where flexibility is paramount.
Casters and Stability: The Balancing Act
The Achilles’ heel of any mobile storage is inadequate wheel hardware. In 2026, expect premium carts to feature dual-wheel casters with individual locking mechanisms—both wheel rotation and swivel. Look for 4-inch or larger polyurethane wheels that roll smoothly over shop debris and cord covers. The cart should have a minimum of two, preferably four, stabilizing feet that drop down when stationary, creating a rock-solid platform that won’t shift during glue-ups. Test stability by loading the cart with your heaviest clamps and pushing on the top corner—any wobble is unacceptable.
Tiered Design Strategies for Mixed Clamp Types
Effective carts use graduated tiers: deep, vertical slots for parallel clamps at the back; angled shelves for bar clamps in the middle; and shallow trays for F-style and spring clamps at the front. This “stadium seating” approach keeps every clamp visible. Some innovative designs incorporate removable caddies that let you grab a selection of clamps and carry them directly to your project, leaving the cart base in place. Consider carts with integrated clamp pad storage and small parts bins to consolidate your glue-up station.
French Cleat Clamp Stations: The Customizable Classic
The French cleat system remains the gold standard for woodworkers who value adaptability and enjoy building custom solutions. Its simplicity belies its incredible versatility, making it perfect for evolving clamp collections.
Designing for Future Expansion
The beauty of French cleats lies in their infinite configurability, but this requires planning. Install your main horizontal cleat high enough (typically 72 inches) that you can hang multiple rows of storage accessories beneath it. Create a library of clamp holders—some for single clamps, others for groups—so you can reconfigure in minutes. In 2026, consider adding RFID tags to each holder and mapping your clamp locations in a digital shop inventory system for instant location tracking.
Material Selection and Durability Factors
While plywood is traditional, Baltic birch or ApplePly offers superior screw-holding power for heavily loaded cleats. Use 3/4-inch minimum thickness, and cut cleats at precise 45-degree angles for maximum contact surface. For holders, consider HDPE (high-density polyethylene) for clamp contact points—it won’t mar clamp finishes and provides a slippery surface for easy retrieval. Apply a coat of paste wax to cleat surfaces to reduce friction and prevent binding when sliding holders.
Pegboard Evolution: Beyond the Basics
Pegboard has undergone a renaissance, shedding its flimsy reputation through heavy-duty materials and engineered accessories. Modern pegboard systems deserve reconsideration from woodworkers who dismissed them decades ago.
Heavy-Duty Pegboard Materials and Standards
Standard 1/8-inch pegboard warps under clamp weight. In 2026, look for 1/4-inch tempered hardboard or metal pegboard with 3/16-inch holes on 1-inch centers. Metal pegboard, typically powder-coated steel, can support impressive loads—up to 75 pounds per square foot when properly mounted. For ultimate strength, consider phenolic resin pegboard, originally developed for industrial applications. These systems maintain dimensional stability in humid shops and won’t degrade over time.
Specialty Hook Designs for Clamp-Specific Storage
Generic hooks won’t suffice for clamps. Seek out pegboard accessories designed specifically for woodworking tools: deep J-hooks with rubber coating for bar clamps, double-prong hooks that cradle parallel clamp bars, and pivoting holders that swing out for easy access. Some innovative designs incorporate cam-lock mechanisms that secure clamps against accidental dislodging. The best systems use a mix of fixed and movable components, allowing you to create custom configurations without fabricating parts from scratch.
Drawer and Cabinet Integration: Hidden Organization
For woodworkers prioritizing clean aesthetics or dealing with dust-sensitive environments, integrated drawer and cabinet solutions offer protected, dust-free clamp storage that disappears when not needed.
Deep Drawer Configuration Strategies
Standard drawer dividers fail with long clamps. Instead, specify drawers at least 30 inches deep with full-extension, 150-pound-rated slides. Create vertical partitions using dado-cut slots in drawer bottoms, allowing you to reposition dividers as your collection changes. Line drawer bottoms with anti-slip matting to prevent clamps from sliding when opening and closing. Consider angled drawer fronts that create a natural finger grip area, eliminating the need for protruding handles that reduce clearance in tight shops.
Cabinet Depth and Accessibility Trade-offs
While deep cabinets hide clutter, they can become black holes where clamps disappear. Implement a “two-deep” rule—if you can’t see or reach it without moving something else, redesign the space. Use pull-out trays within cabinets to bring rear clamps forward. For base cabinets, consider lift-up tambour doors that don’t swing into your workspace. Overhead cabinets benefit from drop-down fronts that create a temporary shelf while accessing clamps, keeping them within reach during project assembly.
Magnetic Storage Solutions: 2026’s Game Changer
Rare-earth magnet technology has revolutionized what’s possible for clamp storage, offering instant grab-and-go accessibility for ferrous-metal clamps. This isn’t your grandfather’s refrigerator magnet solution.
Magnet Strength and Safety Considerations
Modern neodymium magnets with nickel-copper-nickel plating can support surprising weight—some 2-inch diameter discs hold 100+ pounds in sheer force. However, raw magnets can damage clamp finishes and pinch fingers. Quality magnetic storage systems embed magnets in protective housings with rubber faces and include mechanical safety catches for heavier clamps. Always specify magnets with a 3:1 safety ratio; if your clamp weighs 10 pounds, use magnets rated for at least 30 pounds to account for vibration and accidental bumping.
Compatibility with Modern Clamp Materials
Here’s the limitation: magnetic storage only works with steel clamps. Many premium parallel clamps feature aluminum or composite bars that won’t stick. Hybrid solutions combine magnetic strips for steel F-clamps with adjacent rail systems for non-ferrous clamps. Some innovative woodworkers mount steel plates to clamp bars using adhesive-backed magnetic tape, effectively “magnetizing” any clamp. In 2026, expect to see clamp manufacturers offering optional magnetic retrofit kits for their non-steel models.
Ceiling-Mounted Carousel Systems
Carousel systems represent the pinnacle of space efficiency, storing dozens of clamps in a compact cylinder that rotates to bring the needed tool to you. These solutions excel in shops with high ceilings and limited wall space.
Rotational Mechanisms and Bearing Quality
The heart of any carousel is its bearing system. Look for sealed ball-bearing assemblies rated for both radial and thrust loads, ensuring smooth rotation even when fully loaded. Premium systems use tapered roller bearings similar to those in automotive wheels, providing decades of maintenance-free operation. The rotation should require minimal effort—if you need to wrestle it, the bearings are undersized or improperly installed. In 2026, some carousels feature motorized rotation with programmable positions, bringing frequently used clamp types to the “home” position automatically.
Capacity Planning and Load Balancing
Carousels become unwieldy if overloaded on one side. Calculate the weight of each clamp type and distribute them evenly around the circumference. Most systems use a tiered approach—three to four levels, each dedicated to a clamp category. The central column should be structural steel or thick-walled aluminum, not wood, to prevent sagging. Consider the carousel’s diameter; 36 inches is the sweet spot for reaching clamps without a step stool while maintaining a reasonable shop footprint.
Modular Grid Systems: The LEGO Approach
Modular grid systems, featuring regularly spaced holes or slots, allow you to build a custom storage ecosystem using standardized components. This approach offers unparalleled flexibility for woodworkers whose clamp needs change with each project.
Grid Patterns and Attachment Mechanisms
The most common grid uses 3/4-inch holes on 6-inch centers, accepting pegs, hooks, and shelves that lock into place. Better systems incorporate secondary locking mechanisms—cam levers or set screws—that prevent accessories from rotating under load. Some 2026 innovations include grids with embedded steel threaded inserts, allowing you to bolt on accessories with machine screws for ultimate rigidity. Evaluate the grid material; extruded aluminum channels with T-slots offer infinite positioning along both axes, while perforated steel panels provide exceptional strength at lower cost.
Scaling from Small Collections to Professional Shops
Start with a single 2x4 foot grid panel above your assembly bench. As your collection grows, add adjacent panels, creating a storage wall that expands with your needs. The modularity extends to accessories—build a library of holders for different clamp types, swapping them in minutes as projects demand. For professional shops, consider mobile grid panels on heavy-duty casters that can be repositioned around large projects or ganged together to create temporary clamp stations. The initial investment is higher than static solutions, but the long-term adaptability provides unmatched value.
Hybrid Solutions: Combining Storage Methods
The most effective clamp storage rarely relies on a single method. Hybrid approaches recognize that different clamp types have different optimal storage solutions, and your workshop layout likely has varied zones with unique constraints.
Zoning Your Workshop for Clamp Storage Efficiency
Divide your shop into activity zones: assembly, cutting, finishing, and storage. Position heavy parallel clamp storage within arm’s reach of your primary glue-up area. Place spring clamps and quick-grips near your assembly bench for fast hold-downs. Store infrequently used specialty clamps in remote overhead or cabinet storage. This zoning reduces unnecessary movement and keeps the right clamps near where they’re used. Map your typical project workflow and position storage at natural stopping points—where you pause to grab a clamp, you should find appropriate options.
Integration Strategies for Cohesive Systems
Unify disparate storage methods with common design elements—consistent wood species, matching finishes, or shared hardware styles. Use French cleats as the backbone, mounting rail systems, magnetic strips, and custom holders on compatible backers. Paint all storage components the same color (light gray or white maximizes shop lighting) to create visual cohesion. In smart workshops, integrate different storage types into a single inventory management system—scan a clamp out from the wall rack, and the system knows to look there first upon return.
Material Considerations for DIY Clamp Storage
Building your own clamp storage allows perfect customization but demands careful material selection. The wrong choice leads to sagging, cracking, or clamp damage.
Plywood Grades and Core Quality
Avoid construction-grade plywood with voids in the core—these fail catastrophically under clamp weight. Instead, use Baltic birch or ApplePly with consistent, void-free cores throughout. For painted surfaces, MDF provides a smooth finish but lacks screw-holding strength; reinforce mounting points with hardwood blocks. Consider marine-grade plywood for humid climates; its waterproof resins prevent delamination. In 2026, bamboo plywood offers an eco-friendly alternative with impressive strength-to-weight ratio, though it’s harder on cutting tools.
Finish Selection for Clamp Protection and Longevity
Raw wood storage can transfer moisture to clamp bars, promoting rust. Seal all surfaces with at least two coats of water-based polyurethane, sanding between coats for a smooth surface that won’t scratch clamps. For clamp contact points, consider flocking—the same velvet-like coating used in jewelry boxes—or apply self-adhesive UHMW (ultra-high molecular weight) polyethylene strips. These provide a slippery, non-marring surface. Avoid wax finishes on storage surfaces; while they aid sliding, they attract dust that can contaminate glue joints.
Ergonomics and Accessibility: The 2026 Standard
The best clamp storage is useless if it’s uncomfortable to use. Modern ergonomics research has quantified optimal storage heights and reach distances, informing a new generation of user-friendly designs.
Height Recommendations by Clamp Type
Store clamps you use frequently between 36 and 60 inches from the floor—this “golden zone” minimizes bending and reaching. Heavy parallel clamps live at 48 inches, allowing you to lift them straight up without shoulder strain. Lighter spring clamps can occupy higher positions, up to 72 inches. Anything above this requires a step stool and should be reserved for long-term storage. For wheelchair-accessible workshops, lower the golden zone to 24-48 inches and ensure all clamp retrieval can be done with one hand.
Reducing Retrieval and Replacement Effort
Every extra motion adds fatigue. Design storage that allows single-motion removal and replacement—no twisting, tilting, or juggling. Angled slots let gravity help seat clamps securely. Spring-loaded holders that open slightly when you press the clamp in, then close to retain it, eliminate the need for precise alignment. Consider the grip surface; textured rubber or cork inlays prevent clamps from sliding out when you grab adjacent tools, reducing the “domino effect” of dislodged clamps.
Smart Workshop Integration: The Connected Clamp Storage
2026’s most forward-thinking clamp storage incorporates IoT technology, transforming passive holders into active inventory management tools. While not essential for hobbyists, professional shops benefit from quantified clamp usage data.
RFID and NFC Tagging Systems
Embed RFID tags in clamp handles or attach NFC stickers to storage locations. Scanning clamps in and out builds a usage history, helping you identify which sizes you actually need more of versus those collecting dust. Some systems integrate with project management software, suggesting clamp quantities for specific tasks. The storage itself can feature LED indicators that light up the location of the clamp you searched for in your app, reducing hunt time to seconds.
Load Sensing and Capacity Management
Advanced wall-mounted systems incorporate strain gauges that monitor weight distribution in real-time. They alert you when a section approaches capacity or when weight shifts indicate potential failure. This data helps optimize storage layout—if the 24-inch clamp section consistently runs at 90% capacity while 36-inch clamps sit at 30%, you know where to expand. For shared workshops, these systems can track who checked out which clamps, reducing misplaced tool frustration.
Budget Planning: From Frugal to Premium
Clamp storage exists across every price point, but understanding the true cost—including installation time and long-term adaptability—prevents expensive mistakes.
Cost-Benefit Analysis of Different Approaches
A DIY French cleat system might cost $150 in materials but require 20 hours of fabrication time. A premium wall-mounted rail system could run $600 but installs in an afternoon and reconfigures in minutes. Calculate your “hourly shop rate”—even as a hobbyist, your time has value. Mobile carts offer the best cost-per-clamp-stored ratio for small shops, while overhead carousels, though expensive, maximize storage density in high-ceiling spaces. Consider phased implementation: start with a basic rail system, then add modular components as budget allows.
ROI for Professional Shops
For professionals, every minute spent searching for clamps is lost revenue. A $1,000 clamp storage system that saves five minutes daily pays for itself in under a year at typical shop rates. Factor in reduced clamp damage from proper storage—parallel clamps are expensive—and the ROI improves further. Document your current clamp retrieval time for a month, then project savings from an organized system. Many shops find that professional-grade storage increases clamp lifespan by 30-40% by preventing drops and corrosion.
Maintenance and Longevity of Your Storage System
Even the best clamp storage requires periodic attention to maintain functionality and safety. A maintenance plan extends system life and ensures clamps remain protected.
Regular Inspection and Adjustment Schedules
Quarterly, inspect all mounting hardware for loosening due to vibration. Check wooden components for cracks, especially around screw holes and weight-bearing joints. Annually, disassemble and clean rail systems, removing sawdust buildup that can impede sliding components. For magnetic systems, test magnet strength—neodymium magnets can lose up to 20% of their force when heated above 176°F, common near dust collection motors. Reapply protective finishes to any bare wood that could transfer moisture to clamps.
Adapting Storage for New Clamp Acquisitions
Your storage should grow with your collection. Reserve 20% expansion capacity in your initial design—empty space on rails, unused grid holes, or capacity for additional cleat accessories. When adding new clamp types, resist the urge to cram them into existing holders; instead, fabricate or purchase appropriate storage. Document your system’s weight capacity and track total load as you add clamps. Consider a yearly “storage audit” where you reassess which clamps you actually use and relocate underutilized tools to remote storage, freeing prime space for workhorses.
Frequently Asked Questions
What’s the best clamp storage solution for small workshops?
For compact spaces, prioritize vertical wall-mounted rail systems with a small footprint. Combine this with a narrow mobile cart (18 inches wide) that tucks under a workbench when not in use. The key is using every inch of vertical space from floor to ceiling—think wall rails for daily-use clamps, a slim vertical cabinet for specialty clamps, and overhead racks for long bar clamps. Avoid solutions that consume floor space permanently.
How much weight can wall-mounted clamp storage hold?
Properly installed wall-mounted systems can support impressive loads—up to 300 pounds per linear foot for premium aluminum rails anchored into studs. However, drywall-mounted systems should never exceed 50 pounds total, regardless of anchor ratings. Always distribute heavy parallel clamps across multiple studs and use backing plates. For peace of mind, add a 2:1 safety margin: if your clamps weigh 100 pounds, install for 200 pounds capacity.
Are mobile clamp carts stable enough for heavy parallel clamps?
Quality carts with four stabilizing feet and at least two locking casters handle heavy loads safely. Look for carts with a low center of gravity—storage for parallel clamps should be at the bottom—and a base at least 24x36 inches. Load capacity should be clearly stated; professional-grade carts support 500+ pounds. Test stability by loading it with your heaviest clamps and pushing on the top corner—any wobble indicates insufficient design for serious weight.
Can I mix different clamp types on the same storage system?
Absolutely, but organization is crucial. Use divided sections within a rail system or separate tiers on a cart. The danger is chaotic mixing that makes finding the right clamp frustrating. Color-code sections or use labels. Magnetic strips work for steel F-clamps but need adjacent rail sections for aluminum clamps. French cleat systems excel at mixed storage because you can build custom holders for each clamp type while maintaining visual consistency.
What’s the ideal height for mounting clamp storage on a wall?
Store frequently used clamps between 36 and 60 inches from the floor—this “golden zone” minimizes bending and reaching. Place heavy parallel clamps at 48 inches for ergonomic lifting. Light spring clamps can go up to 72 inches. For tall users, raise everything 6 inches; for wheelchair-accessible shops, lower the zone to 24-48 inches. Always consider your personal reach and typical working position.
How do I protect my clamps from rust while in storage?
First, ensure storage surfaces are sealed to prevent moisture transfer. Add silica gel packets to enclosed cabinets, replacing them quarterly. For wall-mounted storage in humid climates, consider a small dehumidifier pointed at your clamp area. Apply a light coat of paste wax or rust inhibitor to clamp bars before long-term storage. Avoid storing clamps directly against exterior walls where temperature fluctuations cause condensation. Some 2026 storage systems integrate low-wattage heating elements that maintain clamps slightly above ambient temperature, preventing moisture accumulation.
Is it worth investing in smart clamp storage with IoT features?
For hobbyists, probably not—the cost rarely justifies the convenience. For professional shops or shared makerspaces, absolutely. IoT systems reduce clamp loss, optimize inventory purchases, and save significant time locating tools. The data on clamp usage patterns alone can inform smarter buying decisions. If you bill shop time at $75+ per hour, a $1,000 smart storage system pays for itself with just a few hours of saved time annually.
How do I calculate the storage capacity I need for my clamp collection?
Measure each clamp category: count parallel clamps by length, bar clamps by size range. Add 20% for future growth. For rail systems, calculate linear inches needed—most clamps require 2-3 inches of rail space. For drawer systems, plan one drawer per clamp category with 25% empty space. Mobile carts should have 30% unused capacity to prevent overcrowding. Always round up; it’s better to have slightly too much storage than to outgrow your system in six months.
What are the safety considerations for overhead clamp storage?
Overhead systems must have redundant safety cables—never rely on a single support method. Install safety nets or secondary restraints to catch clamps if primary supports fail. Ensure the lowered position doesn’t interfere with lighting or create head-strike hazards. Mark the swing radius on the floor with tape to prevent collisions. Inspect all hardware monthly for signs of stress or loosening. Never exceed the manufacturer’s weight rating, and distribute weight evenly to prevent wobbling that could loosen mounts over time.
Can I build an effective clamp storage system with basic woodworking skills?
Absolutely. French cleat systems require only a table saw and drill, making them ideal for beginners. Start with simple L-shaped holders for F-clamps and progress to more complex designs. Plywood boxes with dividers for parallel clamps are beginner-friendly. The key is accurate measurement and solid joinery—pocket holes are perfectly acceptable. Online plans and video tutorials provide step-by-step guidance. Your first version may be crude, but it will be functional, and you can refine it as skills improve. The satisfaction of building custom storage tailored to your exact needs outweighs minor imperfections.
See Also
- 10 Best Woodworking Clamps for Live-Edge Slabs in 2026
- 10 C-Clamps for Heavy-Duty Metalworking & Woodworking in 2026
- 10 C-Clamps for Metalworking Meets Woodworking in 2026
- 10 Expert Picks: Locking Clamps for Welding & Woodworking in 2026
- 10 Pipe Clamp Accessories That Turn Ordinary Clamps into Precision Tools