Table of Contents
Nothing derails a beautifully planned table top project quite like cupping. You’ve meticulously selected your boards, perfected the glue-up, and walked away confident—only to return hours later to a surface that’s bowed, warped, or twisted like a potato chip. This frustrating phenomenon has plagued woodworkers for centuries, but the clamping technology emerging in 2026 is fundamentally changing the game. Modern edge clamps don’t just hold boards together; they actively counteract the internal stresses and moisture differentials that cause cupping, ensuring your table tops remain flat, true, and ready for decades of use.
Understanding how these specialized clamps work—and which features actually matter—can mean the difference between a pro-level result and a disappointing do-over. Whether you’re a seasoned furniture maker or a dedicated hobbyist ready to upgrade your workflow, this guide dives deep into the engineering principles, design innovations, and practical strategies that separate effective anti-cupping clamps from ordinary bar clamps that simply don’t measure up.
Top 10 Edge Clamps
Detailed Product Reviews
1. Semble Edge Band Spring Clamp Set, 10 Piece Pack, 3" Opening, Non-Marring + Anti-Slip, Durable Plastic Construction for Edge Banding, Molding, and Trim BANDCLAMP-10P

Overview: The Semble Edge Band Spring Clamp Set delivers ten 3-inch clamps designed specifically for delicate edge banding and trim work. These lightweight, plastic-bodied clamps feature non-marring rubber bands that provide firm grip without damaging finished surfaces. Ideal for cabinetry and furniture projects, they offer a practical solution for holding materials while adhesive cures.
What Makes It Stand Out: The generous ten-pack quantity distinguishes this set, ensuring you have enough clamps for longer workpieces without constantly repositioning. The one-handed squeeze operation dramatically speeds up workflow compared to traditional screw clamps. The anti-slip rubber bands distribute pressure evenly across the full jaw surface, preventing localized damage to veneers and delicate moldings—a critical advantage over metal-jaw alternatives.
Value for Money: Purchased individually, similar clamps often cost $3-5 each, making this 10-pack an economical choice at typically under $25. For hobbyists and professionals alike, the bulk packaging reduces per-unit cost significantly. While plastic construction keeps the price low, the durability remains adequate for light-to-medium duty applications, offering better value than disposable clamps without the premium of metal alternatives.
Strengths and Weaknesses: Pros: Excellent surface protection; quick one-handed operation; lightweight for extended use; ample quantity for continuous work; 3-inch capacity handles most trim sizes. Cons: Plastic construction limits maximum clamping force; may fatigue over heavy professional use; not suitable for high-temperature applications; spring tension cannot be adjusted.
Bottom Line: This 10-pack is an excellent investment for woodworkers and DIYers who frequently apply edge banding. The combination of surface protection, convenience, and quantity makes it a workshop staple, though heavy-duty users should consider supplementing with metal clamps for demanding tasks.
2. Olympia Tools 3-Way Edging Clamp, 38-192,Black

Overview: The Olympia Tools 38-192 is a robust, single 3-way edging clamp engineered for precision trim and molding installation. Constructed from malleable iron with a black oxide spindle, this professional-grade tool applies controlled pressure from three directions simultaneously. Its 2.75-inch throat depth accommodates substantial workpieces, making it ideal for demanding cabinetry and furniture applications.
What Makes It Stand Out: Unlike spring-loaded sets, this clamp’s three-point contact system ensures perfectly flush alignment of edges without shifting during glue-up. The heavy-duty swivel saddles adapt to irregular surfaces while maintaining even pressure distribution. The ergonomic handle provides fine-tuned torque control, allowing woodworkers to achieve seamless joints that spring clamps simply cannot match for critical applications.
Value for Money: At approximately $15-20 for a single clamp, the Olympia represents a mid-range investment in quality. While more expensive than plastic spring clamps, its malleable iron construction ensures decades of reliable service. For professionals installing high-end trim, the precision and durability justify the cost, outperforming cheaper alternatives that may slip or damage workpieces.
Strengths and Weaknesses: Pros: Exceptional three-way pressure control; durable metal construction; swivel saddles protect surfaces; precise adjustment capability; excellent for critical alignment tasks. Cons: Single clamp limits productivity on long edges; slower setup than spring clamps; heavier weight causes fatigue; higher cost per unit; requires two hands to operate.
Bottom Line: The Olympia 38-192 excels for precision work where alignment is paramount. It’s a worthwhile addition for serious woodworkers tackling high-visibility trim, though most users will want to pair it with quicker spring clamps for efficiency on larger projects.
3. Semble Edge Band Spring Clamp Set, 2 Piece (Pair), 3" Opening, Non-Marring + Anti-Slip, Durable Plastic Construction for Edge Banding, Molding, and Trim BANDCLAMP-2P

Overview: This two-pack from Semble offers the same non-marring, anti-slip design as their larger set but in a minimal quantity for smaller projects. These 3-inch spring clamps feature durable plastic construction with protective rubber bands, making them suitable for delicate edge banding, veneer work, and trim installation where surface preservation is critical.
What Makes It Stand Out: The pair configuration provides an entry point for hobbyists or those needing occasional clamping without committing to a bulk purchase. The identical one-handed operation and 3-inch capacity make these perfect for quick repairs or short-length edge banding. Their compact storage footprint appeals to users with limited workshop space.
Value for Money: Typically priced around $6-8, this pair offers convenience but at a higher per-unit cost than the 10-pack. For users needing only two clamps, it eliminates waste, but the value proposition diminishes for larger projects. It’s an economical trial for those unsure about plastic spring clamps, though frequent users will quickly outgrow this limited quantity.
Strengths and Weaknesses: Pros: Low initial investment; same surface protection as larger set; ideal for small repairs; lightweight and portable; no storage commitment. Cons: Poor value compared to bulk options; insufficient for continuous work; plastic durability concerns; limited clamping force; requires frequent repositioning on long pieces.
Bottom Line: This two-pack serves as a practical introduction to spring clamp edge banding for casual DIYers. While quality matches the larger set, the quantity limits its utility for serious projects. Purchase this only if you need minimal clamping capacity; otherwise, the 10-pack delivers superior value.
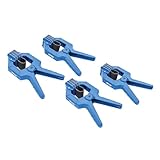
4. BUILDSOMETHING Edge Band Spring Clamp - Home Improvement Hand Tools - Adjustable Band Clamps for Woodworking, Carpentry & More - Set of 4

Overview: BUILDSOMETHING’s four-pack of edge band clamps targets DIY enthusiasts with a blend of durability and versatility. Featuring special-grade spring steel construction and movable jaws with rubber pads, these clamps promise enhanced longevity over plastic alternatives. The set balances quantity and quality for moderate woodworking and home improvement projects.
What Makes It Stand Out: The spring steel construction sets these apart from typical plastic clamps, offering superior clamping force and resistance to fatigue. Movable jaws with rubber pads adapt to various workpiece contours, providing more consistent pressure distribution than fixed designs. This four-pack quantity hits a sweet spot for projects requiring multiple clamps without the overkill of larger sets.
Value for Money: Priced competitively around $12-16 for four clamps, this set offers a middle-ground option. The steel construction justifies a slight premium over plastic clamps while remaining affordable. For hobbyists seeking durability without professional-grade pricing, this represents solid value, though the 10-pack plastic sets may be cheaper for high-quantity needs.
Strengths and Weaknesses: Pros: Steel construction enhances durability; movable jaws increase versatility; adequate quantity for medium projects; rubber pads protect surfaces; good clamping force. Cons: Brand recognition limited compared to established names; steel adds weight; rubber pad adhesion may vary; not suitable for high-heat applications; limited size capacity.
Bottom Line: This four-pack suits serious hobbyists seeking a durability upgrade from plastic clamps. The steel construction and movable jaws provide noticeable performance improvements, making it a smart mid-range choice for regular woodworking projects.
5. VMTW Band Clamp 12 pack for edge clamping, banding on shelving, cabinet edges, plywood edging, laminations

Overview: VMTW’s 12-pack provides the highest quantity option for edge banding applications. These clamps feature rugged engineered plastic construction with strong springs and a 2-1/8-inch opening. Designed specifically for plywood edging and laminations, they include a 2-1/2-inch depth capacity and glue-resistant properties, making them ideal for high-volume cabinetry and shelving projects.
What Makes It Stand Out: The dozen-clamp quantity enables simultaneous application along entire workpiece lengths, dramatically reducing project time. The glue-resistant design prevents adhesive buildup, a common frustration with other clamps. While the opening is slightly smaller than competitors, the increased depth capacity provides better grip on thicker substrates, particularly useful for cabinet carcasses and shelving units.
Value for Money: Offering the lowest per-unit cost in this comparison, the 12-pack typically runs under $20, making it the budget champion. For production shops or ambitious DIYers, the sheer quantity outweighs minor specification differences. The value proposition is unmatched for large-scale edge banding, though the plastic construction remains a durability trade-off.
Strengths and Weaknesses: Pros: Highest quantity for maximum coverage; excellent value per clamp; glue-resistant properties; adequate depth for thick materials; strong spring tension. Cons: Smaller 2-1/8" opening limits some applications; plastic construction less durable than metal; bulk packaging may include inconsistent units; no anti-slip mention; limited brand information.
Bottom Line: This 12-pack is the go-to choice for high-volume edge banding where quantity trumps individual clamp sophistication. Perfect for shop production or large DIY builds, though users needing maximum opening capacity should verify sizing against their specific trim stock.
6. Rockler Small Spring Clamps (Pair) – Easy Squeeze Bandy Clamps Woodworking for Thinner Stock, & Delicate Moldings – One-Handed Operation – Easy to Grip Nylon Hand Clamps

Overview: The Rockler Small Spring Clamps deliver specialized clamping for delicate woodworking tasks where traditional clamps prove too bulky. Designed specifically for edge moldings and thinner stock, these bandy clamps combine spring clamp convenience with rubber band flexibility. The pair format provides immediate utility for symmetrical clamping situations, making them ideal for furniture makers and trim carpenters working with fragile materials.
What Makes It Stand Out: These clamps excel through their intelligent material selection—high-strength nylon reinforced with fiberglass ensures durability without marring workpieces. The rubber over-molded handle provides exceptional comfort during repetitive one-handed operation. Unlike conventional spring clamps, the band design distributes pressure evenly across irregular contours, making them perfect for complex molding profiles that would otherwise require custom cauls.
Value for Money: Priced as a premium pair, these clamps justify their cost through versatility and longevity. While budget spring clamps exist, they lack the specialized band design and ergonomic features. For woodworkers regularly handling delicate trim, the time saved and damage prevented makes this a worthwhile investment compared to replacing cheaper clamps or repairing marred workpieces.
Strengths and Weaknesses: Strengths include comfortable extended use, even pressure distribution, true one-handed operation, and multi-purpose utility for cable management. The nylon construction resists glue buildup better than metal alternatives. Weaknesses involve limited opening capacity suited only for thinner stock, and the pair packaging may insufficient for larger projects requiring multiple clamps.
Bottom Line: These Rockler clamps are essential for discerning woodworkers prioritizing workpiece protection and ergonomic efficiency. Their specialized design solves common clamping challenges with delicate moldings, making them a smart addition to any fine woodworking shop.
7. VMTW Band Clamp 6 pack for edge clamping, banding on shelving, cabinet edges, plywood edging, laminations

Overview: The VMTW Band Clamp 6-pack addresses the high-volume needs of cabinetmakers and DIY enthusiasts tackling extensive edge banding projects. These engineered plastic clamps provide consistent pressure for securing veneer, laminate, and solid wood edging to plywood and shelving. The six-clamp quantity ensures adequate coverage for long runs, recognizing that thinner materials require more frequent clamping points for successful glue-ups.
What Makes It Stand Out: This bulk offering delivers exceptional value through quantity without sacrificing functionality. The rugged engineered plastic construction withstands workshop abuse while the robust spring mechanism maintains reliable tension. A key advantage is the glue-resistant material, preventing the sticky buildup that plagues traditional clamps. The 2-1/2-inch depth accommodates standard cabinet plywood thicknesses, making them purpose-built for common woodworking applications.
Value for Money: The six-pack configuration provides significant savings over purchasing individual clamps, making this an economical choice for large projects. Comparable quality clamps often cost nearly as much for a pair, so the per-unit price here is compelling. For woodworkers building multiple cabinets or shelving units, the upfront investment pays dividends in efficiency and consistent results.
Strengths and Weaknesses: Strengths include the generous quantity, strong spring tension, glue-resistant properties, and adequate depth for most edge banding. The plastic construction is surprisingly durable and won’t rust. Weaknesses include less premium feel compared to metal clamps, potential fatigue in the spring mechanism over extended use, and the fixed size limiting versatility for thicker stock applications.
Bottom Line: This VMTW 6-pack is a practical, cost-effective solution for woodworkers focused on edge banding production work. The quantity and specialized design make them a workshop workhorse for cabinetry and shelving projects.
8. Kreg Edge Band Spring Clamp - One-Handed Edge Banding Clamp with Stretch Band - Non-Marring with Pivoting Jaws for Uniform Pressure Glue-Ups - For Cabinetry, Trim & More - Set of 4
Overview: Kreg’s Edge Band Spring Clamps represent the premium tier of specialized edge clamping tools, bringing innovative engineering to a common woodworking challenge. The set of four clamps features a stretchable band system that adapts to edging up to one inch thick, while pivoting jaws maintain consistent contact across varying material thicknesses. Designed for discerning woodworkers, these clamps prioritize both performance and workpiece protection.
What Makes It Stand Out: The pivoting jaw mechanism is a game-changer, automatically adjusting to maintain full contact and uniform pressure—eliminating the uneven glue lines common with fixed-jaw clamps. The proprietary GripMaxx pads provide exceptional non-marring protection, crucial for pre-finished trim work. Kreg’s reputation for precision tooling ensures these clamps deliver reliable, repeatable results that justify their premium positioning in the market.
Value for Money: While priced higher than generic alternatives, the Kreg set offers professional-grade features that serious woodworkers will appreciate. The four-clamp quantity hits the sweet spot for most cabinet door and furniture projects. Compared to the cost of ruined veneer from inferior clamps, the investment is modest. The durability and precision engineering ensure years of reliable service, making the per-use cost negligible.
Strengths and Weaknesses: Strengths include the innovative pivoting jaws, excellent non-marring pads, comfortable one-handed operation, and stretchable band versatility. The glue-resistant design simplifies cleanup. Weaknesses include the premium price point, limitation to one-inch thickness maximum, and the four-count may require multiple sets for large-scale production work.
Bottom Line: For woodworkers demanding precision and reliability, these Kreg clamps are worth the premium. Their intelligent design solves pressure distribution problems that plague cheaper alternatives, making them essential for high-quality cabinetry and trim work.
9. ProGrip Straight Edge Clamp Ideal for Cutting Large Sheets of Plywood and Dado Slots

Overview: The ProGrip Straight Edge Clamp diverges from traditional edge banding tools, serving instead as a precision cutting guide for sheet goods. Its lightweight 2-3/16-inch tube rail construction provides rigid guidance for circular saws, replacing cumbersome straightedges and C-clamps. Designed for woodworkers regularly breaking down plywood or cutting dado slots, this clamp streamlines the process of achieving factory-straight cuts without a table saw.
What Makes It Stand Out: The integrated clamping mechanism eliminates the need for separate C-clamps, allowing single-person operation on large panels. The low-profile rail design enables smooth saw base travel while the adjustable jaw accommodates various material thicknesses. This dual-functionality—as both clamp and straightedge—reduces setup time and ensures consistent accuracy across multiple cuts, a significant advantage over traditional two-piece systems.
Value for Money: While more expensive than basic metal straightedges, the ProGrip’s integrated clamping justifies the cost through time savings and improved accuracy. The alternative involves purchasing both a quality straightedge and multiple clamps, often at similar total cost. For woodworkers without a panel saw, this tool pays for itself by reducing material waste from miscuts and enabling professional results with standard circular saws.
Strengths and Weaknesses: Strengths include rapid setup, excellent rigidity, versatile adjustability, and elimination of separate clamps. The lightweight design enhances portability. Weaknesses include limited length options, potential flex on very long spans if not supported, and the specialized nature means it won’t replace standard clamps for other tasks. The tube construction may dent if dropped.
Bottom Line: The ProGrip is an indispensable tool for woodworkers processing sheet goods. Its clever integration of clamp and guide functions delivers precision and efficiency that justifies the investment for anyone serious about plywood work.
10. Rockler Medium Spring Clamps (Pair) – Easy Squeeze Bandy Clamps Woodworking for Thinner Stock, & Delicate Moldings – One-Handed Operation Medium Clamps – Easy to Grip Nylon Hand Clamps w/Fiberglass

Overview: Rockler’s Medium Spring Clamps scale up their successful bandy clamp design for applications requiring slightly more capacity while maintaining the gentle touch needed for delicate work. This pair of medium-sized clamps targets woodworkers who need versatility across a range of trim thicknesses. The same high-strength nylon with fiberglass construction ensures durability, while the rubber over-molded handles provide the ergonomic comfort that defines the Rockler clamping line.
What Makes It Stand Out: The medium size bridges the gap between the small version’s delicate touch and the brute force of traditional clamps, offering enhanced utility without sacrificing finesse. The band design continues to excel at distributing pressure across irregular contours, making these ideal for medium-sized crown molding, baseboard trim, and plywood edge banding. The one-handed operation remains effortless even with the increased spring tension, demonstrating thoughtful engineering.
Value for Money: Positioned similarly to the small version, these medium clamps offer expanded capability for the same investment tier. While competitors offer metal spring clamps at lower prices, they lack the non-marring band design and ergonomic sophistication. For woodworkers uncertain about which size to purchase, the medium version provides the best versatility-to-cost ratio in Rockler’s lineup, handling the majority of trim applications effectively.
Strengths and Weaknesses: Strengths include the expanded capacity over small version, durable construction, comfortable grip, and even pressure distribution. The medium size handles most common trim work. Weaknesses include still being too small for thick stock, pair packaging limiting project scale, and the premium price compared to basic hardware store clamps. The band may stretch over time with heavy use.
Bottom Line: These medium clamps represent the sweet spot in Rockler’s bandy clamp range, offering the best versatility for general woodworking. They’re a practical investment for woodworkers needing reliable, non-marring clamping across various trim applications.
Why Table Top Cupping Happens (And Why Traditional Clamping Fails)
Cupping occurs when wood fibers expand and contract unevenly across a board’s width, typically due to differential moisture content between the top and bottom faces. During glue-up, this stress manifests as a concave or convex curve that ruins flatness. Traditional clamps apply pressure primarily along the edge, doing little to counteract the rotational forces that cause cupping. They hold pieces together but don’t prevent them from bending.
The problem intensifies with wider panels and modern kiln-dried lumber that still retains internal tension. Even perfectly jointed edges can pull away from each other as the glue cures, creating microscopic gaps that become permanent defects. Standard F-clamps and pipe clamps excel at closing seams but lack the vertical restraint necessary to maintain planar integrity across the entire assembly.
The Evolution of Edge Clamps in 2026
This year’s clamping technology represents a paradigm shift from passive pressure application to active distortion prevention. Manufacturers have moved beyond simple mechanical advantage to incorporate distributed force engineering, micro-adjustment capabilities, and integrated leveling systems. The focus is no longer just on squeezing boards together—it’s on creating a three-dimensional pressure envelope that stabilizes the entire workpiece.
Smart material selection in clamp construction, including lightweight composites and stress-relieved metals, reduces the clamps themselves becoming a source of distortion. Precision machining has eliminated the flex and play that plagued earlier designs, while ergonomic improvements make proper technique more intuitive and less physically demanding during complex glue-ups.
Key Design Features That Actually Prevent Cupping
Parallel Jaw Mechanisms
The most significant advancement is true parallel jaw movement throughout the clamping range. Unlike traditional clamps where jaws toe-in under pressure, modern anti-cupping designs maintain a perfect 90-degree relationship between the jaw face and the clamping bar. This ensures even pressure distribution from the top to bottom edge of your boards, eliminating the high-pressure points that can actually encourage cupping.
Integrated Vertical Pressure Systems
Top-performing clamps now feature secondary pressure points that apply downward force perpendicular to the glue line. These systems typically use cam mechanisms or independent screw adjustments that let you dial in just enough vertical pressure to counteract upward bowing without crushing wood fibers. The best designs allow you to adjust vertical and horizontal pressure independently, giving you surgical control over the clamping dynamics.
Non-Marring Pad Technology
2026’s pad materials go beyond simple rubber or plastic. Thermoplastic polyurethane pads with engineered durometer ratings conform to minor surface imperfections while maintaining consistent pressure. Some advanced designs feature replaceable pad inserts with different hardness levels for softwoods versus hardwoods, preventing both indentation and slippage simultaneously.
Understanding Clamping Pressure Distribution
Effective anti-cupping requires pressure applied in a specific pattern: maximum force at the center of the panel, gradually decreasing toward the edges. This counterintuitive approach counters the natural tendency for boards to cup upward in the middle. Quality edge clamps achieve this through curved jaw faces or sequential pressure adjustment points that create a pressure gradient rather than uniform compression.
The science involves understanding that wood is anisotropic—its strength properties vary dramatically with grain direction. Applying uniform pressure across a board’s width actually works against you, as the weaker tangential grain compresses more easily than the radial grain, encouraging cupping. Modern clamps compensate for this material behavior through engineered pressure mapping.
Types of Edge Clamps for Different Table Top Sizes
Light-Duty Panel Clamps
For tabletops under 24 inches wide, compact edge clamps with 4-6 inch throat depths provide excellent control without excessive weight. These typically feature quick-release mechanisms and single-handed operation, making them ideal for solo woodworkers managing multiple boards. Their scaled-down size allows precise placement every 8-12 inches along the glue line.
Heavy-Duty Beam Clamps
When you’re building a 48-inch wide dining table, you need clamps that can span significant distances while maintaining rigidity. Beam-style edge clamps use extruded aluminum or steel I-beam construction that resists deflection under load. These monsters can apply over 2,000 pounds of pressure while staying dead flat, crucial for wide panels where even microscopic flex translates to cupping.
Modular System Clamps
The most versatile approach for 2026 involves modular systems where you build custom-length clamping beams using connecting hardware. These let you configure exactly the right setup for each project, adding vertical pressure modules and alignment accessories as needed. While requiring more initial setup time, they eliminate the need to own dozens of fixed-length clamps.
Material Considerations in Clamp Construction
Forged vs. Cast Clamp Bodies
Forged steel bodies offer superior strength-to-weight ratios and better stress distribution than cast iron alternatives. The forging process aligns the metal grain structure, reducing the chance of the clamp body itself flexing or creeping under sustained load. For cast options, look for ductile iron rather than gray iron, as it provides better impact resistance and less brittleness.
Composite Reinforcements
Some cutting-edge designs incorporate carbon fiber or fiberglass composites in non-critical areas to reduce weight without sacrificing strength. This matters because heavy clamps can actually contribute to cupping by creating localized stress points where they contact the workpiece. Lighter clamps are easier to position accurately and less likely to distort delicate panels during cure.
Setting Up Your Glue-Up for Success
Acclimation and Moisture Management
Even the best clamps can’t overcome poor material preparation. Bring your lumber into your shop at least 72 hours before glue-up, stickered to allow air circulation on all faces. Use a pinless moisture meter to verify all boards read within 1% of each other. This simple step eliminates the internal moisture gradients that cause cupping regardless of clamping strategy.
Strategic Clamp Placement
Position your first clamp at the exact center of the panel, then work outward with subsequent clamps spaced 12-18 inches apart. For wide panels, use a clamping caul—a thick, straight board placed across the top—to distribute vertical pressure evenly. The caul should be slightly thicker than your tabletop stock to prevent bending under clamp pressure.
Advanced Clamping Strategies for Problematic Woods
Reaction Wood and Tensioned Lumber
Wood from branches or leaning trees contains internal stresses that release during machining and gluing. For these challenging boards, alternate the growth ring orientation (heart side up, then heart side down) and increase clamp density to every 6-8 inches. Apply initial pressure gently, then gradually increase it in stages over 30 minutes as the glue becomes tacky and starts to resist slippage.
Quarter-Sawn vs. Flat-Sawn Considerations
Quarter-sawn lumber is inherently more stable but requires different clamping pressure. Its dense ray flecks resist compression, so you need higher pressure to achieve good glue penetration—typically 150-200 psi versus 100-150 psi for flat-sawn. However, its stability means you can reduce vertical anti-cupping pressure by about 30%, as the wood is less prone to movement.
The Role of Cauls and Auxiliary Supports
Designing Effective Caul Systems
A proper caul system works in harmony with your edge clamps. Use 3/4-inch thick MDF or plywood cauls, at least 6 inches wide, with wax paper or packing tape applied to prevent glue adhesion. Drill 1/4-inch holes every 2 inches along the length to allow air escape and prevent vacuum lock that can make removal difficult after cure.
Multi-Point Support Benches
Your workbench plays a crucial role. A flat, rigid surface is non-negotiable. Many woodworkers now use torsion box assembly tables with dog holes spaced every 4 inches, allowing you to support the entire panel evenly with adjustable bench dogs. This eliminates sagging that edge clamps alone cannot correct, especially with long panels that span open areas on traditional workbenches.
Calibration and Maintenance for Peak Performance
Pressure Verification Techniques
Don’t trust the clamp’s gauge alone. Use pressure-sensitive film or even simple carbon paper between test boards to visualize actual pressure distribution. Darker areas indicate higher pressure. For critical glue-ups, this testing can reveal jaw misalignment or worn threads that cause uneven clamping before you ruin expensive lumber.
Thread and Slide Maintenance
Clean clamp threads monthly with a brass brush and apply dry lubricant like graphite or PTFE powder. Oil attracts sawdust and creates abrasive paste that accelerates wear. For sliding mechanisms, apply a single drop of synthetic bearing oil to the wear strips, then cycle the clamp 10-15 times to distribute it evenly. This prevents the sticky operation that leads to jerky pressure application.
Cost vs. Value: Investing Wisely
Budget-Friendly Approaches
You don’t need to replace every clamp immediately. Start with two premium anti-cupping clamps for the critical center position, then fill out your collection with economical pipe clamps fitted with aftermarket anti-cupping jaw attachments. These retrofit kits convert standard clamps into cupping-resistant systems for about 30% of the cost of new dedicated clamps.
Professional-Grade ROI
For production shops, the math is compelling. A $200 clamp that prevents even one ruined 40-inch wide walnut tabletop has already paid for itself. Factor in reduced rework time, faster assembly (since you can apply higher initial pressure without distortion), and improved glue joint quality, and premium clamps typically show return on investment within 3-5 major projects.
Safety Considerations and Best Practices
Pressure Limits and Wood Failure
Excessive pressure doesn’t create better joints—it crushes wood fibers and starves the glue line. Most hardwoods fail at 400-600 psi, far below what heavy-duty clamps can generate. Use a torque-limiting approach: tighten until you see minimal glue squeeze-out along the entire joint, then add just one-quarter turn more. More pressure rarely means a stronger bond.
Clamp Storage and Handling
Store clamps horizontally on racks that support their full length, never leaning in a corner where gravity bends the bars. For clamps over 48 inches, use two support points to prevent permanent sag. When carrying long clamps, support them in the middle rather than at the ends to avoid stressing the adjustment mechanisms.
Integrating Edge Clamps with Other Workshop Systems
Dust Collection Compatibility
Modern clamps feature smooth, sealed surfaces that resist dust accumulation in critical mechanisms. Some designs incorporate magnetic dust shields that snap over the threaded rods during glue-ups in dusty environments. This prevents abrasive particles from contaminating the threads and ensures smooth pressure adjustment even in active workshops.
Workflow Optimization
Design your clamp rack system near your assembly table, organized by size and type. Color-code clamps by capacity using heat-shrink tubing on the handles—red for heavy-duty, blue for medium, green for light-duty. This visual system lets you grab the right tool without reading labels, speeding up setup and reducing the temptation to use the wrong clamp for the job.
Future Trends: What’s Next in Anti-Cupping Technology
Smart Pressure Monitoring
Emerging prototypes feature integrated load cells with Bluetooth connectivity, sending real-time pressure data to your smartphone. These systems alert you if pressure drops during cure (indicating glue creep or wood movement) and log clamping parameters for repeatable results. While still premium-priced in 2026, this technology is rapidly moving toward mainstream affordability.
Adaptive Jaw Surfaces
Research into shape-memory polymers promises jaws that conform to the exact contour of your boards during clamping, then return to flat when released. This would eliminate the need for cauls entirely, as the clamps themselves would provide perfect, customized pressure distribution. Early production models are expected by late 2026.
Troubleshooting Common Cupping Issues
When Clamps Alone Aren’t Enough
If you’re still experiencing cupping with quality clamps, examine your stock preparation. Even 0.005-inch thickness variation across a board’s width creates stress that concentrates at the glue line. Use a drum sander or hand plane to ensure uniform thickness before gluing. Also check your shop humidity—it should be stable within 5% relative humidity throughout the glue curing period.
Diagnosing Clamp-Induced Distortion
Sometimes the clamp itself causes cupping. Test this by clamping a single, stable board (like 3/4-inch Baltic birch plywood) and checking for deflection with a straightedge. If the clamp bows the test piece, it’s flexing under load and needs repair or replacement. This simple diagnostic can save hours of frustration blaming the wood when the tool is at fault.
Frequently Asked Questions
How many edge clamps do I really need for a typical dining table top?
For a 36-inch wide, 72-inch long panel, plan on five edge clamps minimum: one at center, two at quarter points, and one each approximately 6 inches from the ends. If using lighter-duty clamps, increase to seven total for optimal pressure distribution. Always have two extra clamps ready for auxiliary vertical pressure if needed.
Can I prevent cupping with regular bar clamps and cauls, or do I need specialized edge clamps?
While traditional bar clamps with well-designed cauls can reduce cupping, they can’t match the three-dimensional pressure control of modern edge clamps. For occasional projects, quality cauls and careful technique suffice. For frequent table top construction, dedicated anti-cupping clamps save time and dramatically improve success rates, paying for themselves through reduced waste.
What’s the ideal clamping pressure for different wood species to prevent cupping?
Softwoods like pine and cedar need 75-100 psi. Hardwoods such as oak and maple require 125-175 psi. Dense exotic species like wenge or ebony may need 200 psi. Apply vertical anti-cupping pressure at roughly 30% of your horizontal pressure values. Always test on scrap first, as over-clamping is more damaging than under-clamping.
How long should I leave edge clamps on during glue-up to prevent cupping?
Leave clamps in place for the full cure time specified by your glue manufacturer—typically 24 hours for PVA glues. Removing clamps after the initial tack phase (30-60 minutes) allows internal stresses to immediately distort the panel. For wide panels prone to cupping, consider leaving light pressure clamps on for an additional 12 hours after full cure as insurance.
Are aluminum clamps as effective as steel for preventing cupping?
High-grade aluminum alloys (6061-T6 or 7075-T6) offer excellent rigidity at 1/3 the weight of steel, making them ideal for wide panels where clamp weight could contribute to distortion. The key is the clamp’s design and precision, not just material. Premium aluminum clamps often outperform mediocre steel clamps, especially in larger sizes where handling ease affects setup accuracy.
Can edge clamps fix a table top that’s already cupped?
Edge clamps are preventive, not corrective. Attempting to flatten a cupped panel by over-clamping typically creates internal stresses that cause future warping or glue line failure. For minor cupping (less than 1/16 inch), gentle clamping with moisture correction in a controlled environment might help. Major cupping requires re-sawing or replacement of affected boards.
What maintenance routine keeps edge clamps performing optimally?
Monthly: Brush threads and apply dry lubricant. Quarterly: Check jaw parallelism with a machinist’s square and adjust if equipped with calibration screws. Annually: Disassemble sliding mechanisms, clean thoroughly, inspect wear strips, and replace if grooved. Store horizontally, never exceed rated pressure, and avoid dropping—impact can misalign precision-machined components.
How do I choose between screw-driven and cam-actuated edge clamps?
Screw-driven clamps offer infinite pressure adjustment and better sustained load holding, ideal for long cure times. Cam-actuated models provide lightning-fast setup and consistent pressure, perfect for production work where speed matters. For anti-cupping applications, screw-driven systems generally provide better control, but premium cam designs with adjustable mechanical advantage close the gap.
Will using too many edge clamps cause cupping instead of preventing it?
Yes, over-clamping creates problems. Too many clamps produce a “scalloped” effect where each clamp point becomes a low spot, and areas between clamps bow upward. Follow the spacing guidelines: one clamp every 12-18 inches for most panels. More clamps don’t equal better results—proper pressure distribution does. Five perfectly adjusted clamps outperform ten haphazardly placed ones.
What’s the biggest mistake woodworkers make when using edge clamps for table tops?
The number one error is applying full pressure immediately. This forces glue out of the joint, starves the bond, and can cause boards to shift and cup as they slide against each other. The correct technique: apply just enough pressure to close the joint (finger-tight plus one turn), verify alignment, then increase pressure in three stages over 15 minutes, allowing the wood and glue to stabilize at each increment.
See Also
- 2026’s Top 10 Bar Clamps for Gluing Up Table Tops
- 10 Pipe Clamps That Solve Bowing Nightmares When Edge-Gluing in 2026
- 10 Pipe Clamps That Eliminate Twist When Gluing Long Boards in 2026
- 10 Pipe Clamps That Solve Bowing Problems When Edge-Gluing in 2026
- Top 10 Best Parallel Clamps for Edge Gluing Panels in 2026