Table of Contents
Precision separates weekend projects from heirloom furniture. In the world of table saw setup, that precision often comes down to thousandths of an inch—the difference between a joint that sings and one that sighs. As we move into 2026, feeler gauges have evolved from simple automotive hand-me-downs into sophisticated instruments designed specifically for the modern woodworking shop. Whether you’re dialing in a new cabinet saw or maintaining a veteran contractor model, understanding these tools isn’t just about buying the right set—it’s about mastering the invisible gaps that determine your work’s quality.
The landscape of table saw accessories has transformed dramatically, with smart features and specialized designs that would have seemed like science fiction a decade ago. Today’s woodworkers face an overwhelming array of options, each promising to revolutionize their setup routine. But here’s the truth: the “best” feeler gauge is the one that matches your specific workflow, your saw’s requirements, and your commitment to accuracy. Let’s cut through the marketing noise and explore what actually matters when selecting these critical setup companions.
Top 10 Feeler Gauges Table Saw
Detailed Product Reviews
1. iGaging Saw Gauge (34-0928 EZ-Align Table Saw Gauge)
Overview: The iGaging EZ-Align gauge is a straightforward mechanical tool designed for essential table saw alignment tasks. Machined from hardened aluminum alloy with an anodized finish, this gauge helps woodworkers check blade-to-miter-slot squareness, fence alignment, and arbor runout without electronic complexity. It’s a no-frills solution for maintaining basic saw accuracy.
What Makes It Stand Out: Its permanent rust-proof construction ensures lifetime durability in workshop environments. The hardened aluminum alloy provides excellent dimensional stability, resisting wear that could compromise measurement accuracy over time. Unlike digital alternatives, this mechanical gauge requires no batteries and offers immediate, reliable readings without calibration concerns.
Value for Money: Positioned as a budget-friendly alternative to digital systems, this gauge delivers professional-grade accuracy at a fraction of the cost. While it lacks digital convenience, its one-time purchase price and zero maintenance requirements make it economically sensible for hobbyists and occasional users who don’t need extreme precision.
Strengths and Weaknesses: Strengths include exceptional durability, simple operation, no battery dependency, and reliable mechanical precision. The anodized finish protects against corrosion indefinitely. Weaknesses involve the lack of digital readout for fine measurements, potentially steeper learning curve for reading analog indicators, and limited features compared to comprehensive alignment kits.
Bottom Line: Ideal for woodworkers seeking reliable, maintenance-free alignment checks without digital complexity. If you value simplicity and durability over high-tech convenience, this gauge represents excellent long-term value for routine table saw maintenance.
2. Neoteck 0-1’’ Digital Dial Indicator Table Saw Gauge Suitable for Table Saws with a Groove Width of 3/4" (19mm) or More for Aligning and Calibrating Work,Shop Machinery,Band Saw and Drill Press-Black

Overview: The Neoteck Digital Table Saw Gauge revolutionizes workshop calibration with its electronic precision. Designed for 3/4-inch miter slots, this system combines a high-resolution digital indicator (0.0005-inch) with CNC-machined anodized aluminum bars to deliver comprehensive alignment capabilities for table saws, band saws, and drill presses.
What Makes It Stand Out: The self-adjusting “Smart Bar” technology automatically compensates for inconsistent slot widths, ensuring perfect fit without repeated adjustments. The digital indicator switches seamlessly between metric and imperial units with zero-setting functionality. Six mounting holes provide versatile positioning for various machine configurations, while the included storage case protects your investment.
Value for Money: Though priced higher than mechanical alternatives, the digital precision and time-saving features justify the cost for serious woodworkers. The comprehensive package eliminates separate purchases, and the 0.0005-inch resolution rivals professional inspection equipment, making it cost-effective for those requiring exacting standards.
Strengths and Weaknesses: Strengths include exceptional accuracy, user-friendly digital display, versatile mounting options, self-adjusting bars, and complete accessory kit. The plastic components may wear over time, and the electronic indicator requires battery management. Some users may find the initial setup complex compared to simpler gauges.
Bottom Line: A premium solution demanding premium investment. Perfect for professional woodworkers and precision enthusiasts who require digital accuracy and versatile functionality. The time savings and measurement confidence easily offset the higher price point.
3. iGaging 35-0928 Digital Table Saw Gauge

Overview: The iGaging 35-0928 represents the digital evolution of their alignment gauge series. While sharing the same hardened, anodized aluminum construction as its mechanical sibling, this model incorporates digital measurement capabilities for enhanced precision in checking blade alignment, fence positioning, and arbor runout on standard 3/4-inch miter slots.
What Makes It Stand Out: Combining iGaging’s renowned durability with digital readout technology, this gauge offers the best of both worlds. The rust-proof anodized aluminum ensures longevity while providing the convenience of electronic measurement. Its straightforward design focuses on essential alignment tasks without overwhelming users with unnecessary complexity.
Value for Money: This mid-range option bridges the gap between basic mechanical gauges and premium digital systems. It delivers digital precision without the extensive feature set (and price tag) of competitors like Neoteck. For woodworkers wanting digital convenience without breaking the bank, it represents a smart compromise.
Strengths and Weaknesses: Strengths include durable construction, digital accuracy, battery-powered convenience, and brand reliability. The anodized finish guarantees rust-free operation. Weaknesses stem from limited feature details in specifications, potentially fewer mounting options than comprehensive kits, and unclear whether it includes the versatile “Smart Bar” technology. The product description lacks the depth found in competitor listings.
Bottom Line: A solid middle-ground choice for woodworkers ready to upgrade from mechanical gauges but not requiring professional-grade digital systems. Its durable construction and digital capability make it a worthwhile investment for serious hobbyists seeking improved measurement confidence.
4. GOINGMAKE Compact Table Saw Miter Gauge with 360mm Fence and Multifunction Flip Stop and Positive Angle Stops, Miter Gauge for Table Saw Accessories, for Woodworking Cuts, Fits 3/4"x3/8" Slot

Overview: The GOINGMAKE Compact Miter Gauge is a cutting accessory, not an alignment tool. Designed for 3/4-inch x 3/8-inch slots, it enables precise angled cuts with 11 positive stops from -60° to +60°. The 360mm fence with flip stop facilitates repeatable cuts, making it ideal for portable jobsite saws where space is limited but accuracy remains critical.
What Makes It Stand Out: Its compact 360mm length excels on smaller table saws without sacrificing functionality. The multifunction flip stop features a magnifying glass and precision pointer for easy reading, while supporting both square and angled workpieces. Engineering plastic handles with metal stops provide secure locking at common angles like 90°, 45°, and 22.5°.
Value for Money: Offering professional features in a compact package, this gauge delivers excellent value for mobile woodworkers. The inclusion of a flip stop, laser-etched scales, and multiple adjustment points typically found on larger, more expensive units makes it a cost-effective upgrade for budget-conscious users.
Strengths and Weaknesses: Strengths include compact portability, versatile angle range, solid flip stop mechanism, and three-point bar adjustment for smooth sliding. The aluminum alloy construction ensures durability. Weaknesses involve the shorter fence limiting capacity for larger workpieces, plastic components that may wear, and it’s unsuitable for calibration tasks—this is strictly a cutting guide.
Bottom Line: Perfect for contractors and hobbyists using portable table saws who need accurate, repeatable angled cuts without bulk. If you require a space-efficient miter gauge with professional features, this compact solution outperforms stock gauges while remaining affordable and portable.
5. 2pcs Feeler Gauges Set Stainless Steel, 32 Straight & 16 Angled Blades, Dual Marked SAE/Metric Wider Range Spark Plug Gap Tool, Filler Gauges Kit for Valves, Automotive, Piston, Guitar

Overview: This professional feeler gauge set provides precision gap measurement beyond table saw applications. With 32 straight blades (0.0008-0.4") and 16 angled blades (0.005-0.02"), it serves automotive, musical instrument, and machinery maintenance needs. Laser-etched dual SAE/metric markings ensure clear, permanent readability across various repair standards.
What Makes It Stand Out: The comprehensive range covers extreme precision scenarios from ultra-thin 0.0008-inch measurements to wider 0.4-inch gaps. Angled blades access confined spaces impossible for straight gauges to reach. Premium stainless steel construction resists corrosion, wear, and deformation, maintaining accuracy in harsh workshop environments where carbon steel might fail.
Value for Money: Exceptional value considering its versatility across multiple disciplines. While not table-saw-specific, it handles tasks like setting blade parallelism, checking fence gaps, and measuring arbor runout. Competing single-purpose gauges cost more, making this dual-set package economical for users needing broad measurement capability.
Strengths and Weaknesses: Strengths include unmatched versatility, durable stainless steel construction, dual measurement scales, and professional-grade precision. The laser-etched markings resist fading indefinitely. Weaknesses involve no dedicated table saw fixture, requiring manual holding during measurements, and the blade set may be overkill for users needing only basic saw alignment. Storage organization could be improved.
Bottom Line: An essential maintenance toolkit addition for anyone serious about precision. While not a dedicated table saw gauge, its versatility and accuracy make it indispensable for detailed setup work and countless other applications. Excellent value for multi-discipline craftsmen.
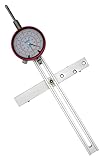
6. GOINGMAKE Table Saw Gauge Dia Indicator for Table Saw and Band Saw,0.01mm Accuracy Calibration Tool,Table Saw Jig Guide Fits for 3/4" T Slot U Slot,Table Saw Accessories for Woodworking,Machinery

Overview: The GOINGMAKE Table Saw Gauge is a precision calibration tool designed for woodworkers who demand exacting standards from their equipment. This dial indicator-based system helps align table saw blades and rip fences to miter slots with 0.01mm accuracy, eliminating guesswork from crucial setup procedures.
What Makes It Stand Out: What makes this tool exceptional is its thoughtful engineering. The adjustable miter bar features dual adjustment rings that eliminate slop, ensuring zero-play fit in standard 3/4" T-slots and U-slots. Its generous 4 to 8.85-inch adjustable range accommodates various machine configurations, while the stable support base prevents tipping during measurements. Unlike basic gauges, this tool addresses blade wobble directly, improving both cut quality and safety.
Value for Money: Priced competitively against entry-level digital alternatives, this manual dial indicator offers reliability without battery dependency. While digital gauges provide instant readouts, this analog tool delivers consistent precision at a fraction of the cost of professional-grade equipment, making it accessible to serious hobbyists and professionals alike.
Strengths and Weaknesses: Strengths include exceptional accuracy, versatile slot compatibility, straightforward setup, and enhanced safety through proper alignment. The manual operation means no batteries required, and the robust construction withstands workshop abuse. Weaknesses involve the learning curve associated with reading dial indicators and the lack of digital convenience for those preferring instant numerical displays.
Bottom Line: The GOINGMAKE gauge is an indispensable tool for woodworkers prioritizing precision over digital flash. It delivers professional-grade alignment capabilities at a reasonable price point, making it a smart investment for anyone seeking to elevate their table saw’s performance.
7. ALLmeter Digital Table Saw Gauge with Dial Indicator 0-1 Inch Range,CNC Machined Aluminum Bar for Fence Alignment on Table Saws Bandsaws (Fits 3/4" or 19mm Groove Width)

Overview: The ALLmeter Digital Table Saw Gauge represents the modern approach to machinery alignment, combining a high-precision digital dial indicator with robust CNC-machined construction. This tool streamlines the calibration process for table saws, bandsaws, and router tables with its 0.01mm accuracy and real-time digital feedback.
What Makes It Stand Out: What truly distinguishes this gauge is its user-friendly digital interface. The instant unit conversion between metric and imperial, one-touch zero function, and clear LCD display eliminate interpretation errors common with analog dials. The 18cm extended rod and six adjustment holes provide exceptional versatility, while the anodized aluminum bar with three reinforced chutes ensures stability across various measurement scenarios. This isn’t just a single-purpose tool—it handles blade runout, fence alignment, and jointer parallelism with equal competence.
Value for Money: While priced at a premium compared to manual gauges, the digital convenience justifies the investment for professionals. The time saved through instant readings and the elimination of dial parallax errors offset the higher initial cost, positioning it as a worthy alternative to expensive industrial calibration equipment.
Strengths and Weaknesses: Strengths encompass the crystal-clear digital display, versatile application range, rock-solid CNC construction, and intuitive operation. The extended rod reaches difficult measurement points easily. Weaknesses include battery dependency and a price point that may deter casual hobbyists. Some users might find the digital interface less tactile than traditional dials.
Bottom Line: For professionals and serious enthusiasts who value speed and absolute precision, the ALLmeter digital gauge is a game-changing workshop addition that pays dividends through time savings and flawless alignment.
8. Dreyoo Table Saw Height Gauge, Aluminum Height Gauge Saw for Router Table, Precision Woodworking Measuring Tools Setup Cutting Blade from 1/8 to 2 Inch, 1/4" Thick for Solid Standing(Blue)

Overview: The Dreyoo Table Saw Height Gauge is a purpose-built measuring tool that simplifies one of woodworking’s most common tasks: setting accurate blade and router bit heights. Machined from quality aluminum, this blue-anodized gauge provides preset measurements from 1/8" to 2" in increments of 1/8" and 1/4" on opposing scales.
What Makes It Stand Out: This tool’s standout feature is its dual-scale design, offering both 1/8" and 1/4" increments on separate sides to accommodate different precision needs. The self-standing 1/4" thick construction allows hands-free use, while the compact footprint and hanging hole ensure convenient storage. Unlike adjustable gauges that require careful reading, this fixed-step design eliminates measurement interpretation entirely—simply match your blade to the appropriate step.
Value for Money: Positioned as an affordable alternative to digital height gauges, this tool delivers remarkable value. It costs significantly less than electronic versions while providing faster setup for standard height requirements. For woodworkers who frequently repeat common cutting depths, this gauge accelerates workflow without sacrificing consistency.
Strengths and Weaknesses: Strengths include dead-simple operation, battery-free reliability, sturdy aluminum construction, and dual-scale versatility. The anodized finish resists corrosion and looks professional. Weaknesses involve limited flexibility—you’re constrained to preset increments—and the inability to measure arbitrary heights between steps. It’s also unsuitable for alignment tasks beyond height setting.
Bottom Line: The Dreyoo gauge excels at rapid, repeatable height setups for common cutting tasks. It’s an essential time-saver for production work and a smart purchase for woodworkers who value simplicity and speed over infinite adjustability.
9. VEVOR Precision Miter Gauge, Standard Slot 3/4’’ x 3/8’’, Aluminum Alloy Table Saw Miter Gauge with 18 in Grating 15 Angle Stops Adjustable Spring Loaded Plunger and Removable Disc, for Woodworking

Overview: The VEVOR Precision Miter Gauge is a substantial upgrade from standard equipment, designed to deliver professional-grade angle accuracy for table saw operations. Engineered to fit standard 3/4" x 3/8" slots, this aluminum alloy gauge features 15 positive stops and micro-adjustment capabilities for precision woodworking.
What Makes It Stand Out: What elevates this gauge above stock versions is its comprehensive angle coverage. The laser-etched scale provides clearly visible markings, while the 15 positive stops include all common angles from 15° to 67.5° plus 90°, with proportional adjustment available for custom settings. The spring-loaded plunger adjustment system ensures zero-play fit in both T-shaped and U-shaped slots, addressing a common frustration with inferior gauges. The convex-concave grating with fine-tuning screws allows for micro-adjustments that serious woodworkers demand.
Value for Money: Mid-priced between budget models and premium brands like Incra, this gauge offers exceptional value. It delivers approximately 90% of the functionality of high-end alternatives at roughly half the cost, making professional precision accessible to advanced hobbyists and small-shop professionals.
Strengths and Weaknesses: Strengths include robust aluminum alloy construction, comprehensive positive stops, dual-slot compatibility, and easy adjustment mechanism. The partially assembled delivery reduces setup time. Weaknesses may include the need for initial fitting on some saws and the lack of incremental adjustment between stops (though proportional adjustment helps). The handle, while textured, might feel less refined than premium options.
Bottom Line: The VEVOR Precision Miter Gauge is arguably the best value proposition in its class. It transforms table saw angle cutting from approximate to exact, making it a must-have upgrade for anyone serious about accurate miter work.
10. Table Saw Height Gauge,Saw Depth Gauge,Aluminum Alloy Red Anodized Surfaces Table Saw and Bench Planes Router Height Gauge,Precision Table Saw and Router Table Tool for Alignment and Calibration

Overview: This aluminum alloy height gauge serves as a dual-purpose tool for setting both table saw blade height and router bit depth. With its vibrant red anodized finish and clear etched scales, this gauge provides measurements from 1/8" or 1/4" up to 2" in 1/4" increments, functioning as both a step gauge and depth reference.
What Makes It Stand Out: The tool’s most distinctive feature is its eye-catching red anodizing, which prevents oxidation while ensuring high visibility in busy workshop environments. The dual-function design allows it to serve as both a saw blade height gauge and router depth gauge, consolidating two tools into one compact package. The 1/4" thick construction provides stable, freestanding operation, while the hanging hole facilitates convenient storage when not in use.
Value for Money: As a budget-conscious option, this gauge delivers solid value for hobbyists and DIYers. It lacks the digital precision of electronic models but offers faster setup than ruler measurements at a fraction of the cost. For woodworkers who don’t require infinite adjustability, this tool covers the most commonly used depth settings efficiently.
Strengths and Weaknesses: Strengths include the durable aluminum alloy construction, highly visible finish, dual-purpose functionality, and straightforward operation. The compact size aids portability between workshop stations. Weaknesses involve the limitation to 1/4" increments on one side, lack of finer 1/8" resolution, and inability to measure intermediate values. It’s also unsuitable for alignment or calibration tasks.
Bottom Line: This red anodized height gauge is a practical, no-frills tool for woodworkers seeking quick, repeatable depth settings without complexity. It’s an economical choice that covers essential measurement needs for routine cutting operations.
Why Precision Matters in Table Saw Setup
The Hidden Cost of Inaccuracy
A table saw that’s out of alignment by just 0.005" doesn’t just create burn marks—it compounds errors across every cut in your project. That slightly off-kilter rip becomes a drawer box that won’t square, which becomes a cabinet that won’t close properly. Professional woodworkers understand that setup time isn’t wasted time; it’s insurance against material waste, frustration, and compromised structural integrity. Modern hardwoods and sheet goods demand tolerances tighter than ever before, especially when working with precision joinery or pre-finished materials where sanding isn’t an option.
How Feeler Gauges Solve Critical Alignment Issues
Unlike visual inspection or “good enough” measurements, feeler gauges provide tactile feedback that eliminates guesswork. When you’re checking blade-to-fence parallelism or verifying throat plate flushness, these tools translate microscopic gaps into physical sensations your fingers can detect. This direct measurement approach bypasses the parallax errors and lighting limitations that plague visual inspections. In 2026’s workshops, where digital tools often supplement rather than replace mechanical verification, feeler gauges remain the trust-but-verify backbone of serious setup protocols.
Evolution of Feeler Gauges for Woodworking Applications
From Automotive to Workshop: A Tool’s Journey
Traditional feeler gauges were designed for engine valve clearances, not woodworking machinery. The transition to workshop-specific designs began when manufacturers recognized that woodworkers needed longer blades for reaching into deep miter slots and more ergonomic handles for repetitive measurements. Today’s models feature blade profiles optimized for saw throat plates, with rounded tips that won’t scratch cast iron surfaces and lengths that accommodate even the largest cabinet saw tables. This evolution represents more than convenience—it’s a fundamental rethinking of how measurement tools interface with woodworking machinery.
Smart Features Reshaping 2026 Standards
The latest generation incorporates features that would surprise traditionalists: color-coded blades with laser-etched QR codes linking to setup videos, integrated depth stops for consistent measurements, and even NFC chips that log measurements directly to shop management apps. While purists may scoff, these additions solve real problems: they reduce setup time, create documentation trails for quality control, and help train less experienced assistants. The key is understanding which smart features genuinely enhance workflow versus those that add complexity without benefit.
Key Types of Feeler Gauges for Table Saw Applications
Traditional Blade-Style Gauges
The classic stack-of-blades design remains relevant for its simplicity and reliability. For table saw work, look for sets where individual blades measure at least 3-4 inches long, allowing you to span miter slots without your fingers interfering with the measurement. The best examples feature blades that fan out from a central pivot but lock individually, letting you combine multiple thicknesses without the stack collapsing at a critical moment. Material thickness typically ranges from 0.0015" to 0.040", covering the full spectrum of table saw adjustment needs.
Tapered Feeler Gauges for Angular Measurements
Tapered models, thicker at one end and gradually thinning to the other, excel at checking blade-to-fence parallelism across the entire length of the fence rail. By sliding the gauge along the miter slot while maintaining contact with both blade and fence, you can detect variations that would require multiple measurements with traditional blades. These gauges often feature measurement marks along their length, turning a simple gap-check into a continuous reading that reveals exactly where your alignment drifts.
Go/No-Go Gauges for Rapid Verification
For production shops where time equals money, go/no-go gauges provide instant pass/fail feedback. These typically combine two specific thicknesses—say 0.003" and 0.007"—representing acceptable tolerance limits. If the thinner gauge slides through but the thicker doesn’t, your setup is within spec. While less versatile than full sets, these specialized tools eliminate measurement interpretation and speed up routine checks between major projects.
Digital Feeler Gauge Systems
Digital models use electronic sensors to measure gap size, displaying readings on an LCD screen. The advantage isn’t just precision—it’s the ability to hold readings, switch between imperial and metric instantly, and sometimes even export data. However, they require batteries, can be fragile, and may not fit into tight spaces as easily as their mechanical counterparts. For 2026, look for models with IP67 ratings and rechargeable batteries that last months, not days.
Magnetic-Base Feeler Gauge Sets
Innovative designs now incorporate rare-earth magnets in the blade holder or even in the blades themselves. This allows hands-free positioning when checking vertical clearances or when you need both hands to adjust trunnions. The magnets must be precisely calibrated—too strong and they’ll pull the gauge off true, too weak and they’ll slip at the wrong moment. The best versions use directional magnets that engage only when you want them to.
Critical Features to Evaluate Before Buying
Material Composition and Durability
High-carbon steel remains the gold standard for feeler gauge blades, offering the right balance of flexibility and stiffness. However, premium sets now use stainless steel or even titanium-coated blades that resist corrosion from workshop humidity and wood acids. Avoid anything that feels flimsy or shows visible flex when you hold a blade horizontally—this indicates poor tempering that will lead to inaccurate measurements over time.
Measurement Range and Increment Precision
For table saw work, your set should cover at least 0.002" to 0.030" in increments no larger than 0.001". Some specialized sets include ultra-thin 0.0015" blades for checking arbor runout and thicker 0.035" blades for verifying splitter clearance. The sweet spot for most woodworkers is a set with 20-26 blades spanning this range, allowing you to measure any gap you’re likely to encounter without carrying unnecessary blades.
Legibility and Markings
Laser-etched markings that won’t rub off are non-negotiable. In 2026, look for high-contrast markings that remain readable even when covered in sawdust. Some premium sets use color-coding—blue for thousandths, red for hundredths—making it faster to grab the right blade without squinting. For metric users, ensure the set includes both systems or dedicated metric markings, not just conversion stickers that peel off.
Ergonomics and Handling
The pivot mechanism should operate smoothly with one hand while wearing gloves. Blades should fan out completely without binding, and the locking screw or lever must hold securely without crushing the blades. Consider the overall size—bulky holders won’t fit between closely spaced adjustment points. Some innovative designs feature offset handles that keep your knuckles clear of sharp blade edges during adjustments.
Protective Coatings and Corrosion Resistance
Look for blades with oil-resistant coatings that prevent staining and won’t attract dust. Anti-glare finishes reduce eye strain under bright shop lights. For humid climates, consider sets with vapor-phase corrosion inhibitor (VCI) storage cases that actively protect the tools when not in use. These details separate tools that last decades from those that become paperweights in two years.
Understanding Measurement Tolerances for Woodworking
Decoding Thou vs. Millimeters
The debate between imperial and metric measurements isn’t just preference—it’s about the math. Thousandths of an inch (thou) align naturally with many American-made saw specifications, while metric offers cleaner calculations for European machinery. Smart woodworkers in 2026 often use both: imperial for machine setup (since most adjustment screws are still imperial-threaded) and metric for project layout. Your feeler gauge set should facilitate this dual approach without forcing constant conversions.
When “Close Enough” Isn’t Close Enough
Cabinet-grade plywood with pre-finished surfaces tolerates no sanding, meaning your cuts must be perfect from the blade. A 0.003" gap in blade alignment creates a 0.006" taper over a 24" rip—enough to make a miter joint gape visibly. For joinery, errors compound: a slightly off blade leads to misaligned tenons, which leads to weak joints that fail under stress. The professionals’ secret is that they check alignment every time they change blades, not just once a month.
Industry Standards vs. Workshop Realities
Manufacturer specs often claim ±0.001" accuracy, but achieving this requires technique. Temperature variations cause cast iron to expand and contract, meaning a perfect setup at 8 AM might be off by 0.002" by afternoon. Your feeler gauge technique must account for this—always measure at working temperature, and understand that chasing perfection beyond 0.001" is often wasted effort when wood itself moves more than that with humidity changes.
Advanced Setup Applications for Feeler Gauges
Blade-to-Fence Parallelism
The classic test involves placing a gauge between a miter slot reference bar and the blade plate at the front and rear of the blade. But here’s the expert technique: use two identical gauges simultaneously, one at each end, while rotating the blade by hand to find its minimum clearance position. This eliminates runout errors and reveals true parallelism. Mark your fence rail with tape at measurement points to ensure you check the same spots every time.
Blade-to-Miter Slot Alignment
This fundamental check determines whether your crosscuts will be square. Extend the gauge through the miter slot while contacting the blade plate, sliding it from front to back. Any variation indicates trunnion misalignment. The pro move? Use a tapered gauge to map the exact deviation curve, then adjust in small increments, rechecking after each tweak. This methodical approach prevents the overshooting that plagues rushed setups.
Throat Plate Flushness Verification
A throat plate sitting 0.005" below the table creates a lip that catches workpieces and causes dangerous kickback. Conversely, one sitting proud creates alignment issues for thin stock. Use a straightedge spanning the table with feeler gauges underneath to check flushness at multiple points. For zero-clearance plates, check before and after raising the blade to ensure the plate hasn’t shifted during the cut.
Arbor Runout Detection
Mount a dial indicator on the table and place a feeler gauge between the indicator tip and the arbor flange. Rotate the arbor by hand, using the gauge as a consistent contact point. Variation in the gauge’s slide indicates runout. This combination approach—using the gauge for consistent positioning and the dial indicator for precise measurement—provides a level of accuracy neither tool achieves alone.
Splitter and Riving Knife Positioning
Post-installation checks with feeler gauges ensure your splitter aligns perfectly with the blade kerf. Check both side-to-side position and vertical height relative to the blade teeth. A common mistake is aligning only at one point; instead, verify along the entire splitter length. For riving knives that raise and lower with the blade, check alignment at multiple blade heights to ensure the mechanism tracks true.
Digital vs. Analog: Making the Right Choice
The Case for Traditional Mechanical Gauges
Analog gauges never need batteries, won’t glitch, and provide instant tactile feedback that builds intuition. They fit into tighter spaces, cost significantly less, and last generations with minimal care. For most woodworkers, a high-quality mechanical set handles 95% of setup tasks more reliably than digital alternatives. The physical act of feeling the gauge slide through a gap trains your fingers to detect variations that digital tools might miss.
When Digital Integration Makes Sense
Digital gauges shine in production environments requiring documentation for quality control. If you need to prove a machine was within spec for a client’s project or track wear patterns over time, digital logging is invaluable. They’re also excellent for woodworkers with vision limitations or those working in poor lighting. The key is choosing a model with a physical “feel” mode that vibrates or beeps when reaching a set dimension, combining digital precision with tactile feedback.
Hybrid Approaches for Maximum Versatility
Smart woodworkers in 2026 often own both: a premium mechanical set for daily use and a digital gauge for troubleshooting and documentation. Some manufacturers now offer mechanical sets with QR codes on each blade—scan with your phone to log which blade you used, creating a digital paper trail without electronic components in the tool itself. This approach provides the reliability of analog with the traceability of digital.
Calibration and Maintenance Best Practices
Zero-Point Verification Techniques
Even new gauges can be off due to manufacturing tolerances or shipping damage. Verify accuracy by measuring a known standard—a gauge block or micrometer-standard. Check several blades across the set, especially those you use most frequently. For digital gauges, compare readings against a trusted mechanical gauge at multiple points. Document any deviations; if a blade is consistently off by more than half its marked increment, it’s time for replacement.
Cleaning and Storage Protocols
Never wipe blades with oily rags that attract dust. Instead, use dry microfiber cloths or specialized tool wipes that leave no residue. Store gauges in their original case with desiccant packs to control humidity. For heavy use, consider ultrasonic cleaners that remove embedded pitch and resin without abrasion. After cleaning, fan all blades out to air dry completely before storage—trapped moisture between blades causes rust that ruins accuracy.
When to Replace vs. Recalibrate
Blades that show nicks, bends, or visible wear at the tips must be replaced—they’ll never provide accurate measurements again. However, minor surface corrosion can sometimes be cleaned without affecting precision. The rule of thumb: if you can feel a burr with your fingernail, replace the blade. For digital gauges, recalibrate according to manufacturer schedules, typically every 6-12 months for professional use. If calibration fails or readings become erratic, replacement is usually more cost-effective than repair.
Integration with Modern Table Saw Accessories
Using Feeler Gauges with Dial Indicators
The synergistic relationship between these tools defines professional setup routines. Use feeler gauges to establish a consistent starting gap, then employ the dial indicator for precise measurement of variation. This approach eliminates the trial-and-error of adjusting while watching a dial jump around. Some woodworkers create custom fixtures that hold both tools simultaneously, allowing single-handed operation while the other hand makes adjustments.
Combining with Straightedges and Squares
A precision straightedge spanning the table combined with feeler gauges underneath reveals high and low spots in cast iron surfaces. This technique identifies whether your alignment issues stem from blade position or table flatness. For checking blade squareness to the table, use a machinist’s square against the blade plate with feeler gauges detecting any gap. This method is more accurate than relying on the square’s edge alone, especially with used or lower-quality squares.
Smartphone Apps and Documentation
While we avoid specific product recommendations, the trend toward app integration is undeniable. Some woodworkers photograph their gauge in position, using apps to annotate measurements directly on the image. Others maintain digital setup logs, recording which blades were used for each verification point. This creates a maintenance history that reveals patterns—like a saw that always needs readjustment after cutting particularly resinous woods.
Safety Considerations During Setup
Power Down and Lockout Procedures
Never measure while the blade is powered, even by accident. Unplug the saw and use lockout tags if others have shop access. The temptation to “just check one thing” while the machine is idle has led to countless injuries. Develop a ritual: unplug, verify power is dead with a test light, then proceed with measurements. This discipline becomes even more critical when using magnetic gauges that could accidentally contact live electrical components.
Handling Sharp Blades and Narrow Gaps
Feeler gauge blades are thin and can slice fingers surprisingly easily. Always handle them by the holder, not the individual blades. When measuring near sharp blade teeth, use the gauge’s protective sleeve or wear cut-resistant gloves. For checks requiring insertion between blade and fence, consider using a gauge with a bent tip that keeps your fingers further from the cutting edge. Remember: a feeler gauge slipping from your grip can become a projectile if it contacts a spinning blade.
Protecting Your Investment and Your Fingers
Store gauges away from high-traffic areas where they could be knocked onto the floor, creating invisible bends that ruin accuracy. Never use feeler gauges as pry bars or scrapers—this seems obvious until you’re frustrated during a difficult adjustment. The cost of a proper pry tool is far less than replacing a precision gauge set or repairing a damaged saw. Treat these tools as the precision instruments they are, not as general shop utility knives.
Budget vs. Premium: What You’re Really Paying For
Entry-Level Options for Hobbyists
Budget sets under $25 can be surprisingly accurate for occasional use. They typically use lower-grade steel that may rust faster and have stamped rather than laser-etched markings. For a hobbyist making a few cuts per month, these limitations matter less than the price difference. The key is recognizing their limitations: check critical measurements with multiple blades to verify consistency, and replace the set if you notice any blades that don’t lay flat or slide smoothly.
Professional-Grade Features Worth the Investment
Premium sets costing $75-150 offer blades machined from tool steel, tolerances certified to ±0.0002", and cases that protect against moisture and impact. They include specialty blades for specific table saw tasks and often come with calibration certificates traceable to NIST standards. For professionals, this investment pays for itself in reduced setup time, fewer rejected parts, and tools that remain accurate for years of daily use. The difference isn’t just accuracy—it’s confidence.
The False Economy of Cheap Tools
A $15 gauge set that gives false readings can cost hundreds in ruined material and wasted time. Consider the total cost: if you spend 30 extra minutes per setup fighting a cheap gauge, and you set up twice weekly, that’s 52 hours annually—more than a full workweek lost to poor tools. Premium gauges also retain value; a well-maintained professional set can be resold for 60-70% of its purchase price, while cheap sets go straight to the landfill.
Common Mistakes That Ruin Accuracy
Applying Excessive Pressure
The most frequent error is forcing a gauge that doesn’t fit. Proper technique uses just enough pressure to feel slight drag—like pulling a thread through fabric. Too much force bows the blade, giving false readings and permanently deforming thin gauges. Practice with known gaps: measure a stack of feeler gauges held together with a clamp, then check your “feel” against the actual sum. This calibration of touch takes time but is essential for reliable measurements.
Temperature and Humidity Effects
Steel gauges expand and contract with temperature changes. A 0.002" blade can change by 0.0001" with a 20°F temperature swing—enough to matter in critical setups. Always let gauges acclimate to shop temperature before use, and never store them in unheated spaces. Humidity causes rust that increases blade thickness unevenly; use VCI storage or keep a dehumidifier in your tool chest. For ultimate accuracy, note the shop temperature in your setup log and measure at consistent times of day.
Contamination and Debris Interference
A single wood chip or drop of dried pitch between blades creates a gap that throws off every measurement. Clean gauges before and after each use, especially when working with sappy woods like pine or aromatic cedar. Compressed air can force debris deeper between blades; instead, use a soft brush or dedicated tool blower. For pitch removal, soak in a mild solvent, never scrape with metal tools that could scratch the precisely ground surfaces.
Future-Proofing Your Purchase for 2026 and Beyond
Modular Systems and Expandability
Look for gauge sets designed to accept additional blades as your needs evolve. Some systems use standard holder sizes, allowing you to purchase specialty blades individually rather than buying complete new sets. This is particularly valuable as table saw designs evolve—new blade sizes or splitter configurations may require gauges outside traditional ranges. A modular system grows with your shop, while a fixed set becomes obsolete.
Compatibility with Emerging Standards
The push toward metric measurements in woodworking continues, even in the US. Ensure any imperial set you buy includes metric equivalents or consider a true dual-scale set. Some 2026 models feature blades with both systems marked, eliminating conversion errors. Also consider compatibility with digital measurement ecosystems—sets that include reference numbers linking to online calibration data or technique videos future-proof your investment as documentation becomes standard practice.
Warranty and Manufacturer Support
Premium manufacturers now offer warranties that cover accuracy, not just defects. If a blade is found to be out of spec, they’ll replace it free. This matters because feeler gauges are wear items; even with perfect care, they eventually need replacement. Check whether the manufacturer sells individual replacement blades—a company that forces you to buy complete sets when one blade fails doesn’t deserve your loyalty. In 2026, look for brands offering at least a 5-year accuracy guarantee.
Building a Complete Setup Workflow
Step-by-Step Verification Sequence
Professional setup follows a logical order: start with table flatness, then miter slot alignment, then blade parallelism, then fence alignment, and finally accessory positioning. Using feeler gauges at each stage creates a comprehensive picture of your saw’s condition. Document each measurement with photos or notes, creating a baseline that reveals drift over time. This sequence prevents the circular adjustments that happen when you check items in random order—adjusting the fence before ensuring the blade is true, for example, wastes time and leads to frustration.
Documentation and Repeatability
Create a setup card for each saw, listing the specific gauge thicknesses used for each check point. Laminate it and keep it with the saw. This ensures you (or anyone else) repeat the exact same measurements every time, making trends visible. Note the date, ambient temperature, and any observations. Over months, this log becomes invaluable for predictive maintenance—you’ll know it’s time to service trunnions before the saw starts producing poor cuts.
Training Assistants and Shop Helpers
If you have employees or family members helping in the shop, standardized feeler gauge procedures ensure consistency. Create simple go/no-go fixtures using blocks and gauges that remove interpretation—if the gauge fits, the setup is correct. This empowers others to perform routine checks without your direct supervision while maintaining your quality standards. The best shops have visual guides posted near each machine, showing exactly how and where to place gauges during verification.
Frequently Asked Questions
What’s the minimum number of blades I need for basic table saw setup?
For most hobbyists, a 20-blade set covering 0.002" to 0.025" in 0.001" increments handles 90% of alignment tasks. Add a single 0.0015" blade for arbor runout checks and you’re set. Avoid smaller 10-12 blade sets—they force you to stack blades for common measurements, increasing error.
Can I use automotive feeler gauges for my table saw?
Technically yes, but they’re not ideal. Automotive gauges are often too short to reach deep miter slots and may lack the fine increments woodworkers need. They also typically skip the ultra-thin sizes critical for arbor runout. If you already own them, they’ll work in a pinch, but purpose-built woodworking sets pay dividends in ease of use and accuracy.
How often should I check my table saw alignment with feeler gauges?
Check blade-to-fence parallelism every time you change blades or after cutting hardwoods thicker than 2". Full alignment checks including miter slots and throat plate should happen monthly for frequent users, quarterly for hobbyists. Always check after moving the saw or after any impact, even minor bumps from cleaning.
Why do my measurements vary when I check the same gap multiple times?
Inconsistent pressure is the culprit. Practice the “thread-pulling” technique until it becomes muscle memory. Also ensure your gauge blades are perfectly clean and the gap itself is free of debris. Temperature changes between measurements can affect both the gauge and the cast iron table—always measure at consistent shop temperature.
Are digital feeler gauges more accurate than mechanical ones?
Not inherently. Quality mechanical gauges offer ±0.0002" accuracy, matching most digital models. Digital advantages lie in ease of reading and data logging, not fundamental precision. For most woodworking, mechanical gauges are actually more reliable since they can’t suffer electronic drift or battery failure at critical moments.
What’s the best way to store feeler gauges in a humid shop?
Use the original case with desiccant packs, replacing the desiccant monthly in humid climates. Store in a climate-controlled area if possible. For extreme conditions, consider a sealed container with a rechargeable dehumidifier rod. Never store them loose in a toolbox where they’ll absorb moisture and contact other tools.
Can I sharpen or repair damaged feeler gauge blades?
No. Any attempt to sharpen or straighten a bent blade alters its thickness, destroying accuracy. Replace individual blades if the manufacturer offers them, or replace the entire set if damage is widespread. The precision grinding required for accurate thickness cannot be replicated with shop tools.
How do I know if my feeler gauges are still accurate?
Check them against a micrometer or gauge blocks annually. Stack several blades and measure the total with a caliper—the sum should equal the individual thicknesses within the gauge’s stated tolerance. If you don’t have calibration standards, compare readings between multiple blades of the same marked size; they should feel identical when sliding through the same gap.
What’s the difference between “plus” and “minus” tolerance gauges?
Plus tolerance gauges are manufactured slightly thicker than marked (typically +0.0001"), while minus tolerance gauges are slightly thinner. Most woodworking sets are nominal or minus tolerance, ensuring they fit in gaps at least as large as marked. For go/no-go testing, having both types allows you to create precise tolerance windows—for example, a 0.005" minus gauge should fit while a 0.005" plus gauge should not.
Should I buy individual specialty gauges or a comprehensive set first?
Start with a comprehensive 20-26 blade set. Specialty gauges like tapered or go/no-go models solve specific problems but aren’t versatile enough for general shop use. Once you’ve mastered basic alignment with a full set, you’ll understand which specialty tools would actually improve your workflow. Most woodworkers find they rarely need more than a good general-purpose set and perhaps one tapered gauge for fence alignment.
See Also
- How to Choose the 10 Best Feeler Gauges for Table-Saw Setups in 2026
- 10 Expert-Recommended Feeler Gauges for Table-Saw Blade Alignment in 2026
- 10 Feeler Gauges for Table-Saw Blade Alignment in 2026
- 10 Game-Changing Safety Ear Muffs for Table Saw Users in 2026
- 10 Most Durable Depth Gauges After 6 Months of Table-Saw Abuse in 2026