Table of Contents
When you’re jointing boards that stretch beyond 48 inches, the rules of precision change dramatically. That beautiful 24-inch straight edge that serves you perfectly for cabinet doors becomes laughably inadequate when you’re aligning tabletops, long bench slabs, or architectural panels. The challenge isn’t just about having a longer tool—it’s about managing deflection, thermal expansion, and microscopic deviations that compound across greater distances. As we look toward 2026, woodworkers are increasingly tackling larger projects in smaller shop spaces, making the choice of a long straight edge more critical than ever. This guide will walk you through everything you need to know before investing in this essential layout and verification tool, from understanding tolerance standards to future-proofing your purchase against evolving workshop technologies.
Top 10 Long Straight Edges Jointing
Detailed Product Reviews
1. SICWOOD Extra Long 3" Straight Plunge Router Bit 1/2" Shank, Carbide-Tipped 2-Flute Bit for Deep Wood Grooving, Slotting & CNC Machining

Overview: The SICWOOD Extra Long 3" Straight Plunge Router Bit is a specialized tool for deep woodworking operations. Its 3-inch cutting depth enables single-pass grooving, slotting, and mortising in thick stock that standard bits cannot handle. Built for professionals in cabinet making, furniture building, and CNC machining, this carbide-tipped bit cuts hardwoods, softwoods, plywood, and MDF with precision.
What Makes It Stand Out: The 3-inch cutting length is the star feature, eliminating multiple passes that introduce alignment errors. Premium carbide edges maintain sharpness and resist heat, while the 1/2-inch shank provides critical rigidity to minimize vibration during deep cuts. This stability is essential for clean, accurate results in demanding applications like sign making and timber framing. The bit’s ability to handle various materials makes it versatile for shop-wide use.
Value for Money: Priced at a premium, this bit justifies its cost for professionals who regularly work with thick stock. It saves significant time by enabling single-pass cuts and outlasts high-speed steel alternatives. For occasional users, the investment may be harder to justify, but for those needing consistent deep-groove capability, it eliminates the expense of multiple shorter bits or alternative methods.
Strengths and Weaknesses: Strengths include exceptional cutting depth, durable carbide construction, stable 1/2-inch shank, and versatility across materials. It excels in both handheld and CNC routers. Weaknesses: requires a powerful router (2+ HP), demands careful feed rates to avoid overheating, and costs more than standard bits. Proper workpiece clamping is mandatory for safety.
Bottom Line: The SICWOOD bit is a must-have for serious woodworkers tackling deep-cut projects regularly. Its depth, durability, and stability deliver professional results worth the premium price. Casual hobbyists should verify their router’s power and project frequency before investing.
2. JET 6-Inch Long Bed Jointer, Straight Knife Cutterhead, 1 HP, 115/230V 1Ph (JJ-6CSDX)
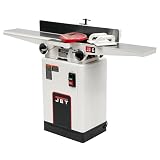
Overview: The JET JJ-6CSDX 6-Inch Long Bed Jointer is a professional-grade machine built for precision jointing of boards up to six inches wide. Its 1 HP motor and exclusive three-knife cutterhead system deliver flat, square edges and faces. The 56-inch cast iron table length provides excellent support for long stock, while the heavy-duty steel closed stand ensures stability during operation.
What Makes It Stand Out: JET’s exclusive auto-set quick-change knife system is the defining feature, reducing blade change time and guaranteeing perfect alignment without tedious adjustments. The 56-inch total table length minimizes snipe on long boards—a common jointer problem. Center-mounted fence controls allow convenient adjustments from the working position. The built-in 1/2-inch rabbeting ledge adds versatility for edge profiles and rabbets without extra accessories.
Value for Money: Priced in the mid-to-high range, this jointer justifies its cost through significant time savings and robust construction. The quick-change knife system alone pays dividends for frequent users. While more expensive than benchtop models, its cast iron tables and steel stand offer durability and stability that cheaper alternatives lack. The dual voltage motor adds shop flexibility, making it a solid long-term investment.
Strengths and Weaknesses: Strengths: innovative auto-set knives, long tables reducing snipe, powerful motor, convenient fence controls, stable stand, and built-in rabbeting capability. It handles hardwoods effectively and excels at precision work. Weaknesses: 6-inch width capacity limits larger projects; 1 HP motor may struggle with very dense stock; substantial weight requires permanent placement; lacks helical cutterhead option some competitors offer.
Bottom Line: The JET JJ-6CSDX is ideal for serious woodworkers and furniture makers prioritizing precision and efficiency. Its quick-change knife system and long bed deliver professional results that justify the price. For those regularly processing wide boards, an 8-inch model may be better, but for typical cabinet and furniture work, this jointer is an outstanding, reliable choice.
Why 48+ Inches Changes Everything for Jointing Accuracy
The moment your project crosses the four-foot threshold, you’re playing a different game. A deviation of just 0.001 inch per foot translates to nearly 0.005 inches over 60 inches—enough to create visible gaps in fine furniture or cause alignment issues in segmented work. Long straight edges serve as your reality check against the cumulative errors that naturally occur when machining lengthy stock. They become reference standards that reveal whether your jointer’s tables are truly coplanar, if your hand-planing technique is maintaining true flatness, or if that beautiful slab has hidden twist that will haunt you during glue-up. The weight of the tool itself, environmental stability, and even how you support it during use all become factors that simply don’t matter at shorter lengths.
Understanding Straight Edge Fundamentals for Large-Scale Work
The Physics of Deflection
A 60-inch straight edge behaves more like a structural beam than a simple measuring tool. When supported only at its ends, its own weight causes it to sag in the center—a phenomenon called self-deflection. Premium long edges account for this through careful material selection and cross-sectional geometry. The most effective designs increase rigidity without adding prohibitive weight, typically using I-beam profiles, boxed sections, or tapered geometries that place more mass at the edges where it’s needed for stiffness. Understanding this principle helps you recognize why that lightweight aluminum yardstick from the hardware store will never deliver jointing-grade accuracy.
Reference vs. Working Edges
Long straight edges typically feature two distinct edges: a reference edge and a working edge. The reference edge is the precision surface, often marked or protected, that should only contact your work during verification. The working edge might include bevels, markings, or a different finish that makes it suitable for general layout tasks. This distinction preserves the integrity of your critical surface while giving you a versatile tool for everyday use. In 2026, we’re seeing more manufacturers laser-etch subtle markings along the working edge while leaving the reference edge completely pristine.
Material Matters: Comparing Straight Edge Construction
Tool Steel: The Traditional Gold Standard
Tool steel straight edges represent the pinnacle of durability and stability. These instruments, often hardened to Rc 50-60, resist wear and maintain their form exceptionally well. The density of steel—roughly 0.284 pounds per cubic inch—provides natural damping characteristics that minimize vibration during use. However, this heft becomes a liability at extended lengths; a 72-inch steel straight edge can weigh 15-20 pounds, making it cumbersome to maneuver and potentially dangerous if dropped. The thermal expansion coefficient of steel (about 6.5 microinches per inch per degree Fahrenheit) means temperature control in your shop becomes crucial for repeatable accuracy.
Cast Iron: Stability Through Mass
Cast iron offers superior vibration damping and excellent long-term stability once properly aged. The material’s graphite structure absorbs micro-vibrations that could affect your readings. Modern cast iron straight edges often feature ribbed or hollow designs that reduce weight while maintaining rigidity. The downside? Cast iron is brittle—a drop on a concrete floor can fracture the tool. It also requires diligent rust prevention, especially in humid climates. For 2026, expect to see more cast iron edges with advanced polymer coatings that provide corrosion resistance without affecting dimensional stability.
Aluminum Alloys: Lightweight Precision
Aircraft-grade aluminum (typically 6061-T6 or 7075-T6) offers an appealing compromise between weight and stiffness. A 60-inch aluminum straight edge might weigh just 4-6 pounds, making it far more manageable in cramped shops. The trade-off comes with thermal expansion—aluminum expands at nearly twice the rate of steel—which means you must acclimate the tool to your shop temperature before critical work. Some premium aluminum edges now feature carbon fiber reinforcement along the neutral axis, creating hybrid tools that leverage both materials’ strengths.
Engineered Composites: The Emerging Category
Carbon fiber and granite composite straight edges are gaining traction for their exceptional stiffness-to-weight ratios and minimal thermal expansion. These materials don’t come cheap, but they represent the future of ultra-precise layout work. Carbon fiber’s near-zero coefficient of thermal expansion makes it ideal for climate-controlled shops or outdoor timber framing where temperature swings are inevitable. The primary drawback is vulnerability to impact damage—carbon fiber can delaminate if struck, and repairs are seldom feasible.
Precision Tolerances: What “Straight” Actually Means
Understanding Grade Classifications
Straight edges are classified by their deviation from perfect straightness, typically measured in microinches or ten-thousandths of an inch. A Grade AA (master grade) tool might be certified to ±0.00002 inch over its entire length, while a Grade A (inspection grade) could be ±0.00005 inch. For jointing work, Grade A is generally sufficient—your hand plane can’t maintain master-grade tolerances anyway. However, if you’re verifying machine tables or doing high-end architectural work, the extra precision of Grade AA provides meaningful confidence.
The Light Gap Test Standard
The traditional method for checking straightness involves placing the edge against a reference surface and looking for light gaps. Under proper lighting, you shouldn’t see any light passing through when using a tool rated for jointing work. However, this subjective test has limitations—your eye can detect gaps as small as 0.0005 inches under ideal conditions, but that’s not precise enough for critical work. Modern verification often uses feeler gauges or dial indicators for quantifiable results.
Length Considerations: Sizing Your Straight Edge Correctly
The 1.5x Rule for Jointing
For jointing applications, your straight edge should be at least 1.5 times the length of the workpiece you’re checking. This ensures you can rock the tool across the entire surface to detect any wind or twist. If you routinely work with 60-inch panels, a 72-inch or 96-inch straight edge becomes necessary. Some craftspeople prefer a full 2x length for complex glue-ups where multiple boards need simultaneous verification.
Storage Reality Checks
Before falling in love with that 96-inch monster, honestly assess your shop space. Can you store it vertically without risk of damage? Do you have a wall long enough to mount protective brackets? Some 2026 solutions include segmented straight edges with precision joints that allow disassembly for storage, though these require careful handling to maintain accuracy at the connections. Another approach is the “two-tool system”—a 48-inch edge for everyday use and a longer one reserved for specific projects.
Profile and Ergonomics: How Shape Affects Performance
Beveled vs. Square Edge Profiles
A beveled reference edge (typically 30-45 degrees) concentrates contact along a narrow line, making deviations more apparent during light-gap tests. This profile also reduces friction when sliding the tool across surfaces. Square edges provide more stable contact for certain layout operations but can obscure subtle variations. For jointing work, a beveled reference edge is almost universally preferred—it amplifies your ability to detect high spots that would interfere with a tight glue joint.
Handling Features
Long straight edges should include thoughtful grip points that don’t interfere with the reference surface. Look for recessed handles, through-holes for hanging, or removable end caps that protect the precision edges during transport. Some designs incorporate magnetic strips that allow temporary attachment to steel surfaces—handy for solo work on large panels. The tool’s balance point matters too; a well-designed straight edge feels lighter than its actual weight because it pivots naturally in your hands.
Surface Finish and Friction Characteristics
Surface Roughness Specifications
The reference edge’s finish directly impacts its ability to reveal imperfections. A surface roughness of Ra 8-16 microinches (0.2-0.4 micrometers) provides the right balance—smooth enough to glide across wood without catching, yet not so polished that it creates suction or sticks to slightly damp stock. Some manufacturers apply micro-texturing through chemical etching or fine abrasive blasting to achieve consistent friction characteristics across different materials.
Protective Coatings
While bare metal provides the ultimate reference surface, protective coatings have evolved significantly. Thin-film ceramic coatings, measuring just 2-3 microns thick, offer rust protection without measurably affecting dimensions. These coatings also reduce friction and prevent the dark gray marks that steel tools can leave on light woods. For 2026, expect more options with user-replaceable edge guards—thin strips of UHMW plastic that snap onto the reference edge during storage or transport.
Certification, Calibration, and Traceability
Understanding Calibration Certificates
A proper calibration certificate for a long straight edge should document measurements taken at multiple points along its length, not just the ends. Look for certificates traceable to NIST (National Institute of Standards and Technology) or equivalent national bodies. These documents should include temperature and humidity conditions during calibration, giving you a baseline for your own shop environment. Reputable manufacturers recalibrate their masters annually, and some offer lifetime calibration services for premium tools.
In-Shop Verification Standards
Even certified tools can be damaged in shipment or through use. Establishing your own verification routine using a known-good surface plate or another straight edge is prudent practice. The cross-checking method—comparing two straight edges against each other and looking for rocking or gaps—reveals which tool, if either, has developed a problem. Document these checks in a shop log to track tool performance over time.
Storage, Handling, and Workshop Integration
Vertical vs. Horizontal Storage
The eternal debate: store your straight edge hanging vertically to prevent sag, or lay it flat to avoid stress concentrations? The answer depends on your tool’s design. Most modern long edges are engineered for vertical storage when supported at multiple points along their length. Use padded brackets spaced no more than 24 inches apart, and ensure the wall is true—storing against a bowed wall will slowly deform your tool. If horizontal storage is your only option, support the entire length on a flat surface with the reference edge facing up, never resting on the precision surface.
Temperature Acclimation Protocols
Bringing a cold straight edge into a warm shop (or vice versa) requires patience. Allow at least one hour per foot of length for thermal equilibrium before critical measurements. Some shops keep their precision tools in insulated cabinets that maintain stable temperature year-round. For 2026, we’re seeing integrated temperature sensors in high-end straight edges that alert you when the tool has reached shop temperature and is ready for use.
Cost vs. Value: Investment Strategies for 2026
The False Economy of Budget Options
A $50 straight edge from a discount tool retailer might look tempting, but its tolerance stack-up over 48+ inches makes it useless for serious jointing work. The money saved will be lost in wasted material, failed glue-ups, and frustration. That said, you don’t need to buy the most expensive option either. Mid-range tools from established manufacturers often deliver 90% of the performance at 50% of the cost of master-grade instruments. The key is understanding which features matter for your specific work and which are marketing fluff.
Total Cost of Ownership
Factor in calibration costs ($75-150 per session for long edges), protective cases, and wall-mounting hardware when budgeting. A $400 straight edge that includes lifetime calibration and a damage warranty often represents better value than a $300 tool with no support. Consider resale value too—quality straight edges hold their worth remarkably well, while cheap ones become shop clutter.
Safety Protocols for Oversized Layout Tools
Drop and Impact Prevention
A 72-inch straight edge falling from bench height can break toes, damage floors, and render the tool worthless in an instant. Always carry long edges vertically with both hands, keeping the ends in your peripheral vision to avoid hitting doorways or machinery. When working alone on large panels, use non-marring clamps to temporarily secure the straight edge rather than balancing it precariously. Some shops install ceiling-mounted trolleys that allow sliding long tools safely across the workspace.
Personal Protective Equipment
While not power tools, long straight edges demand respect. Steel-toed boots are non-negotiable when handling anything over 48 inches. Cut-resistant gloves with good grip help prevent drops, and safety glasses protect against metal splinters if you ever need to deburr a damaged edge. The sharp corners of some profiles can cause nasty cuts; consider having the edges slightly broken (0.010 inch chamfer) by the manufacturer if you find them too aggressive.
Workflow Efficiency: Incorporating Long Edges into Your Process
The Three-Check System for Jointing
Develop a consistent routine: first check your machine tables with the straight edge, then verify your board’s reference face, and finally confirm the jointed edge before glue-up. This systematic approach prevents compound errors. Mark your boards with cabinetmaker’s triangles and note which face was verified against the straight edge—this documentation saves hours of rework if something shifts during clamping.
Jigs and Accessories
Dedicated straight edge guides can transform your long edge into a versatile system. Consider investing in precision angle brackets that clamp to your straight edge, allowing you to check for square across wide panels. Some woodworkers build dedicated stands that support the straight edge at perfect 90-degree orientation to the bench, making it easier to check board edges without assistance.
Common Pitfalls When Working with Extended Straight Edges
The Rocking Misinterpretation
A common mistake is assuming any rocking indicates a curved straight edge. In reality, a perfectly straight edge will rock on a board with twist or wind—the rocking reveals the work’s imperfection, not the tool’s. Learn to differentiate between a tool that rocks consistently (indicating it’s curved) versus one that rocks only in specific orientations (revealing board twist). This nuance separates novice users from seasoned craftspeople.
Pressure Points and Reading Errors
Applying uneven pressure when checking for flatness creates false readings. The tool’s own weight should provide sufficient contact pressure; additional force only induces deflection. Practice a light touch, and if you must apply pressure, do so directly over support points. Another error is checking in poor lighting—always position yourself so light passes between the tool and work, making gaps visible. A simple LED task light on an articulating arm revolutionizes your ability to see subtle variations.
Maintenance and Recalibration Schedules
Cleaning Protocols
Never use abrasive pads on your reference edge. A soft cloth with isopropyl alcohol removes oils and debris without affecting the surface. For cast iron tools, apply a light coat of camellia oil or paste wax after cleaning, buffing thoroughly to prevent transfer to your workpiece. Store silica gel packs in your tool cabinet to control humidity, especially if your shop isn’t climate-controlled.
When to Recalibrate
After any drop or impact, recalibration is mandatory. Even if you can’t see damage, internal stresses may have shifted. For regular use, schedule professional calibration every two years for inspection-grade tools, annually for master-grade. Between professional checks, perform monthly cross-checks against a surface plate or another verified straight edge. Document everything—this paper trail proves invaluable if you ever need warranty service.
Future-Proofing Your Purchase: Trends Shaping 2026 and Beyond
Integrated Measurement Technology
The line between straight edge and digital measurement tool is blurring. We’re seeing prototypes with embedded capacitive sensors that can quantify gaps digitally, displaying measurements on a smartphone app via Bluetooth. While these features don’t replace traditional visual checks, they provide hard data for quality control documentation. Some systems even log temperature and humidity during measurements, creating a complete environmental profile for critical work.
Sustainable Manufacturing
Environmental consciousness is driving innovation in materials and production. Recycled aluminum alloys with performance matching virgin material are entering the market. Some manufacturers are experimenting with bio-based epoxy composites that offer carbon fiber’s stability without petroleum-derived feedstocks. These green options command premium prices but appeal to environmentally focused craftspeople and may become standard as regulations tighten.
Customization and Modularity
The one-size-fits-all approach is giving way to configurable systems. Imagine a straight edge where you can swap end caps—one set with integrated levels, another with magnetic mounts, a third with protective bumpers. This modularity extends tool life and adapts to evolving needs. 3D printing is enabling custom accessories that clip onto standard straight edges, creating personalized solutions for unique workflows.
Verification Techniques: Testing Your Straight Edge at Home
The Flip Test Method
Here’s a reliable home test: Place your straight edge on a flat surface (even a reasonably true workbench). Slide a thin feeler gauge under the center—if it passes, you have sag. Now flip the straight edge over and repeat. If the feeler gauge passes on both sides, your tool is curved. If it passes on only one side, your bench is the problem. This simple test reveals whether your straight edge is trustworthy without requiring expensive equipment.
Using a Dial Indicator Setup
For quantitative verification, mount a dial indicator to a sturdy base and slide your straight edge beneath it, supported on two equal-height blocks at its ends. The indicator will reveal total deviation as you traverse the length. Repeat with the straight edge flipped to check both reference edges. This method gives you actual numbers rather than subjective assessments, helping you decide when professional recalibration is truly needed.
Frequently Asked Questions
What’s the minimum length straight edge I need for jointing 48-inch boards?
For reliable jointing checks, select a straight edge at least 72 inches long. This 1.5x rule allows you to rock the tool across the entire board surface to detect twist and wind, ensuring your jointed edges will mate perfectly during glue-up.
Is a steel or aluminum straight edge better for large panel work?
Steel offers superior stability and durability but becomes heavy above 60 inches. Aluminum’s light weight makes it practical for daily use, though you’ll need to account for greater thermal expansion. For most woodworkers, a high-quality aluminum edge with reinforced geometry provides the best balance.
Can I make my own long straight edge and achieve professional results?
While skilled craftspeople can create functional straight edges, achieving jointing-grade accuracy over 48+ inches requires specialized lapping equipment and verification tools. The time and material costs often exceed purchasing a manufactured tool, and you won’t have traceable certification for client work.
How should I store a 72-inch straight edge in a small shop?
Vertical wall storage with padded brackets spaced every 18-24 inches is ideal. If wall space is limited, consider a ceiling-mounted rack or a custom cabinet with full-length support. Never lean it in a corner—gravity will eventually cause sag.
Will temperature changes in my shop affect measurement accuracy?
Absolutely. A 20°F temperature swing can change a 72-inch aluminum straight edge’s length by nearly 0.020 inches. Allow tools to acclimate for at least one hour per foot of length after significant temperature changes, and document your shop’s typical temperature range when making critical measurements.
What’s the difference between a straight edge and a winding stick?
Winding sticks are shorter, paired tools used specifically for detecting twist by comparing opposite ends of a board. A long straight edge serves this function and many others—it checks flatness, verifies machine tables, and acts as a layout reference. One quality long edge can replace several shorter winding sticks.
How much should I expect to spend on a quality 60-inch straight edge?
Expect to invest $200-400 for a professional-grade aluminum edge, $400-800 for tool steel, and $800+ for composites or master-grade instruments. This price includes proper certification and typically reflects a tool that will last decades with proper care.
How often do I need to recalibrate my straight edge?
With normal use, professional calibration every 2-3 years suffices for inspection-grade tools. Perform monthly cross-checks at home using the flip test or dial indicator method. After any drop, impact, or if you notice inconsistent results, recalibrate immediately.
Can I use my long straight edge for tasks other than jointing?
Definitely. These tools excel at verifying table saw flatness, setting up jointers, checking assembly squares, and as guides for circular saws or routers when paired with clamps. Just protect the reference edge and clean it thoroughly after contact with machinery to prevent abrasive damage.
Are digital straight edges worth the premium price?
Digital features that quantify gaps and log measurements are valuable for production shops requiring documentation, but they don’t replace the craftsman’s eye and feel. For most woodworkers, a traditional precision edge plus good technique delivers better results than relying on digital readouts. The technology is exciting but still maturing—wait for second-generation products if you’re not running a commercial operation.
See Also
- 10 Long-Length Straight Edges for Jointer Setup Precision in 2026
- 10 Long Straight Edges for Table-Sled Alignment Without Sag
- 10 Must-Have Straight Edges for Edge-Jointing Without a Jointer in 2026
- The 10 Ultimate Straight Edges for Table-Top Flatness Checks in 2026
- 10 Best Value Straight Edges for Checking Board Flatness Under $40 in 2026