Table of Contents
The world of miniaturism demands a level of precision that often feels almost impossible. When you’re working with furniture that’s smaller than a postage stamp or architectural details measured in millimeters, every tool in your arsenal must earn its place. Wood stain pens have quietly become the secret weapon of elite miniaturists, transforming what was once a messy, imprecise process into something that feels almost like painting with a single hair. As we look toward 2026, these tools aren’t just getting better—they’re fundamentally changing how we approach wood finishing at scale, offering control that traditional brushes and rags simply cannot match.
Whether you’re restoring a Victorian dollhouse, crafting a 1:48 scale workshop, or building a tiny library complete with aging shelves, the right staining technique separates the amateur from the master. Wood stain pens deliver pigment exactly where you want it, allowing you to create realistic wood grain, age corners naturally, and add depth to tiny surfaces without the risk of oversaturation. But not all stain pens are created equal, and understanding what makes one perfect for your specific miniaturist needs requires more than just reading package claims.
Top 10 Wood Stain Pens
Detailed Product Reviews
1. Furniture Repair Kit Wood Markers - Set of 13 - Markers and Wax Sticks with Sharpener Kit, for Stains, Scratches, Wood Floors, Tables, Desks, Carpenters, Bedposts, Touch Ups, and Cover Ups
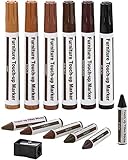
Overview: This 13-piece furniture repair kit offers a comprehensive solution for DIY furniture touch-ups. It includes six repair markers, six wax sticks, and a dedicated sharpener, providing dual approaches to concealing scratches and scuffs on wood surfaces. Designed for versatility, it works on furniture, floors, cabinets, and bedposts.
What Makes It Stand Out: The combination of markers and wax sticks sets this kit apart, allowing users to address different types of damage effectively. The inclusion of a sharpener ensures the wax sticks remain precise and usable over time. With six colors—Maple, Oak, Cherry, Walnut, Mahogany, and Black—it covers most common wood tones, eliminating the need for professional services.
Value for Money: Priced competitively against single-marker alternatives, this kit delivers exceptional value through its sheer versatility. At roughly the cost of two premium brand markers, you receive 13 tools capable of handling various damage types. Professional furniture touch-ups can cost $50-100 per visit, making this kit a budget-friendly alternative for homeowners.
Strengths and Weaknesses: Strengths include comprehensive color selection, dual repair methods, and user-friendly application. The quick-drying formula yields immediate results. However, as a generic brand, color accuracy may vary slightly from premium options, and the wax sticks can wear down faster than expected. The markers may not penetrate deep scratches as effectively as liquid stains.
Bottom Line: This kit is ideal for homeowners seeking an all-in-one, economical solution for minor furniture blemishes. While not professional-grade, it handles everyday touch-ups admirably and pays for itself after a single use.
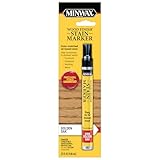
2. Minwax 63487000 Wood Finish Stain Marker for Touch Ups, Dark Walnut, .33 fl oz
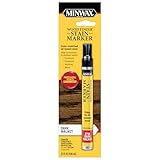
Overview: Minwax’s Dark Walnut stain marker represents precision touch-up solutions from America’s leading wood finish brand since 1904. This .33 fl oz pen delivers professional-grade staining for nicks, scratches, and small craft projects, embodying decades of wood finishing expertise in a convenient applicator.
What Makes It Stand Out: The Minwax name guarantees quality and color accuracy that generic brands struggle to match. Its fast-drying formula allows immediate use after application, while the precise tip enables detailed work on molding, cabinets, and furniture. The rich Dark Walnut shade, with deep brown and black notes, complements numerous wood species authentically.
Value for Money: While single markers cost more than budget kits, Minwax justifies the premium through superior pigmentation and authentic wood stain rather than surface ink. For targeted repairs matching existing Minwax-stained pieces, it’s invaluable. However, for multiple furniture colors, purchasing several markers becomes expensive compared to multi-color kits.
Strengths and Weaknesses: Strengths include trusted brand reliability, true wood stain composition, fast drying, and professional results. The color consistency across Minwax products ensures seamless blending. Weaknesses involve limited quantity per marker, single-color limitation, and higher cost for whole-home touch-ups. It works best for maintaining Minwax-finished pieces specifically.
Bottom Line: Perfect for purists and those with Minwax-stained furniture, this marker excels at authentic color matching. For isolated repairs where quality trumps quantity, it’s worth every penny. Consider multi-packs for broader applications.
3. Minwax Repair Markers
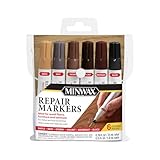
Overview: Minwax Repair Markers deliver the brand’s legendary wood finishing quality in a convenient multi-marker format. Designed for quick and easy scratch repair, these markers restore color to furniture, cabinets, trim, and floors, hiding nicks and minor imperfections with professional-grade results.
What Makes It Stand Out: Leveraging Minwax’s century-long expertise, these markers offer authentic wood stain formulas rather than superficial inks. The quick-drying, permanent solution bonds with wood fibers for lasting repairs that won’t wash away or fade prematurely. Their versatility across multiple wood surfaces makes them indispensable for home maintenance.
Value for Money: Positioned between budget generics and premium specialty products, Minwax Repair Markers offer excellent mid-range value. While costing more than no-name kits, they provide superior color accuracy and durability that prevents costly reapplication. For homeowners serious about maintaining wood finishes, the brand premium translates to reliable results.
Strengths and Weaknesses: Strengths include trusted brand heritage, authentic stain formulation, permanent results, and professional color matching. The markers work seamlessly with existing Minwax finishes. Weaknesses typically involve higher pricing than generic alternatives and potentially limited color selection in certain packs. The markers may require multiple applications for deeper scratches.
Bottom Line: These markers suit homeowners who prioritize quality and longevity over initial cost. For maintaining fine furniture and preserving wood finish integrity, Minwax’s reputation and performance justify the investment. Ideal for those who value professional results.
4. Rejuvenate Exact Match Wood Furniture & Floor Repair Markers, 6 Count, Brown Markers Cover All Scratches, Scuffs And Damage To Wood Furniture And Flooring

Overview: Rejuvenate’s Exact Match Wood Repair Markers offer a six-pack solution covering Maple, Oak, Cherry, Walnut, Mahogany, and Espresso shades. This kit targets scratches, scuffs, and damage across all wood furniture and flooring, promising an economical restoration approach without professional intervention.
What Makes It Stand Out: The “Exact Match” branding emphasizes universal coverage, suggesting these markers adapt to various wood colors beyond their labeled shades. The reapplication feature allows users to darken areas gradually, providing custom color matching. This flexibility distinguishes it from single-application products.
Value for Money: This six-marker set typically retails below premium single-marker prices, offering outstanding value for whole-home applications. The ability to blend colors effectively multiplies its utility, essentially providing unlimited shade possibilities. Compared to professional touch-up services, the kit pays for itself immediately.
Strengths and Weaknesses: Strengths include versatile color range, layering capability, budget-friendly pricing, and ease of use. The markers work on any wood color as advertised. However, the “Exact Match” claim may oversimplify color matching challenges, and the formulation might lack the durability of premium brands. Coverage may be less opaque on deep scratches requiring multiple applications.
Bottom Line: Excellent for budget-conscious homeowners needing versatile coverage across multiple furniture pieces. While not professional-grade, the color-blending capability and value make it a smart purchase for general maintenance and minor touch-ups throughout the home.
5. Rust-Oleum Wood Stain Repair Marker Kit - 6 Colors

Overview: Rust-Oleum’s Wood Stain Repair Marker Kit provides six colors for addressing scratches and damage on wood furniture and floors. Leveraging Rust-Oleum’s reputation as a leading paint and coating manufacturer, this kit offers a practical solution for DIY furniture maintenance without detailed feature specifications.
What Makes It Stand Out: Rust-Oleum’s expertise in durable coatings suggests these markers offer superior adhesion and longevity compared to generic alternatives. The brand’s century-long history in protective finishes implies professional-grade formulation. While features aren’t explicitly listed, the six-color range indicates versatility for common wood tones.
Value for Money: Positioned in the mid-range price bracket, this kit balances brand reputation with affordability. Rust-Oleum typically prices competitively against Minwax while offering comparable quality. For consumers trusting established brands, this represents safer value than unknown generics, though specifications remain unclear from the listing.
Strengths and Weaknesses: Strengths include trusted brand name, likely durable formulation, and standard color selection. Rust-Oleum products generally resist fading and wear effectively. Weaknesses stem from the complete lack of listed features—buyers cannot verify drying time, application method, or whether these are true stains versus surface inks. Color accuracy remains unconfirmed without user testing.
Bottom Line: Suitable for Rust-Oleum loyalists seeking a brand-name repair solution. While the missing specifications create uncertainty, the company’s coating expertise suggests reliable performance. Purchase if you prioritize brand trust over detailed product information.
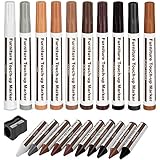
6. Wooden Furniture Floor Scratch Repair Markers and Wax Sticks for Stains, Scratches, Wood Floors, Tables, Desks, Carpenters, Bedposts, Touch Ups, and Cover Ups (Set of 13)

Overview: The 13-piece Wooden Furniture Repair Kit offers a streamlined solution for minor wood damage. With six touch-up markers and six wax sticks plus a sharpener, it covers the most common wood tones. This kit targets homeowners seeking quick fixes for everyday scratches and scuffs on furniture, floors, and cabinets without professional help.
What Makes It Stand Out: This kit’s focused color palette eliminates guesswork for standard wood finishes. The dual-format approach—markers for surface scratches and wax sticks for deeper gouges—provides versatility in one compact set. The inclusion of a sharpener ensures the wax sticks remain precise, preventing waste and enabling detailed work on intricate furniture details.
Value for Money: At this price point for 13 pieces, the kit delivers solid entry-level value. While color-matching options are limited compared to larger sets, you’re paying only for essential shades you’ll actually use. For occasional touch-ups rather than full restoration projects, this represents a cost-effective alternative to professional services or buying individual markers separately.
Strengths and Weaknesses: Pros: Compact essential color selection; dual marker/wax approach; sharpener included; easy application; quick drying Cons: Only six colors limits matching accuracy; wax may wear off high-traffic areas; not suitable for major damage
Bottom Line: This kit excels as a homeowner’s first line of defense against minor wood damage. For those with standard wood tones, it provides everything needed for quick, satisfactory repairs. Consider larger sets only if you have exotic wood finishes or perform frequent touch-ups.
7. DAIXISM Furniture Repair Kit Wood Markers Wax Sticks, for Stains, Scratches, Wood Floors, Tables, Desks, Carpenters, Bedposts, Touch Ups, and Cover Ups (21)
Overview: DAIXISM’s 21-piece furniture repair kit elevates the DIY touch-up game with an expanded arsenal of 10 markers, 10 wax sticks, and a sharpener. The broader color spectrum addresses a wider range of wood tones, from contemporary grey and white to rich chestnut and burnt sienna, making it ideal for modern and traditional furniture alike.
What Makes It Stand Out: The 10-color selection is the star feature, offering nuanced matching that cheaper kits lack. This professional-grade variety transforms users into their own furniture restoration experts. The crayon-style wax sticks fill deeper imperfections while markers blend surface scratches seamlessly, providing a comprehensive two-step repair system for various damage depths.
Value for Money: With 21 pieces at a competitive price point, this kit delivers exceptional value per component. The expanded palette eliminates the need to purchase supplemental colors separately, saving money long-term. Compared to hiring a refinisher or buying brand-name individual markers, this all-in-one solution pays for itself after a single use on multiple furniture pieces.
Strengths and Weaknesses: Pros: Excellent color variety; high coverage formula; professional results; sharpener included; cost-effective bulk purchase Cons: Some colors may go unused; wax can smudge if not sealed; markers may dry out if not recapped properly
Bottom Line: For serious DIY enthusiasts or households with diverse wood finishes, this kit is a smart investment. The extensive color range ensures perfect matches across furniture eras and styles, delivering professional-looking results without the professional price tag.
8. Minwax 63481000 Wood Finish Stain Marker for Touch Ups, Golden Oak
Overview: The Minwax Golden Oak Stain Marker represents precision wood care from America’s most trusted finishing brand. Unlike multi-color kits, this specialized tool delivers authentic Minwax stain in a convenient pen format for targeted touch-ups on oak and similar light wood tones. It’s engineered for discerning homeowners who prioritize color accuracy over variety.
What Makes It Stand Out: Minwax’s century-long expertise in wood finishing ensures this isn’t just paint—it’s genuine stain that penetrates and blends with existing finishes. The Golden Oak shade is a classic, versatile tone that matches countless furniture pieces and flooring. Its fast-drying formula and precise felt tip allow for surgical accuracy on small nicks without affecting surrounding areas.
Value for Money: While a single marker costs as much as some budget kits, you’re paying for authentic stain chemistry and perfect color matching. For homes dominated by oak furniture, this specialized tool outperforms generic alternatives. It eliminates the compromise of “close enough” matches, potentially saving hundreds in professional refinishing costs when color accuracy is paramount.
Strengths and Weaknesses: Pros: Authentic Minwax stain; trusted brand quality; precise application; fast drying; perfect for oak finishes Cons: Single color limits versatility; higher cost per unit; not for deep gouges; requires clear coat for durability
Bottom Line: Choose this marker when color fidelity matters most. For oak-heavy interiors, it’s an indispensable tool that delivers factory-finish results. Supplement with wax sticks for deeper damage, but for surface scratches, this professional-grade solution is unmatched.
9. DAIXISM Furniture Markers Touch Up,Wood Filler Floor Scratch Repair Kits,Set of 21-Markers and Wax Sticks with Sharpener Kit for Funiture Repair,Floor Scratch.

Overview: DAIXISM’s upgraded 21-piece kit distinguishes itself with a unique alcohol-soluble formula across 10 markers and 10 wax sticks. This innovative feature allows users to apply color and then refine the finish by removing excess surface stain while preserving pigment in the scratch itself. The comprehensive set includes a sharpener and covers everything from white and grey to deep walnut and black.
What Makes It Stand Out: The alcohol-soluble technology is a game-changer for achieving natural-looking repairs. Apply the marker, then gently wipe with an alcohol pad to feather the edges and eliminate the “painted-on” appearance common with basic kits. This professional technique, included in the kit’s instructions, elevates results from obvious cover-up to invisible restoration.
Value for Money: This kit matches competitors’ piece counts while offering superior formulation at a similar price. The ability to correct mistakes and blend repairs adds tremendous value, reducing waste from botched applications. For those willing to master the technique, it delivers near-professional results that justify the investment over cheaper, less forgiving alternatives.
Strengths and Weaknesses: Pros: Innovative alcohol-soluble formula; superior blending capability; comprehensive color range; professional finish potential Cons: Requires learning curve; alcohol pads not included; wax still needs sealing; markers can dry quickly
Bottom Line: This is the thinking person’s repair kit. If you’re prepared to spend five extra minutes learning the technique, you’ll achieve invisible repairs that cheaper kits simply cannot match. The formula innovation makes it worth the premium over basic sets.
10. Flybunny Repair Pen Wooden Furniture Floor Scratch Repair Markers and Wax Sticks Set of 21 for Stains, Scratches, Wood Floors, Tables, Desks, Carpenters, Bedposts, Touch Ups, and Cover Ups

Overview: Flybunny’s 21-piece repair kit enters the crowded furniture touch-up market with a balanced approach of 10 markers, 10 wax sticks, and a sharpener. The 10-color palette intelligently mixes traditional wood tones with modern neutrals like grey and white, addressing contemporary furniture trends often ignored by classic kits. It’s positioned as a versatile, user-friendly solution for all skill levels.
What Makes It Stand Out: The kit emphasizes permanent, 100% effective results with a satisfaction guarantee that removes purchase risk. Its balanced color selection avoids overwhelming users with too many similar shades while ensuring coverage for most modern and antique finishes. The crayon-style wax sticks are formulated to adhere strongly to vertical surfaces, preventing drips on chair legs and bedposts.
Value for Money: Competitive pricing for 21 pieces makes this an attractive middle-ground option. It avoids the premium of single-brand markers while offering more color intelligence than bare-bones kits. The satisfaction guarantee provides additional value, essentially offering a free trial period where unsatisfied customers can request replacements or refunds.
Strengths and Weaknesses: Pros: Balanced color selection; strong adhesion formula; satisfaction guarantee; sharpener included; good for vertical surfaces Cons: Brand recognition lower than Minwax; wax may need topcoat; limited instructions; colors can be slightly off on exotic woods
Bottom Line: Flybunny delivers reliable, risk-free performance for typical household repairs. The guarantee makes it an excellent choice for first-time users unsure about DIY repairs. While not revolutionary, it’s a dependable workhorse that covers most common scenarios without breaking the bank.
Why Wood Stain Pens Are Revolutionizing Miniature Woodworking
The shift from traditional staining methods to precision pen applications represents more than just convenience—it’s a complete paradigm shift for miniaturists. Traditional staining involves brushes that deposit too much product, rags that blur fine details, and solutions that pool in corners, ruining the delicate proportions of miniature work. Wood stain pens eliminate these issues by delivering controlled amounts of stain through tips engineered for detail work.
What makes this revolution particularly relevant in 2026 is the convergence of improved ink formulations and tip technology that accommodates the extreme scales miniaturists work in. We’re talking about tools that can realistically stain individual planks on a 1:144 scale ship deck or add authentic wear patterns to a 1:12 scale rocking chair’s armrest without touching adjacent surfaces. This level of control means you can work faster, layer more effectively, and achieve results that previously required hours of tedious masking and touch-up work.
Understanding the Anatomy of a Premium Wood Stain Pen
Before evaluating any wood stain pen, you need to understand what separates a professional-grade tool from a craft-store novelty. The internal engineering directly impacts performance, especially when you’re asking the pen to deliver stain to a surface area smaller than your fingernail.
Ink Reservoir and Flow Control System
The heart of any stain pen is its reservoir and flow mechanism. High-quality pens use a pressurized or precision-valve system that maintains consistent ink delivery regardless of angle or pressure. This matters enormously when you’re staining the underside of a miniature table or working vertically on a dollhouse wall. Inconsistent flow leads to blotching—a death sentence for realistic wood effects at small scales.
Tip Construction and Replaceability
Premium pens feature tips made from compressed fibers or precision-molded nibs that resist fraying even after repeated use on wood surfaces. For miniaturists, the ability to replace tips is crucial. When you’re working with multiple stain colors, being able to swap tips prevents cross-contamination and saves you from purchasing entirely new pens for each color variation.
Key Features to Evaluate Before You Buy
Shopping for wood stain pens without a checklist is like buying a miniature saw without considering tooth count—you’ll end up with something that looks right but performs poorly. Here are the non-negotiable features that serious miniaturists prioritize.
Pigment Density and Transparency
The stain’s formulation determines whether you can build realistic depth. Look for pens that offer high pigment density while maintaining transparency. This allows you to apply multiple sheer layers, creating the complex color variations found in real aged wood. Opaque stains might cover in one pass, but they eliminate the wood’s natural character and look artificial at miniature scales.
Drying Rate and Workability
In miniaturism, you need stains that dry quickly enough to prevent accidental smudging but slowly enough to allow blending. The sweet spot is typically 30-90 seconds of open time. Faster drying formulations might seem convenient, but they can create harsh lines that are difficult to soften. Slower drying stains give you the window to feather edges and create smooth transitions between light and dark areas.
Tip Styles and Their Applications in Miniature Work
The tip of your stain pen is your brush, your pencil, and your precision instrument all in one. Different projects demand different tip configurations, and understanding these variations will dramatically expand your staining capabilities.
Ultra-Fine Bullet Tips for Grain Lines
Bullet tips with a 0.5mm or smaller point excel at creating artificial wood grain on raw wood or adding fine lines to suggest individual boards. When you’re working on something like a 1:24 scale hardwood floor, this tip lets you draw each plank’s grain pattern before applying a broader base coat, creating stunning realism.
Chisel Tips for Edge Work and Shading
A chisel tip with a 1-2mm edge is invaluable for staining the edges of miniature furniture components or creating shadow lines along architectural trim. The angled surface lets you work into tight corners while the flat side can cover small flat areas efficiently. This dual functionality means fewer tool changes and more consistent results.
Brush Tips for Washes and Blending
Flexible brush tips mimic traditional brush behavior but with built-in flow control. They’re perfect for applying thin washes over large-ish miniature areas (like a 1:12 scale tabletop) or for softening harsh lines created by finer tips. The key is finding one that doesn’t splay after a few uses—look for reinforced ferrules and high-quality fiber construction.
The Importance of Color Range and Customization
Miniaturists rarely work with just one wood tone. A realistic miniature scene might require a dozen different wood shades—from sun-bleached pine to dark walnut—with subtle variations for age, wear, and exposure. The availability of colors and your ability to customize them is paramount.
Building a Core Palette
Your foundational set should include a light amber, medium oak, rich walnut, and a deep ebony. From these four, you can create most wood tones through layering. However, the real magic happens when you add specialty colors like weathered gray, tobacco brown, and honey gold. These allow you to simulate specific wood species and aging effects without complex mixing.
Layering for Custom Tones
The true professional doesn’t rely on premixed colors alone. Learn to layer complementary stains to create depth. For example, applying a thin gray wash over a warm oak base creates that distinctive aged barn wood look. Understanding color theory helps you predict how layers will interact, preventing muddy results and achieving sophisticated finishes.
Drying Time and Curing: What Miniaturists Need to Know
Patience might be a virtue, but in miniaturism, it’s a requirement. However, understanding the difference between “dry to the touch” and “fully cured” can save you from catastrophic project failures.
Touch-Dry vs. Cured: The Critical Distinction
Most wood stain pens feel dry within minutes, but the underlying solvents continue to evaporate for 24-72 hours. Working over a “dry” stain with another color can reactivate the layer beneath, causing colors to bleed together unexpectedly. For precision work, always wait the full cure time before applying tape, handling extensively, or adding protective topcoats.
Accelerating Curing in Humid Environments
Miniaturists often work in small home studios where humidity fluctuates. High humidity can extend curing times dramatically. Using a small dehumidifier in your workspace or a gentle warm air stream (not a heat gun, which can blister the stain) can reduce curing time by half. Some professionals even use desiccant chambers for small components.
Safety and Ventilation in Small Workspaces
Let’s address the elephant in the room: most wood stains contain solvents that aren’t great to breathe, and miniaturists often work in closets, spare bedrooms, or basement corners without industrial ventilation.
Understanding VOC Content
Volatile Organic Compounds (VOCs) are the chemicals that evaporate from stain as it dries. Even “low-VOC” formulations can cause headaches and dizziness in enclosed spaces. For miniaturists, the solution isn’t just opening a window—it’s creating a dedicated ventilation system. A simple DIY fume extractor made from a computer fan and activated carbon filter can make a tremendous difference.
Protective Equipment Beyond the Mask
While a respirator rated for organic vapors is essential, don’t forget about skin protection. Nitrile gloves prevent stains from absorbing through your skin during long staining sessions. More importantly, they keep natural oils from your fingers off the miniature wood, which can interfere with stain absorption and create blotchy patches.
Compatibility with Different Wood Types and Scales
The wood you’re staining matters as much as the stain itself. Different species absorb stain differently, and at miniature scales, these differences become magnified.
Softwoods vs. Hardwoods at Miniature Scales
Basswood, the miniaturist’s staple, is a softwood that absorbs stain quickly and can become oversaturated with minimal product. Hardwoods like walnut or cherry (when you can find them at scale) are denser and may require more aggressive application or pre-treatment. Understanding these absorption rates helps you adjust your pressure and number of passes.
Pre-Treating Problematic Woods
Some woods, particularly plywood and MDF used in kit manufacturing, have inconsistent density that leads to blotchy staining. A thin shellac washcoat applied with a fine-tip pen can seal the surface just enough to promote even stain absorption. This technique, called “spit-coating” in traditional woodworking, is even more critical at miniature scales where imperfections are magnified.
Blending and Layering Techniques for Realistic Effects
The difference between a stained miniature and a realistically finished one lies in the subtlety of blending. Wood stain pens give you unprecedented control over this process, but technique matters.
Feathering Edges for Natural Transitions
To avoid harsh lines where stain starts and stops, practice the feathering technique. Apply your stain, then immediately use a clean, dry brush tip (or a barely damp one with clear blending solution) to soften the edge. This creates the gradual color transitions seen in naturally weathered wood. The key is working quickly while the stain is still mobile.
Creating Depth with Complementary Colors
Real wood isn’t one flat color. Use this to your advantage by applying a base coat in your primary wood tone, then adding subtle hints of complementary colors in recesses and corners. A touch of cool gray in the shadows of warm oak, or a hint of red undertone in dark walnut, adds dimensional complexity that reads as authentic, even at 1:48 scale.
Common Mistakes and How to Avoid Them
Even experienced miniaturists can fall into traps when switching to pen-based staining. Recognizing these pitfalls before they happen will save countless hours of stripping and re-staining.
Over-Saturation and Bleeding
The most common error is applying too much product. Unlike traditional staining where excess can be wiped away, pen-applied stain absorbs immediately. Start with less than you think you need. You can always add another pass, but you can’t easily remove stain that’s soaked too deep. Test on scrap wood identical to your project piece first.
Inconsistent Pressure and Speed
Your hand pressure and movement speed directly affect color depth. Develop a consistent rhythm—practice on test pieces until you can produce uniform color across a surface. Many miniaturists find that bracing their hand on a stable surface and moving the piece rather than the pen yields more consistent results for tiny components.
Maintenance and Storage Best Practices
A premium wood stain pen represents an investment. Proper care ensures it remains precise and reliable for hundreds of projects, not just a few.
Preventing Tip Drying and Clogging
Always cap your pens immediately after use. For long-term storage, store them horizontally to keep the tip saturated and prevent drying. If a tip does begin to dry, don’t immediately discard it—many can be revived with a few drops of appropriate thinner applied carefully to the tip’s base, allowing capillary action to restore flow.
Cleaning Between Color Changes
When switching tips on a multi-tip pen, clean the threads and collar with a cotton swab dipped in appropriate solvent. Dried stain on these surfaces prevents proper sealing, leading to leaks and dried tips. This 30-second step extends the life of your pens significantly.
Budget Considerations: Finding Value Without Compromise
The most expensive wood stain pen isn’t always the best for miniaturism, and the cheapest option often costs more in ruined projects. Understanding where to invest and where to save creates a smart, sustainable tool budget.
Investing in Core Colors vs. Supplementing with Budget Options
Build your palette around 3-4 premium pens in your most-used colors. These are your workhorses for primary surfaces. For specialty colors you use less frequently—like that specific greenish-gray for weathered cedar—mid-range options often perform adequately. This hybrid approach gives you professional results where it matters without breaking the bank.
Cost Per Use Analysis
A $15 pen that lasts 50 projects costs less per use than a $5 pen that dries out after 3. Consider ink volume, tip replaceability, and overall construction when calculating true value. Many professional miniaturists find that premium pens actually cost less annually because they replace them less frequently and waste less stain through poor application control.
The Environmental Impact of Your Choice
Sustainability matters, even in hobbies. The wood stain pen market has responded with more eco-conscious formulations, but understanding the nuances helps you make genuinely greener choices.
Water-Based vs. Solvent-Based Formulations
Water-based stains have improved dramatically, offering performance that rivals traditional solvents with significantly lower environmental impact. They clean up with water, emit fewer VOCs, and often use renewable raw materials. The trade-off is slightly longer drying times and potentially less vibrant colors on some wood species, but for most miniature applications, the difference is negligible.
Refillable Systems and Waste Reduction
Some premium stain pen systems now offer refillable reservoirs and replaceable tips. While the initial investment is higher, these systems generate significantly less plastic waste over time. For miniaturists who stain regularly, a refillable system can pay for itself within a year while aligning with sustainable crafting values.
Future Trends in Miniature Wood Staining Technology
As we move through 2026, several emerging technologies promise to further transform how miniaturists approach wood finishing. Staying ahead of these trends positions you at the forefront of the craft.
Smart Flow Control and Digital Integration
Experimental pens with micro-pumps that respond to digital stylus pressure are entering the market. While currently expensive, this technology promises to eliminate the physical pressure inconsistencies that plague even experienced users. Imagine a pen that knows when you’re working on a 1:144 scale detail versus a 1:12 surface and automatically adjusts flow rate.
Bio-Based Pigments with Enhanced Lightfastness
New pigment technologies derived from algae and other bio-sources offer unprecedented color stability. For miniaturists, this means stained pieces that won’t fade even after years of display near windows. These formulations also tend to have lower toxicity profiles, making them ideal for the enclosed workspaces common in our community.
Building Your Signature Staining Kit
Ultimately, the perfect collection of wood stain pens is deeply personal. It reflects the types of projects you tackle, the wood species you prefer, and your individual technique. Building this kit is a journey, not a one-time purchase.
Documenting Your Formulas and Techniques
Keep a dedicated journal where you record which pen combinations create specific effects. Note the wood type, stain colors, number of layers, and any special techniques used. Over time, this becomes your personal formula book—an invaluable reference that ensures consistency across projects and lets you recreate that perfect aged oak or sun-bleached driftwood years later.
The Minimalist vs. Comprehensive Approach
Some master miniaturists work with just four colors and create everything through layering. Others maintain a collection of thirty or more specialty tones. Neither approach is superior. The key is choosing a system that matches your working style. Start minimal and add colors only when you find yourself unable to achieve a specific effect through mixing. This prevents overwhelming your workspace and ensures every pen earns its keep.
Frequently Asked Questions
How do wood stain pens differ from regular markers or paint pens?
Wood stain pens contain transparent, penetrating pigments designed to soak into wood fibers rather than sit on top like paint. This creates the natural, translucent look of stained wood rather than an opaque painted finish. The formulations also include binders and solvents specifically balanced for wood adhesion and grain enhancement.
Can I achieve the same results with a brush and traditional stain?
Technically yes, but practically no—especially at miniature scales. Brushes deposit exponentially more product, making it nearly impossible to control saturation on tiny surfaces. The precision of a pen tip allows you to stain individual boards on a 1:48 scale floor or add grain detail to a 1:144 chair without touching adjacent areas. The learning curve is also much gentler with pens.
How many wood stain pens do I actually need to start?
Four core colors will handle 80% of miniature projects: a light amber, medium oak, dark walnut, and a weathered gray. Master blending these before expanding your collection. This minimalist approach forces you to develop layering skills that will serve you better than owning twenty colors you barely know how to use.
What’s the best way to test stain colors before applying them to my project?
Always test on scrap wood from the exact same board as your project piece. Wood density varies even within the same species and board. Create a test strip showing single coats, double coats, and blended combinations. Label everything and wait for full cure before evaluating, as colors shift significantly during curing.
How do I prevent stain from bleeding into adjacent areas?
Work on a stable surface with good lighting. Apply painter’s tape to protect adjacent areas, but seal the tape edge first with a clear acrylic medium applied with a fine brush. This prevents stain from wicking underneath. Also, use less product—bleeding often results from over-saturation that has nowhere to go but sideways.
Can wood stain pens be used on materials other than wood?
Yes, with caveats. They work beautifully on paper-based materials like chipboard and some cardstocks, creating realistic wood effects on these common miniature substrates. On plastics or metals, they behave more like translucent paints and may require special primers. Always test first, as adhesion varies dramatically by material.
How long do wood stain pens typically last with regular use?
A premium 5ml stain pen used for typical miniature work should last 30-50 projects, depending on surface area. The tip usually wears out before the ink depletes. Replaceable tip systems extend this significantly. Budget pens often dry out within 3-6 months regardless of use due to poorer seals and lower-quality valves.
What’s the ideal workspace setup for staining miniatures?
Create a dedicated staining station with a white surface for color accuracy, a swing-arm magnifying lamp, and a small fume extractor. Keep a “wet station” with blending solution and cleaning swabs, and a “dry station” with your test pieces and cured components. This separation prevents accidents and keeps your workflow organized.
How do I fix a staining mistake on a miniature piece?
For minor errors, let the stain dry completely, then gently sand the area with 600-grit paper wrapped around a flat block. For major problems, use a gel stain remover applied with a fine-tip applicator to target only the offending area. In worst cases, you may need to sand back to bare wood and restart—another reason to always test first.
Are there any wood species I should avoid using with stain pens?
Extremely oily woods like teak or rosewood can resist water-based stains and may require solvent-based formulations. Some exotic hardwoods contain tannins that react unpredictably with certain pigments, creating green or purple tones. When working with unfamiliar species, always test extensively and consider a tannin-blocking pre-treatment if you’re getting strange color shifts.
See Also
- 10 Wood Stain Pens for Detail Work on Miniatures in 2026
- 10 Must-Have Wood Stain Pens for Detailed Woodworking Projects in 2026
- 10 Wood Stain Applicators Every Professional Refinisher Needs in 2026
- 10 Wood Stain Markers Every Cabinet Maker Needs in 2026
- 10 Professional Wood Stain Pens for Detailed Crafts in 2026