Table of Contents
There’s something deeply satisfying about breathing new life into a cherished wooden toy. Whether it’s a vintage rocking horse that’s lost its luster or a well-loved building block set showing battle scars, toy restoration connects us to simpler times while teaching valuable skills. Stain pens have emerged as the secret weapon for DIY enthusiasts, offering precision, convenience, and professional results without the steep learning curve of traditional staining methods. As we explore the world of beginner-friendly stain pens for toy repair, you’ll discover how these innovative tools can transform your restoration projects from intimidating undertakings into rewarding creative sessions that preserve childhood memories for generations to come.
Top 10 Wood Stain Pens
Detailed Product Reviews
1. Furniture Repair Kit Wood Markers - Set of 13 - Markers and Wax Sticks with Sharpener Kit, for Stains, Scratches, Wood Floors, Tables, Desks, Carpenters, Bedposts, Touch Ups, and Cover Ups
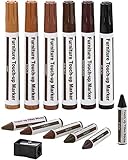
Overview: This comprehensive 13-piece kit delivers a dual-approach solution for wood furniture repair, combining 6 markers with 6 paper-wrapped wax sticks and a dedicated sharpener. Designed for DIY enthusiasts, it addresses scratches, scuffs, and discoloration across various wood surfaces including floors, tables, cabinets, and bedposts. The kit’s versatility makes it suitable for both quick cosmetic touch-ups and more substantial damage filling, eliminating the need for professional services in many cases.
What Makes It Stand Out: The kit’s standout feature is its intelligent hybrid design—markers for rapid color application and wax sticks for physically filling deeper scratches. The integrated sharpener is a thoughtful addition rarely found in budget alternatives, ensuring precise wax application. Offering six wood tones from maple to black, it covers most common furniture finishes. The “100% effective and permanent” claim, while ambitious, reflects confidence in the premium formulation.
Value for Money: At its typical price point, this kit represents exceptional value compared to $100+ professional touch-up services. The 13-piece configuration essentially provides two repair methodologies in one package, making it more economical than purchasing components separately. For homeowners with multiple wood pieces, the variety justifies the investment, particularly when considering the cost per application across numerous furniture items.
Strengths and Weaknesses: Strengths include remarkable versatility, straightforward application, and comprehensive color selection. The quick-dry formula and universal wood compatibility are practical benefits. However, wax sticks may wear under heavy use, and achieving perfect color matching requires careful testing. The “permanent” claim is overstated—longevity depends heavily on surface preparation and usage patterns. The blister packaging feels less premium than the product itself.
Bottom Line: An excellent all-in-one solution for occasional furniture touch-ups. While not replacing professional refinishing, it’s perfect for renters and homeowners seeking quick, affordable cosmetic fixes across multiple wood surfaces.
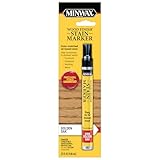
2. Minwax 63487000 Wood Finish Stain Marker for Touch Ups, Dark Walnut, .33 fl oz
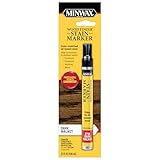
Overview: Minwax’s Dark Walnut stain marker brings 120 years of wood finishing expertise to convenient touch-ups. This .33 fl oz pen delivers authentic Minwax wood stain formula in a precision applicator for nicks, scratches, and small craft projects. As America’s leading wood finish brand since 1904, Minwax offers professional-grade results in a consumer-friendly format, specifically formulated to match their popular Dark Walnut stain color.
What Makes It Stand Out: The marker contains genuine Minwax wood stain—not merely surface pigment—ensuring authentic color penetration and finish matching. Its fast-drying formula allows immediate use after application, crucial for high-traffic furniture and floors. The precision tip enables accurate application on detailed moldings, cabinets, and woodwork without messy cleanup. This is actual stain technology, not just a cosmetic concealer.
Value for Money: While a single marker costs more than generic multi-packs, you’re investing in Minwax’s proprietary stain formula and brand reliability. For those specifically needing Dark Walnut, it’s vastly cheaper than purchasing a full quart of stain. The quality justifies the premium for targeted touch-ups, though frequent users might find a larger kit more economical. The price reflects genuine wood finishing chemistry rather than simple coloring agents.
Strengths and Weaknesses: Strengths include trusted brand reputation, authentic stain formulation, and rapid drying time. The precision applicator excels at small repairs with professional results. However, the single-color limitation restricts versatility, and .33 oz depletes quickly with multiple projects. It’s stain, not filler, so deep scratches remain physically visible. The premium price may deter budget-conscious buyers.
Bottom Line: Ideal for Minwax loyalists and those needing authentic Dark Walnut touch-ups. Best for maintaining existing Minwax-finished pieces, but less practical for general household repairs requiring multiple wood tones.
3. Minwax Repair Markers
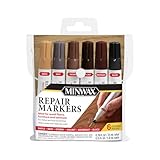
Overview: Minwax Repair Markers deliver the brand’s trusted quality in a multi-color format for comprehensive wood furniture restoration. Designed to hide nicks and minor scratches, these markers restore color to furniture, cabinets, wood trim, and floors. While specific feature details are minimal in the listing, the Minwax name signals reliable performance for everyday touch-ups and represents the manufacturer’s entry into the multi-marker repair market.
What Makes It Stand Out: The primary differentiator is Minwax’s 120-year reputation in wood care, translating to superior pigment quality and color accuracy compared to generic brands. These markers likely feature the same fast-drying technology found in Minwax’s single markers, ensuring quick repairs without prolonged downtime. The multi-color assortment provides versatility across various wood tones, making it practical for households with diverse furniture finishes.
Value for Money: Positioned between budget kits and premium single markers, this product offers brand reliability at a moderate price point. For consumers prioritizing quality over quantity, Minwax’s formulation likely outperforms cheaper alternatives in longevity and color matching. However, the lack of wax sticks or sharpeners means you’ll need separate supplies for deeper damage, potentially increasing total cost. The value depends on the specific color count included.
Strengths and Weaknesses: Strengths include brand trust, professional-grade pigments, and likely superior durability compared to discount competitors. Minwax products consistently deliver color fidelity and lasting results. Weaknesses stem from sparse product details—unclear color count, no accessories, and ambiguous quantity. Without wax fillers, it’s limited to surface scratches only. The minimalist listing leaves buyers guessing about kit contents.
Bottom Line: A solid choice for those wanting Minwax quality across multiple furniture pieces. Best for surface-level color restoration, but verify the specific color selection and quantity before purchasing to ensure it meets your repair needs.
4. Rejuvenate Exact Match Wood Furniture & Floor Repair Markers, 6 Count, Brown Markers Cover All Scratches, Scuffs And Damage To Wood Furniture And Flooring

Overview: Rejuvenate’s six-marker set promises an economical solution for covering scratches, scuffs, and damage on wood furniture and flooring. The kit includes maple, oak, cherry, walnut, mahogany, and espresso tones, aiming to address most household wood finishes. Marketed as an “exact match” system, it targets budget-conscious consumers seeking simple cosmetic improvements without professional intervention.
What Makes It Stand Out: The “covers all scratches in any color wood” claim is bold, suggesting each marker works across multiple wood tones through layering technique. The reapplication feature to darken areas provides customization lacking in single-application products. At its aggressive price point, it’s positioned as the most economical way to maintain multiple furniture pieces, making it particularly attractive for rental properties and large households.
Value for Money: This kit offers exceptional affordability, often retailing for less than a single professional touch-up service. Six markers for the price of one premium brand marker makes it highly cost-effective. While “exact match” is optimistic marketing, the variety allows acceptable blending for most common damage. For cosmetic concealment rather than restoration, the value proposition is compelling. It’s essentially disposable pricing for a multi-use product.
Strengths and Weaknesses: Strengths include unbeatable price, good color variety, and straightforward application. The layering capability adds flexibility for color adjustment. However, the “exact match” marketing overpromises—results depend heavily on wood species, grain, and lighting conditions. Pigment quality likely doesn’t match premium brands, and deeper scratches require separate filler products. Durability may be inferior to wax-based or stain-based solutions, requiring more frequent reapplication.
Bottom Line: Perfect for renters, landlords, and budget-minded homeowners needing quick, acceptable fixes. Manage expectations regarding “exact match” claims and treat it as a cosmetic concealer rather than a permanent restoration solution for best satisfaction.
5. Rust-Oleum Wood Stain Repair Marker Kit - 6 Colors

Overview: Rust-Oleum’s six-color marker kit leverages the brand’s century-long reputation in protective coatings to address wood furniture and floor repairs. While specific features aren’t listed, Rust-Oleum’s leadership in industrial and consumer finishes suggests a quality stain-based formula. The kit presumably includes common wood tones for versatile application across household items, representing the brand’s expansion into wood touch-up solutions.
What Makes It Stand Out: Rust-Oleum’s core strength lies in its protective coating technology, likely infused into these markers for enhanced durability compared to pure pigment markers. The brand’s industrial heritage implies robust, long-lasting results resistant to wear. The six-color assortment provides reasonable coverage for most furniture collections, making it a practical middle-ground option between budget and premium brands.
Value for Money: Positioned as a mid-range offering, this kit balances brand reputation with affordability. It likely costs more than discount brands but less than premium single markers. For consumers trusting Rust-Oleum’s protective products, this represents fair value. However, the complete absence of detailed features creates uncertainty about included accessories, marker type (stain vs. pigment), or special capabilities, making value assessment speculative.
Strengths and Weaknesses: Strengths include trusted brand name, likely superior durability from protective additives, and reasonable color selection. Rust-Oleum products generally perform reliably in real-world conditions. Major weaknesses stem from the complete lack of product specifications—unclear if these are stain markers, wax sticks, or a hybrid. No mention of drying time, permanence, or application tools. This information gap makes informed purchasing difficult and suggests potential supply chain or marketing issues.
Bottom Line: Potentially a durable, quality option for Rust-Oleum devotees, but proceed with extreme caution. The missing details prevent a strong recommendation. Contact seller for specifications or consider alternatives with transparent feature lists to ensure the product meets your specific repair needs.
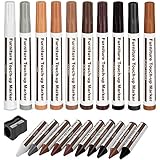
6. Wooden Furniture Floor Scratch Repair Markers and Wax Sticks for Stains, Scratches, Wood Floors, Tables, Desks, Carpenters, Bedposts, Touch Ups, and Cover Ups (Set of 13)

Overview: This 13-piece furniture repair kit delivers a focused solution for common wood touch-ups. With six markers and six wax sticks plus a sharpener, it covers the most popular wood tones. The set targets maple, oak, cherry, walnut, mahogany, and black finishes, making it ideal for standard household furniture and flooring repairs. The dual-marker and wax-stick approach handles both surface scratches and deeper gouges effectively.
What Makes It Stand Out: The kit’s focused color palette eliminates guesswork for typical wood furniture. The quick-drying formula promises immediate results without professional help. The included sharpener ensures precise application of wax sticks, while the permanent coverage claim provides confidence for lasting repairs. This streamlined approach prevents the overwhelm of larger sets with unused colors.
Value for Money: Positioned as an entry-level option, this kit delivers solid value for homeowners with traditional wood furniture. It costs significantly less than professional refinishing services and competes well against larger 21-piece sets. For those with common wood tones, this targeted approach prevents overspending on unnecessary shades while covering essential repair needs.
Strengths and Weaknesses: Strengths include easy application, focused color selection for traditional woods, and permanent coverage claims. The sharpener adds precision for wax application. Weaknesses involve limited color matching for exotic or bleached woods, potential for markers drying out over time, and the six-color range may fall short for modern furniture with unique finishes. The brand recognition is also less established than premium alternatives.
Bottom Line: This kit excels for homeowners with classic wood furniture needing occasional touch-ups. It’s practical, affordable, and covers the essential wood tones found in most homes. Perfect for DIYers who want reliable results without unnecessary complexity.
7. DAIXISM Furniture Repair Kit Wood Markers Wax Sticks, for Stains, Scratches, Wood Floors, Tables, Desks, Carpenters, Bedposts, Touch Ups, and Cover Ups (21)
Overview: DAIXISM’s 21-piece furniture repair kit expands on basic sets with an impressive 10-color selection. Including 10 markers, 10 wax sticks, and a sharpener, it addresses a broader spectrum of wood furniture from antique to contemporary pieces. The added white, grey, chestnut, and burnt sienna shades provide versatility beyond standard wood tones, making it suitable for modern painted or stained pieces.
What Makes It Stand Out: The expanded color range makes this kit exceptionally versatile for matching modern furniture with non-traditional finishes. The professional-grade formulation claims 100% effectiveness and permanence, while the dual applicator system handles various damage depths. This empowers users to tackle repairs that previously required expensive specialists, from scuffs on grey-washed tables to white trim nicks.
Value for Money: While pricier than 13-piece kits, the additional four colors justify the cost for those with diverse furniture. It eliminates the need to purchase multiple specialized products and still costs a fraction of professional restoration. For households with mixed wood types or painted pieces, the investment pays for itself after just one avoided service call.
Strengths and Weaknesses: Strengths include excellent color variety, suitability for contemporary and traditional furniture, and the comprehensive sharpener tool. The 10-color range covers most scenarios. Weaknesses involve potential quality control issues (as noted in warranty), possible color redundancy for some users, and a steeper learning curve to match less common shades correctly. The markers may dry faster than expected with frequent use.
Bottom Line: This kit suits homeowners with varied furniture styles or those planning future purchases. The expanded palette future-proofs your repair capabilities, making it a smart long-term investment for comprehensive home maintenance and restoration projects.
8. Minwax 63481000 Wood Finish Stain Marker for Touch Ups, Golden Oak
Overview: Minwax’s Golden Oak stain marker brings century-old expertise to quick furniture touch-ups. This single-marker solution targets light oak finishes specifically, offering a fast-drying stain pen for surface scratches and small projects. As a focused product from America’s leading wood finish brand, it prioritizes reliability over comprehensive coverage, delivering precise color matching for oak furniture, molding, and flooring.
What Makes It Stand Out: The Minwax reputation ensures consistent quality and color accuracy that generic kits often lack. The fast-drying formula allows immediate use after application, while the precise tip enables detailed work on moldings and intricate furniture parts. Its Golden Oak shade is a timeless, widely-used finish that matches countless household items, backed by a brand trusted since 1904.
Value for Money: As a single marker, it’s the most affordable option for oak furniture owners. You avoid paying for unnecessary colors while getting premium brand reliability. However, its value diminishes if you own multiple wood types. For dedicated oak furniture households, it’s perfect; for mixed wood homes, a kit proves more economical despite higher upfront cost.
Strengths and Weaknesses: Strengths include trusted brand quality, fast drying time, precise application, and perfect color matching for oak. The wipe-off excess feature allows clean application without staining surrounding areas. Weaknesses are the single-color limitation, lack of wax filler for deep scratches, and no sharpener or auxiliary tools. It’s a specialized tool, not a comprehensive kit for varied repair needs.
Bottom Line: This is the go-to choice for homes predominantly featuring oak furniture. Its quality and specificity outweigh kit versatility for targeted use. If your furniture is mostly oak, buy this; if you have varied wood types, invest in a multi-color kit instead to avoid multiple purchases.
9. DAIXISM Furniture Markers Touch Up,Wood Filler Floor Scratch Repair Kits,Set of 21-Markers and Wax Sticks with Sharpener Kit for Funiture Repair,Floor Scratch.

Overview: This 21-piece DAIXISM kit mirrors its sibling product but highlights an alcohol-soluble marker formula. With 10 markers, 10 wax sticks, and a sharpener, it covers white, grey, oak, maple, cherry, walnut, mahogany, chestnut, burnt sienna, and black shades. The set targets comprehensive furniture repair for various damage types, from pet scratches to water stains on multiple wood surfaces.
What Makes It Stand Out: The alcohol-soluble marker formulation allows users to wipe away excess stain while leaving color in scratches, creating a more natural, less “painted-on” appearance. This feature helps perfectionists achieve professional-looking results. The 10-color range handles everything from modern painted pieces to traditional hardwoods, making it exceptionally versatile for diverse household needs.
Value for Money: Priced competitively with other 21-piece kits, this set offers unique correction capabilities that justify its cost. The ability to refine applications reduces waste from mistakes, saving money long-term. It still costs far less than professional services while providing near-professional results for patient DIYers who want flawless finishes without paying contractor rates.
Strengths and Weaknesses: Strengths include the innovative alcohol-soluble formula, diverse color selection, and permanent coverage claims. The correction feature is a game-changer for visible repairs. Weaknesses involve requiring rubbing alcohol (not included), a slightly more complex process, and potential over-saturation if not used carefully. The brand’s quality control concerns remain, and the markers may leak during shipping as noted in warranty terms.
Bottom Line: Ideal for detail-oriented users who want flawless repairs. The correction capability makes it forgiving for beginners while satisfying advanced DIYers. If you value precision over speed and want the ability to perfect your work, this kit’s unique formulation makes it worth the investment despite the extra step.
10. Flybunny Repair Pen Wooden Furniture Floor Scratch Repair Markers and Wax Sticks Set of 21 for Stains, Scratches, Wood Floors, Tables, Desks, Carpenters, Bedposts, Touch Ups, and Cover Ups

Overview: Flybunny’s 21-piece furniture repair kit provides a comprehensive solution for wood damage with 10 markers, 10 wax sticks, and a sharpener. The 10-color range includes maple, oak, cherry, walnut, mahogany, burnt sienna, chestnut, white, grey, and black, addressing most household furniture and flooring needs. The kit balances completeness with user-friendliness for DIY repairs.
What Makes It Stand Out: The kit offers all essential colors without overwhelming complexity, making it accessible for beginners. The satisfaction guarantee demonstrates manufacturer confidence, while the dual-marker and wax system handles various scratch depths. It positions itself as a direct competitor to established brands with similar features but adds consumer protection through its warranty promise.
Value for Money: This kit offers strong value in the crowded 21-piece category, typically priced to undercut name brands while matching their color selection. For budget-conscious buyers wanting comprehensive coverage, it delivers. However, the lesser-known brand name may raise longevity concerns compared to Minwax or established alternatives, though the guarantee helps offset this risk.
Strengths and Weaknesses: Strengths include full color spectrum, satisfaction guarantee, easy application process, and suitability for multiple surfaces including doors and bedposts. The 10-color selection covers most scenarios. Weaknesses involve brand recognition issues, potential quality variance, and claims of “100% permanent” that may not hold up under heavy wear. The wax sticks may be softer than premium alternatives, requiring more frequent sharpening.
Bottom Line: A solid, cost-effective choice for comprehensive furniture repair needs. The satisfaction guarantee mitigates purchase risk, making it worth trying for those wanting full color variety without premium pricing. It competes well with similar kits while offering peace of mind through its warranty backing.
Why Stain Pens Are Revolutionizing Toy Restoration
The toy repair landscape has shifted dramatically in recent years, with stain pens leading a quiet revolution in how we approach wooden toy restoration. Unlike traditional brush-on stains that require extensive prep, multiple tools, and years of practice to master, modern stain pens deliver pigment through precision-tipped applicators that give you surgical control over color placement. This innovation matters particularly for toys, where intricate details, small surface areas, and the need for child-safe materials create unique challenges.
What makes these tools truly revolutionary isn’t just their convenience—it’s the democratization of professional-quality results. Parents and grandparents who once felt intimidated by restoration projects now confidently tackle everything from touch-ups on wooden train sets to complete refinishing of dollhouse furniture. The learning curve has flattened, but the quality hasn’t compromised. Advanced formulations now offer the same depth of color and durability as traditional stains, while the pen format eliminates common beginner frustrations like drips, uneven application, and oversaturation that can ruin a beloved toy.
The Science Behind Modern Stain Formulation
Understanding what happens inside that pen barrel elevates your repair game significantly. Modern stain pens contain carefully engineered suspensions of pigment particles, solvents, and binding agents that work synergistically to penetrate wood fibers while maintaining color consistency. Unlike markers that simply deposit ink on the surface, quality stain pens use capillary action to draw the stain into the wood’s cellular structure, creating a bond that won’t peel or flake—a critical consideration for toys that face constant handling.
The viscosity of these formulations has been meticulously calibrated for toy-specific applications. Too thin, and the stain bleeds beyond intended areas; too thick, and it sits on the surface like paint, obscuring wood grain. Manufacturers have struck an optimal balance that allows the stain to flow smoothly through the applicator tip while maintaining enough body to stay where you place it. This precision engineering means even novices achieve results that look intentional rather than amateurish.
Key Features That Define Beginner-Friendly Stain Pens
Not all stain pens deserve a spot in your toy repair toolkit. The truly beginner-friendly options share specific characteristics that reduce the likelihood of costly mistakes while maximizing creative control. First, look for pens with transparent barrels or windows that let you monitor stain levels—running dry mid-project creates visible lap marks that are nearly impossible to blend seamlessly. The best beginner pens also feature replaceable tips, because nothing derails a project faster than a frayed applicator that releases stain unpredictably.
Ergonomics play a surprisingly important role in toy restoration success. You’ll often work for extended periods on detailed areas, so pens with comfortable grips and balanced weight distribution prevent hand fatigue that leads to shaky application. Some advanced models even incorporate anti-roll designs that keep the pen stationary on your workbench—seemingly minor, but invaluable when you’re focused on intricate details and can’t afford to chase a rolling pen across the room.
Precision Applicator Design Matters
The tip of your stain pen functions as both brush and control valve, making its design crucial for toy repair success. Bullet tips offer robustness for larger surface areas like dollhouse floors or rocking horse bodies, while chisel tips provide versatility for both broad strokes and fine lines. For truly detailed work—think facial features on wooden peg dolls or grain lines on toy animals—micro-fine tips measuring less than 1mm give you the control of a professional artist’s brush.
What separates premium applicators from basic versions is the internal flow regulation system. Quality pens maintain consistent stain delivery regardless of pressure applied, preventing the dreaded “gush” that can flood a delicate area. This consistency proves especially valuable when working on porous woods common in toys like pine and birch, which can absorb stain unevenly if application pressure varies. Beginners should prioritize pens advertised as having “controlled flow” or “pressure-regulated delivery” to build confidence through predictable performance.
Drying Time and Workability
The window between application and drying—called the open time—dramatically impacts your ability to correct mistakes and blend colors. Beginner-friendly stain pens typically offer 30-60 seconds of workability, enough time to feather edges or wipe away excess with a clean cloth if you’ve applied too heavily. This forgiveness factor transforms the learning experience, turning potential disasters into teachable moments rather than project-ending catastrophes.
Fast-drying formulations might seem appealing, but they leave zero room for error correction—a recipe for frustration when you’re still developing technique. Conversely, stains that remain tacky for hours attract dust and fingerprints, problematic when little hands can’t wait to reclaim their repaired toys. The sweet spot for toy repair projects lands around 5-10 minutes to touch-dry, with full cure within 2-4 hours. This timeline allows you to complete multi-step repairs in a single afternoon while ensuring the toy returns to service quickly.
Understanding Different Stain Pen Formulations
The chemistry inside your stain pen determines everything from safety profile to final appearance, making formulation knowledge essential for smart selection. Toy repair presents unique constraints that don’t exist in general woodworking, primarily the non-negotiable requirement for child-safe materials. This limitation has driven innovation in stain chemistry, resulting in three primary categories that each serve specific restoration scenarios.
Water-based formulations dominate the beginner-friendly category for good reason. They clean up with soap and water, emit minimal odor, and typically achieve non-toxic certifications more easily than their solvent-based counterparts. The trade-off historically involved reduced color depth and durability, but modern polymer-enhanced water-based stains now rival traditional options while maintaining safety profiles suitable for mouthing toys common among toddlers.
Water-Based vs. Oil-Based Options
Water-based stain pens excel at preserving the natural look of light woods while adding subtle color enhancement. They raise the wood grain slightly during application—a characteristic you can use to your advantage on worn toys where the grain has compressed from years of handling. A light sanding after the first coat smooths the raised grain, and subsequent coats build color gradually, giving beginners exceptional control over final intensity.
Oil-based stain pens, while less common in toy-specific applications, offer superior penetration on dense hardwoods like maple and beech frequently found in European-made toys. Their longer open time facilitates beautiful blending and gradient effects, but the extended cure time (often 24+ hours) and stronger fumes require careful consideration. If you choose oil-based options for toy repair, verify they’ve been specifically formulated to meet toy safety standards, as traditional oil stains contain heavy metal driers and solvents inappropriate for children’s items.
Gel-Based Stain Pens: The Middle Ground
Gel stain pens represent the newest innovation in toy restoration, combining the best attributes of water and oil formulations. Their thicker consistency sits on the wood surface longer before penetrating, giving beginners maximum control and virtually eliminating accidental over-absorption in end grain or porous areas. This characteristic proves invaluable when repairing toys with mixed wood types, where different absorption rates typically create blotchy results.
The gel format also excels at creating uniform color on less expensive toys made from multiple wood pieces or wood composites. Because the stain doesn’t penetrate deeply, it doesn’t highlight the differences in wood density that often betray a repair. For beginners working on modern mass-produced toys, gel stain pens offer the most forgiving introduction to color matching and restoration.
Safety First: Non-Toxic Considerations for Children’s Toys
When repairing toys, safety transcends all other considerations. The most beautiful restoration job becomes meaningless if it creates health risks for the child who’ll inevitably chew, drool on, or sleep with the repaired item. Understanding safety certifications and chemical composition isn’t just responsible—it’s non-negotiable. Beginners often assume “non-toxic” labels tell the complete story, but the reality involves multiple standards and testing protocols that vary significantly.
The primary concern involves volatile organic compounds (VOCs) that continue off-gassing long after the stain feels dry to the touch. Even water-based stains can contain concerning levels of glycol ethers or formaldehyde-releasing preservatives. For toy repair, seek products explicitly labeled as meeting toy safety standards rather than general “non-toxic” claims, which often reference adult exposure levels inappropriate for children who weigh significantly less and have developing organ systems.
ASTM Standards and What They Mean
ASTM F963-17 represents the gold standard for toy safety in the United States, covering everything from chemical composition to heavy metal content. Stain pens meeting this standard have undergone rigorous third-party testing for extractable heavy metals, phthalates, and other harmful chemicals. The testing simulates real-world conditions, including saliva extraction to model mouthing behavior—critical for toys intended for children under three years.
European EN71-3 standards often exceed ASTM requirements, testing for an even broader range of chemicals and considering cumulative exposure from multiple sources. When selecting stain pens for toy repair, prioritize products certified to both standards when possible. This dual certification indicates the manufacturer has invested significantly in safety testing, providing peace of mind that extends beyond marketing claims. Remember that certification applies to the fully cured stain, so always respect the manufacturer’s recommended cure time before returning toys to children.
Surface Preparation: The Foundation of Flawless Results
The best stain pen in the world cannot compensate for poor surface preparation. Toy repair presents unique prep challenges because you’re often working with unknown finishes, embedded grime from years of play, and damage that extends beneath the surface. Rushing this stage guarantees disappointment, while methodical preparation sets the stage for restoration that looks professional and lasts.
Begin by assessing the toy’s current finish. Natural wood toys with minimal existing finish offer the easiest starting point for beginners. Painted or heavily varnished toys require complete removal of the old finish for stain penetration—an advanced technique that might overwhelm novices. For your first projects, select toys where the original finish has worn away naturally, leaving bare wood ready for refinishing.
Cleaning Protocols for Different Toy Materials
Wooden toys accumulate a unique patina composed of skin oils, food residue, and environmental grime that regular dusting never removes. Before staining, clean surfaces with a solution of mild dish soap and warm water, using a soft toothbrush to reach carved details and crevices. Avoid soaking the wood—excessive moisture raises grain unevenly and can loosen joints. Instead, use damp cloths and work in small sections, immediately drying with a clean towel.
For stubborn buildup, especially on vintage toys, mineral spirits on a lint-free cloth cut through grime without raising grain. Work in a well-ventilated area and wear gloves, even with low-odor formulations. After cleaning, allow the toy to dry completely for at least 24 hours in a warm, dry environment. This drying period prevents trapped moisture from interfering with stain absorption and causing uneven color or adhesion failure later.
Sanding Techniques for Beginners
Sanding transforms a tired toy into a receptive canvas for stain. Start with 150-grit sandpaper to remove surface roughness and old finish remnants, always sanding with the grain to avoid creating cross-grain scratches that stain will highlight dramatically. For beginners, sanding sponges offer better control than loose sheets, conforming to curved surfaces on toys like rocking horses or car bodies while distributing pressure evenly.
Progress to 220-grit for a final smoothing pass that prepares the wood for stain without closing the pores too much. Over-sanding with fine grits (320+) creates a surface so smooth that stain struggles to penetrate, resulting in a washed-out appearance. After sanding, remove all dust using a vacuum with a brush attachment followed by a tack cloth. Compressed air works well for blowing dust from carved details, but follow with a tack cloth to capture any remaining particles that could mar the final finish.
Mastering Color Matching Like a Pro
Color matching separates amateur touch-ups from professional restorations. Toys rarely use premium hardwoods, meaning you’re typically working with pine, poplar, or birch that have been stained to mimic expensive species. Replicating these factory finishes requires understanding both color theory and wood characteristics. The good news? Stain pens make incremental color building possible, allowing you to approach the perfect match gradually rather than committing to a single application.
Start by identifying the wood’s undertone—the subtle color that shows through the primary stain. Most toy woods lean yellow or orange, while some manufactured woods have gray undertones from the glues used in their production. Hold the toy in natural daylight and examine unstained areas or the wood visible on the bottom or back. This undertone informs your base color selection and prevents the final result from looking “off” in ways you can’t quite identify.
Understanding Wood Undertones
Yellow undertones dominate in pine and birch toys, requiring stain pens with warm base formulations. Look for color names containing “golden,” “honey,” or “amber” as your starting point. Orange undertones appear frequently in older toys made from heart pine or fir, where “chestnut,” “red oak,” or “cherry” base stains provide better matches. Gray undertones, common in laminated or composite toy parts, need stains with “weathered,” “driftwood,” or “ash” descriptors to neutralize the coolness.
The magic happens when you layer complementary undertones. For example, a yellow-toned pine toy that needs to match a richer, more expensive look might start with a golden oak base, followed by light applications of a red-toned stain to add depth. This layering mimics how light interacts with natural wood grain, creating dimension that single-color applications lack. Stain pens excel at this technique because you can apply multiple thin layers without the brush marks that often betray layered brush-on stains.
Testing and Layering Strategies
Never apply stain directly to the toy without testing. Create a test board using scrap wood of the same species as your toy, or test on the bottom of the toy where any mismatch remains hidden. Apply your base color using light, overlapping strokes, then immediately wipe with a clean cloth to see the true color. This wipe reveals the stain’s actual contribution rather than the misleading wet appearance.
Build color slowly using the “three-layer rule”: apply a light base coat covering 100% of the surface, let it dry completely, then add a second coat to 70% of the area, focusing on worn spots that need more color. The final coat targets only the most damaged 30% of the surface. This graduated approach creates natural variation that mimics how wood ages, avoiding the flat, artificial look of uniform color application. Between layers, lightly buff with 0000 steel wool to remove any raised grain and ensure subsequent coats adhere properly.
Application Techniques for Professional-Looking Results
Technique determines outcome more than any other factor in toy restoration. Stain pens reward patience and punish rushing, making methodical application your best strategy. The grip, angle, pressure, and speed of your application all influence how stain releases and penetrates, creating results that either delight or disappoint. Mastering a few fundamental techniques transforms your approach from hesitant dabbing to confident, flowing strokes.
Hold the pen like a pencil, but with a slightly more relaxed grip that allows fluid movement. Apply at a 45-degree angle to the wood surface, using the side of the tip rather than the point for broader coverage. This approach distributes stain more evenly and prevents the tip from digging into soft woods. Keep your wrist flexible and move from your elbow and shoulder rather than your fingers, creating longer, smoother strokes that blend naturally.
The Three-Pass Method
Professional restorers use a systematic approach I call the three-pass method, which works perfectly with stain pens. The first pass—called the “sketch pass”—lightly outlines the area you’re staining, creating a roadmap that prevents accidental overlap onto adjacent surfaces. Use minimal pressure, just enough to release a faint line of stain that guides subsequent work.
The second pass, or “fill pass,” applies the actual color using overlapping strokes that cover the area completely. Work in small sections no larger than 2-3 square inches, applying stain in the direction of the wood grain with consistent pressure. Immediately after each fill pass, complete the third “blend pass” using a clean, dry cloth wrapped around your finger. Lightly buff the stained area in circular motions, then finish with straight grain-direction strokes. This blending removes excess stain that would create dark spots while distributing color evenly across the grain structure.
Blending and Feathering Tricks
Feathering edges where new stain meets old finish separates seamless repairs from obvious touch-ups. After applying stain to the damaged area, use a barely-damp cloth to gently pull color beyond the repair boundary, creating a gradient that transitions from full color to nothing over 1/4 inch. This technique mimics how natural wear occurs and makes the repair virtually invisible.
For larger repairs requiring multiple pen strokes, maintain a “wet edge” by working quickly enough that adjacent areas of stain remain workable simultaneously. If an edge dries before you blend it, you’ll create a visible line where the two areas meet. In dry climates, keep a spray bottle with distilled water nearby and lightly mist the wood surface before staining to extend open time. The water slows penetration slightly, giving you precious extra seconds to perfect your technique.
Durability and Finish Longevity
A beautifully stained toy that can’t withstand playroom abuse represents wasted effort. Understanding how stain pens create durable finishes helps you select products and apply techniques that ensure repairs last. The stain itself provides minimal protection—it’s the binding agents and your topcoat strategy that determine longevity. Beginners often confuse stain with finish, but they’re distinct products serving different purposes.
Quality stain pens incorporate UV inhibitors that prevent color fading when toys sit near windows or spend time outdoors. This protection proves especially important for toys with bright, saturated colors that fade noticeably with sun exposure. The inhibitors work by absorbing UV radiation before it can break down the stain pigments, extending the vibrancy of your restoration by years rather than months.
Topcoat Compatibility and Selection
Stain pens require protective topcoats to lock in color and provide wipeable surfaces that resist juice spills and sticky fingers. Water-based polyurethane offers the best combination of safety and durability for toy applications. Apply it with a high-density foam brush in thin, even coats, sanding lightly between applications with 320-grit paper. Two to three coats create a protective barrier that allows the toy to be cleaned without damaging the underlying stain.
Test topcoat compatibility on your sample board before applying to the actual toy. Some stain formulations, particularly oil-based options, can inhibit the curing of water-based topcoats, leading to tacky surfaces that never fully harden. If you notice the topcoat beading up or failing to level, stop immediately and switch to a shellac-based sanding sealer as an intermediate layer. Shellac adheres to virtually any stain and provides a compatible base for water-based poly, solving most adhesion issues.
Common Pitfalls and How to Avoid Them
Even with beginner-friendly tools, certain mistakes plague novices and veterans alike. Recognizing these pitfalls before they occur saves projects, preserves cherished toys, and builds confidence through successful outcomes. The most frequent error involves over-application—applying too much stain in an attempt to achieve dark color quickly. This approach floods the wood, creating blotchy areas that obscure grain and remain tacky for days.
Another common mistake is working in poor lighting conditions, which hides color inconsistencies until it’s too late to correct them. Always set up your workspace near a natural light source or use daylight-balanced LED lamps that reveal true colors. Inspect your work frequently from multiple angles, as lighting changes can reveal issues invisible from a single viewpoint.
Skipping the final protective topcoat ranks as the third major error. Stain alone provides no protection against moisture, abrasion, or cleaning. Toys stained without topcoats quickly show wear patterns, water spots, and color transfer onto hands and clothing. The extra step of applying a clear finish transforms a cosmetic improvement into a durable restoration that withstands real-world use.
Project Ideas to Build Your Skills
Developing proficiency with stain pens requires practice on projects that build skills progressively. Start with simple color refresh projects before tackling complex repairs. Wooden building blocks offer ideal starting material—their small size and simple geometry teach controlled application without high stakes. Practice matching the original color on a few blocks, then progress to creating custom color sets by staining natural blocks to complement existing ones.
Graduate to wooden vehicles where you can practice following curved surfaces and maintaining consistent color across different grain directions. The simple shapes of cars and trains introduce you to working around edges and creating clean lines where different colors meet. These projects typically take under an hour but teach techniques applicable to more complex toys.
Maintenance and Storage: Extending Pen Life
Stain pens represent an investment that proper care can extend significantly. Store pens horizontally in a cool, dry place to keep the tip saturated and prevent pigment from settling at one end. Extreme temperatures degrade stain formulation, so avoid storage in garages or attics where temperatures fluctuate dramatically. The ideal storage temperature ranges between 60-75°F, similar to comfortable room conditions.
If a pen tip dries out during a project, don’t discard it immediately. Remove the tip (most quality pens allow this) and soak it in the appropriate solvent—water for water-based stains, mineral spirits for oil-based—for 15 minutes. Blot dry and reinsert; often, this simple restoration brings pens back to full functionality. Replace caps immediately after use, as even brief exposure to air begins the drying process that eventually clogs tips permanently.
Cost vs. Quality: Making Smart Investment Decisions
The stain pen market spans from budget multi-packs under $10 to professional-grade singles costing $15 or more. While tempting to start with inexpensive options, the false economy becomes apparent when cheap tips fray, colors fade within months, or formulations lack the workability that makes stain pens beginner-friendly. A quality stain pen costs more initially but delivers predictable results, better color accuracy, and durability that justifies the investment.
Consider the cost of the toy you’re repairing when selecting stain pens. A $5 pen to restore a $200 handmade heirloom makes obvious financial sense, but even for sentimental items of minimal monetary value, the frustration avoided by using quality tools proves worthwhile. Many professional-grade pens offer refillable options, reducing long-term costs while providing consistent performance across multiple projects.
When to Use Stain Pens vs. Alternative Methods
Stain pens excel at specific scenarios but aren’t universal solutions. They shine for touch-ups, small area repairs, and detailed work where brushes create mess and overspray. For large, flat surfaces like dollhouse floors or play kitchen countertops, traditional brush-on stains applied with a foam brush often prove more efficient and cost-effective. The pen format’s advantage disappears when covering large areas where consistent application speed matters more than precision.
Consider the toy’s construction when deciding. Stain pens work beautifully on solid wood toys with defined grain patterns. For laminated or veneered toys, test carefully in an inconspicuous area—some veneers are so thin that stain pen solvents penetrate and loosen the adhesive. Painted toys requiring color restoration need paint pens rather than stain pens, as stain cannot adhere to non-porous painted surfaces. Understanding these limitations prevents project failures and ensures you select the right tool for each unique restoration challenge.
Frequently Asked Questions
How long should I wait before giving a repaired toy back to my child?
Wait at least the full cure time specified by the stain manufacturer, typically 24-48 hours for water-based stains and 72+ hours for oil-based options. Even when the surface feels dry, uncured stain can transfer to skin or clothing. For mouthing toys, extend the wait to a full week and verify the stain meets ASTM F963-17 standards for extractable chemicals.
Can I mix different brands or types of stain pens on the same toy?
Mixing formulations risks compatibility issues, especially between water-based and oil-based products. If you must combine brands, test on a sample piece first and always apply a compatible topcoat over the entire surface to unify the finishes. Sticking with one product line throughout a project eliminates variables and ensures consistent results.
What’s the best way to remove stain pen mistakes on toys?
Act quickly while the stain remains wet—wipe with a cloth dampened with the appropriate solvent (water for water-based, mineral spirits for oil-based). For dried mistakes, sand the area lightly with 220-grit paper and restain. On intricate details, use a cotton swab dipped in solvent to carefully lift unwanted stain without affecting surrounding areas.
Do I need to seal stain pens differently for outdoor toys?
Outdoor toys require additional UV protection and moisture resistance. After staining, apply three coats of marine-grade spar urethane rather than standard polyurethane. Spar urethane contains flexible agents that expand and contract with temperature changes, preventing cracking and peeling in outdoor conditions.
Why does my stain pen color look different on the toy than on the cap?
Cap colors approximate the stain color but can’t account for your wood’s natural undertones, existing finish, or absorbency. Always test on an inconspicuous area or scrap wood of the same species. The color develops as it penetrates and dries, so wait until fully cured before judging the match.
Can stain pens repair plastic or metal parts on toys?
Stain pens are formulated specifically for wood and won’t adhere to plastic or metal. For non-wood components, use paint markers designed for those materials. Some advanced hybrid pens work on multiple surfaces, but verify compatibility through testing before committing to visible areas.
How do I prevent stain pen tips from drying out between projects?
Store pens horizontally, replace caps immediately after use, and consider storing them in a sealed plastic bag with a damp paper towel during extended projects. For long-term storage, place a small piece of plastic wrap under the cap before sealing to create an extra air barrier. If a tip does dry, soak it in solvent as described in the maintenance section.
What’s the difference between stain pens and furniture touch-up markers?
Furniture markers typically contain dyes and shellac that sit on the surface, while stain pens use pigments that penetrate wood fibers. For toys that will be handled frequently, stain pens provide more durable color that won’t wear off. Furniture markers work for temporary cosmetic fixes but lack the longevity proper restoration demands.
Can I achieve a dark, rich color with stain pens, or are they only for light touch-ups?
Absolutely! Build dark colors through multiple thin layers rather than one heavy application. Apply 3-5 light coats, allowing each to dry completely and lightly buffing with steel wool between applications. This layering approach creates depth and richness impossible to achieve with a single heavy coat while maintaining wood grain visibility.
How do I know when a toy is beyond repair with stain pens alone?
When structural damage compromises safety—cracked limbs, loose joints, or splintering wood—stain pens can’t address the underlying issues. Similarly, if the existing finish is cracking or peeling extensively, complete stripping and refinishing becomes necessary. Stain pens excel at cosmetic restoration but can’t fix structural problems or adhere to failing finishes.
See Also
- 10 Must-Have Wood Stain Pens for Detailed Woodworking Projects in 2026
- 10 Wood Stain Pens for Precision Coloring on Small Projects in 2026
- 10 Best Value Wood Stain Sprays for Large Surface Projects Under $20
- 10 Best Budget Wood Stains Under $15 for Beginner Projects in 2026
- 10 Best Wood Stain Sprays for Even Coverage on Large Surfaces This Year