Table of Contents
Woodworking in 2026 has evolved into an art form where precision meets convenience, and nothing embodies this shift quite like the modern wood stain pen. Whether you’re touching up a cherished antique chair, camouflaging a scratch on your hardwood floor, or adding intricate details to a handcrafted jewelry box, these specialized tools have transformed how we approach small-scale staining projects. Gone are the days of mixing messy cans of stain and wrestling with brushes that seem designed to spread color everywhere except where you need it. Today’s stain pens deliver surgical precision right where you want it, making them indispensable for both seasoned craftsmen and weekend DIY warriors.
But here’s the thing: not all wood stain pens are created equal. As we navigate the increasingly sophisticated market of 2026, understanding the nuances between different formulations, tip technologies, and application techniques can mean the difference between an invisible repair and a glaring eyesore. This comprehensive guide dives deep into everything you need to know about selecting and mastering wood stain pens for your precision coloring projects, ensuring your small-scale work achieves professional-grade results every single time.
Top 10 Wood Stain Pen
Detailed Product Reviews
1. Furniture Repair Kit Wood Markers - Set of 13 - Markers and Wax Sticks with Sharpener Kit, for Stains, Scratches, Wood Floors, Tables, Desks, Carpenters, Bedposts, Touch Ups, and Cover Ups
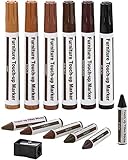
Overview: This comprehensive 13-piece furniture repair kit provides a complete solution for concealing scratches and scuffs on wood surfaces. The set includes six markers, six wax sticks, and a dedicated sharpener, offering six wood tones from maple to black. Designed for DIY enthusiasts, it promises professional-looking results without the expense of hiring a craftsman.
What Makes It Stand Out: The dual-format approach sets this kit apart. While the markers handle surface scratches, the wax sticks fill deeper gouges and nicks, creating a more substantial repair. The included sharpener ensures precise application of wax sticks, and the blister card packaging keeps everything organized. This versatility makes it suitable for everything from floorboards to bedposts.
Value for Money: With 13 pieces at a budget-friendly price point, this kit delivers exceptional value compared to professional touch-up services that can cost hundreds. The multi-piece design means you’re prepared for various wood tones and damage types in one purchase, effectively costing less than a single service call while providing multiple repair options.
Strengths and Weaknesses: Strengths include comprehensive color selection, dual repair methods, user-friendly application, and professional-grade results for light to moderate damage. Weaknesses involve the generic brand’s unverified longevity claims, potential color-matching limitations with exotic wood species, and wax sticks that may wear faster than professional fillers on high-traffic areas.
Bottom Line: This kit is ideal for homeowners seeking an affordable, all-in-one solution for routine furniture maintenance. While not a substitute for professional restoration, it effectively handles everyday wear and tear, making it a smart addition to any home maintenance toolkit.
2. Minwax 63487000 Wood Finish Stain Marker for Touch Ups, Dark Walnut, .33 fl oz
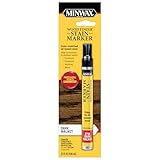
Overview: Minwax’s Dark Walnut stain marker brings century-old wood finishing expertise to quick touch-ups. This .33 fl oz pen delivers the brand’s trusted dark walnut stain formula in a convenient applicator for masking nicks and scratches on furniture, cabinets, and floors. It’s designed for precision application on small areas.
What Makes It Stand Out: As America’s leading wood finishing brand since 1904, Minwax offers unmatched color accuracy and stain quality. The fast-drying formula ensures immediate use, while the precise felt tip allows for controlled application. This isn’t just a cover-up; it’s actual wood stain that penetrates and blends seamlessly with existing Minwax finishes.
Value for Money: While pricier than generic alternatives per unit, you’re investing in proven chemistry and perfect color matching for Minwax-stained pieces. A single marker can handle dozens of touch-ups, making it far more economical than professional services. For Minwax users, the color fidelity alone justifies the premium.
Strengths and Weaknesses: Strengths include trusted brand reputation, authentic stain formula, rapid drying time, and precise application. The dark walnut color provides rich, deep coverage suitable for many furnishings. Weaknesses are the single-color limitation, small volume, and that it works best only on Minwax stains. Generic furniture may require test patches, and the marker format isn’t ideal for deep gouges.
Bottom Line: Perfect for existing Minwax customers or those seeking professional-grade touch-ups. This marker excels at color-matched repairs on stained surfaces but consider a kit with wax sticks for deeper damage. Quality trumps quantity for discerning homeowners.
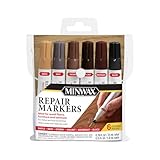
3. Rejuvenate Exact Match Wood Furniture & Floor Repair Markers, 6 Count, Brown Markers Cover All Scratches, Scuffs And Damage To Wood Furniture And Flooring

Overview: Rejuvenate’s Exact Match kit provides six markers designed to cover scratches and scuffs across all wood furniture and flooring. The set includes maple, oak, cherry, walnut, mahogany, and espresso tones. Marketed as a universal solution, it aims to eliminate guesswork in color matching for quick cosmetic repairs.
What Makes It Stand Out: The “covers all scratches in any color wood” claim is bold, but Rejuvenate’s reputation for floor care products lends credibility. The marker-only approach simplifies application without wax stick complications. The ability to reapply to darken areas provides customization, while the brand’s focus on restoration products suggests formulation expertise.
Value for Money: Positioned between budget kits and premium single markers, this six-pack offers solid value for homeowners with multiple wood tones. Eliminating professional touch-up costs provides immediate ROI. However, the marker-only format means deeper damage requires separate fillers, potentially increasing overall expense.
Strengths and Weaknesses: Strengths include reputable brand backing, versatile color range, straightforward marker application, and layering capability. The espresso shade adds modern appeal. Weaknesses involve the questionable “any color wood” claim—exotic species may still mismatch—and lack of wax sticks for substantial damage. Markers may wear faster than stains on floors.
Bottom Line: A reliable choice for surface-level scratches on common wood species. Rejuvenate’s brand trustworthiness makes this preferable to generic kits, though manage expectations about universal matching. Best for furniture and low-traffic areas where convenience matters most.
4. Minwax 63481000 Wood Finish Stain Marker for Touch Ups, Golden Oak
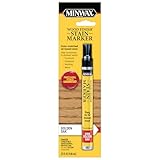
Overview: Minwax’s Golden Oak stain marker offers the same trusted quality as its Dark Walnut sibling in a lighter, versatile shade. This .33 fl oz pen dispenses authentic golden oak stain for touching up nicks on furniture, molding, cabinets, and doors. It’s specifically formulated for light to medium wood tones common in many homes.
What Makes It Stand Out: The golden oak color is a timeless, widely-used finish that matches countless furniture pieces and hardwood floors. Minwax’s century-long expertise ensures the stain penetrates rather than just coating the surface. The fast-drying, low-odor formula allows immediate use, while the precise tip enables accurate application on detailed trim work.
Value for Money: As a premium single marker, it commands a higher price than generics but delivers authentic stain chemistry. For homes with golden oak finishes, one pen prevents expensive professional callbacks. The concentrated formula means a little goes far, making it cost-effective for maintaining consistent appearance across multiple pieces.
Strengths and Weaknesses: Strengths include perfect color matching for Minwax Golden Oak finishes, trusted brand reliability, quick drying, and professional results. The light color effectively masks scratches without darkening surrounding areas. Weaknesses are the niche application—useless for dark woods—the single-marker limitation, and inability to fill deep scratches. Non-Minwax surfaces may require testing.
Bottom Line: Essential for homeowners with golden oak furnishings. This marker excels at maintaining color consistency on Minwax-stained pieces. For general repair needs, pair it with a multi-color kit, but for matching golden oak, nothing beats the original formula. Precision and quality justify the investment.
5. Wooden Furniture Floor Scratch Repair Markers and Wax Sticks for Stains, Scratches, Wood Floors, Tables, Desks, Carpenters, Bedposts, Touch Ups, and Cover Ups (Set of 13)

Overview: This 13-piece furniture repair kit mirrors the comprehensive approach of similar sets, providing six markers, six wax sticks, and a sharpener. With colors spanning maple to black, it targets scratches, discoloration, and separation gaps on furniture and floors. The kit positions itself as a complete wood restoration solution for DIYers.
What Makes It Stand Out: The satisfaction guarantee demonstrates confidence in product performance. The combination of markers and crayon-type fillers addresses both surface and deeper damage in one package. The sharpener ensures precise wax application, while the dual-format design handles everything from hairline scratches to noticeable gouges without purchasing separate products.
Value for Money: Competing directly with other budget kits, this set offers remarkable value through its comprehensive approach. The 13-piece count provides multiple repair options at a fraction of professional service costs. The money-back guarantee reduces purchase risk, making it an attractive entry point for those new to furniture repair.
Strengths and Weaknesses: Strengths include the complete toolkit approach, versatile color selection, ease of use, and risk-free guarantee. The wax stick format fills gaps effectively. Weaknesses involve generic brand uncertainty regarding long-term durability, potential color-matching limitations with premium furniture, and wax that may require reapplication in high-use areas. Quality consistency could vary.
Bottom Line: A solid, low-risk option for general furniture maintenance. The guarantee makes it worth trying, especially for first-time users. While professional restorers may prefer specialized products, this kit capably handles household wear and tear. Consider it a practical, economical addition to your home care arsenal.
6. Varathane 368035 Less Mess Wood Stain and Applicator, 4 oz, Golden Oak

Overview: The Varathane Less Mess Wood Stain combines stain and applicator in one compact 4-ounce bottle, designed specifically for crafts and small woodworking projects. This Golden Oak shade delivers a warm, natural tone that enhances wood grain without the traditional staining hassle. The water-based, low-odor formula makes it suitable for indoor use, cleaning up easily with soap and water.
What Makes It Stand Out: The integrated sponge-tip applicator eliminates the need for separate brushes and rags, providing exceptional color control and precision. Unlike conventional stains that drip and spill, the easy-flow sponge releases just enough product for smooth, even coverage. The water-based chemistry means minimal fumes and quick drying, making it ideal for quick-turnaround projects or indoor crafting sessions where ventilation is limited.
Value for Money: At approximately $8-10, this 2-in-1 system offers excellent value for hobbyists. Traditional staining requires purchasing stain ($10-15), mineral spirits ($8), brushes ($5), and rags, easily exceeding $25. For small projects, this single tool delivers comparable results without the investment in supplies you’ll rarely use. The 4-ounce size prevents waste from leftover stain drying out in cans.
Strengths and Weaknesses: Pros: Mess-free application, precise control, low odor, easy cleanup, no additional tools needed, perfect for small surfaces. Cons: Limited to small projects, sponge tip may wear out with heavy use, color may appear lighter than traditional oil-based stains, not suitable for large furniture pieces.
Bottom Line: This is an exceptional solution for crafters, DIY beginners, and anyone tackling small staining projects. The convenience and cleanliness far outweigh limitations for large-scale work.
7. Minwax Repair Markers
Overview: Minwax Repair Markers offer a straightforward solution for concealing minor scratches, nicks, and abrasions on finished wood surfaces. These markers work like standard permanent markers but are formulated with wood-toned pigments that penetrate scratches to restore color. Designed for furniture, cabinets, trim, and floors, they provide a quick cosmetic fix without sanding or refinishing.
What Makes It Stand Out: The Minwax brand carries decades of wood finishing expertise, ensuring reliable color matching with their stain line. The marker format allows pinpoint accuracy, letting you color only the damaged area without affecting surrounding finish. This makes repairs virtually invisible on superficial scratches. The quick-drying formula sets in seconds, making it practical for last-minute touch-ups before guests arrive or home showings.
Value for Money: Typically priced around $6-8 for a single marker or $12-15 for multi-packs, these represent moderate value. While inexpensive initially, the limited ink volume means frequent replacements if you have numerous repairs. Compared to full refinishing or professional touch-up services costing hundreds, they’re an economical stop-gap. However, specialized kits with multiple colors may offer better versatility for similar prices.
Strengths and Weaknesses: Pros: Extremely easy to use, fast drying, precise application, trusted brand, no cleanup required, portable for on-the-go repairs. Cons: Limited color selection, ink can dry out if not capped properly, doesn’t fill deep gouges, may not match non-Minwax finishes perfectly, temporary solution.
Bottom Line: Keep one handy for emergency touch-ups, but consider it a temporary cosmetic fix rather than a permanent repair solution. Best for maintaining showroom appearance between major refinishing projects.
8. Old English 75144 Scratch Cover For Dark Woods, 8oz Bottle, Wood Polish

Overview: Old English Scratch Cover is a conditioning polish specifically formulated to mask imperfections on dark wood finishes. This 8-ounce bottle contains oils and pigments that simultaneously hide scratches while nourishing the wood. Unlike markers that simply color scratches, this product creates a rich, uniform sheen that helps damage blend into the overall patina of dark furniture, cabinets, and paneling.
What Makes It Stand Out: The dual-action formula both conceals and conditions, preventing wood from drying out and cracking further. It’s specifically calibrated for dark woods, avoiding the waxy buildup that all-purpose polishes can create. The liquid application covers larger areas efficiently, making it practical for revitalizing entire surfaces rather than spot-treating individual scratches. The familiar lemon scent also leaves furniture smelling fresh.
Value for Money: Priced at $6-8 for 8 ounces, this offers excellent value compared to professional restoration services. A little goes a long way, with one bottle lasting months of regular use. However, as a maintenance product rather than true repair, the value depends on your expectations. It won’t permanently fix damage but extends the time between refinishing projects, saving significant labor costs.
Strengths and Weaknesses: Pros: Large coverage area, conditions wood, affordable, easy application with cloth, pleasant scent, effective on superficial scratches. Cons: Oily residue attracts dust, strong fragrance may bother sensitive users, only for dark woods, doesn’t repair deep damage, requires regular reapplication.
Bottom Line: An essential maintenance product for dark wood furniture owners. Use it regularly to keep pieces looking their best, but understand it’s camouflage, not repair. Pair with colored markers for best results on deeper scratches.
9. DAIXISM Furniture Markers Touch Up,Wood Filler Floor Scratch Repair Kits,Set of 21-Markers and Wax Sticks with Sharpener Kit for Funiture Repair,Floor Scratch.

Overview: This comprehensive 21-piece repair kit from DAIXISM provides an all-in-one solution for wood damage, including 10 touch-up markers, 10 wax filler sticks, and a sharpener. Designed to address scratches, nicks, dents, and discoloration across various wood tones, the kit includes colors from White to Black, covering Maple, Oak, Cherry, Walnut, Mahogany, Chestnut, and Burnt Sienna. It’s marketed as a DIY alternative to professional furniture restoration.
What Makes It Stand Out: The sheer versatility sets this kit apart. With ten distinct wood tones, you can match virtually any furniture piece in your home. The inclusion of both markers (for surface scratches) and wax sticks (for deeper gouges) addresses multiple damage types. The sharpener ensures precise application of wax fillers, while the alcohol-soluble marker formula allows cleanup of excess stain, preventing permanent mistakes.
Value for Money: At $15-20 for 21 pieces, this represents exceptional value—less than $1 per item. Individual markers from premium brands cost $6-8 each. While the quality may not match professional-grade products, the variety alone justifies the price for homeowners with mixed wood furnishings. The kit essentially replaces multiple single-purpose products.
Strengths and Weaknesses: Pros: Extensive color range, dual repair methods, sharpener included, alcohol-soluble for corrections, cost-effective, covers various damage depths. Cons: Lower pigment concentration than premium brands, wax can be difficult to blend, colors may not match perfectly, durability concerns on high-traffic areas.
Bottom Line: An outstanding starter kit for homeowners wanting to maintain multiple wood pieces. While not professional-grade, the variety and convenience make it invaluable for routine maintenance and minor repairs throughout the home.
10. Varathane 368029 Less Mess Wood Stain and Applicator, 4 oz, Dark Walnut
Overview: The Dark Walnut version of Varathane’s innovative Less Mess stain system delivers rich, deep brown tones in the same convenient 2-in-1 applicator bottle. This 4-ounce package combines premium water-based stain with an integrated sponge tip, making it ideal for small projects, touch-ups, and crafts requiring a darker finish. The semi-transparent formula allows wood grain to show through while building to desired intensity with multiple coats.
What Makes It Stand Out: Like its Golden Oak sibling, the sponge applicator provides mess-free precision, but the Dark Walnut shade offers more dramatic transformation potential. The buildable color is particularly valuable—apply one coat for a medium brown or layer for deep espresso tones. The water-based formula maintains low odor and easy soap-and-water cleanup, rare for such a rich dark stain that typically requires harsh solvents.
Value for Money: Priced similarly to the Golden Oak at $8-10, this delivers identical value proposition. For small dark-staining projects, it eliminates the need for $25+ in traditional supplies. The ability to build color means you won’t waste stain mixing custom shades. However, the small volume remains best suited for projects under 10 square feet.
Strengths and Weaknesses: Pros: Rich, buildable color, mess-free application, precise control, low VOC, easy cleanup, no extra tools required, excellent for detail work. Cons: Small capacity limits project size, sponge durability concerns, multiple coats needed for deepest color, may raise wood grain requiring light sanding.
Bottom Line: Perfect for crafters and DIYers working on small dark wood projects. The convenience and control make it superior to traditional stains for touch-ups and detailed work, though serious woodworkers will need larger quantities for furniture pieces.
Why Wood Stain Pens Are Revolutionizing Small-Scale Woodworking
The rise of wood stain pens represents more than just another tool in the woodworking arsenal—it signals a fundamental shift in how we approach surface finishing. Traditional staining methods, while effective for large surfaces, often create more problems than they solve when dealing with detailed work. The brush marks, oversaturation, and lack of control that plague conventional application methods become magnified when you’re working on intricate carvings, tight corners, or delicate touch-ups.
The Precision Advantage Over Traditional Staining Methods
What makes stain pens truly revolutionary is their ability to deposit exactly the right amount of stain exactly where you need it. The finest tips available in 2026 can deliver color to within a millimeter of accuracy, allowing you to follow wood grain patterns, fill tiny scratches, and blend edges with unprecedented control. Unlike brushes that carry excess stain in their bristles, a quality stain pen releases controlled amounts through precision-engineered tips, virtually eliminating the risk of bleed-through and over-application that ruins so many small projects.
Ideal Projects for Stain Pen Applications
The versatility of wood stain pens makes them perfect for dozens of applications that would frustrate even experienced woodworkers using traditional methods. Picture frame repairs, furniture scratch concealment, cabinet touch-ups around hardware, and detailed work on turned wood pieces all benefit from pen application. They’re particularly invaluable for matching existing finishes when you don’t want to refinish an entire piece—think of that one drawer front that’s faded differently than the rest of your dresser, or the water ring on your coffee table that needs targeted treatment.
Key Features to Evaluate in 2026’s Wood Stain Pens
As manufacturers continue innovating, the feature set of modern stain pens has expanded dramatically. Understanding these elements helps you cut through marketing hype and identify tools that genuinely deliver professional results.
Tip Technology and Precision Engineering
The heart of any stain pen lies in its applicator tip. In 2026, you’ll encounter everything from traditional fiber tips to advanced micro-felt precision points and even ceramic rollerball mechanisms. Fiber tips offer flexibility for broader strokes but can fray over time. Micro-felt tips maintain their shape through hundreds of applications, providing consistent line width. The newest ceramic rollerball tips, borrowed from high-end writing instrument technology, deliver the smoothest application with zero tip degradation, though they command premium prices. Consider your typical project scale—if you’re constantly working with hairline scratches, a 0.5mm micro-felt tip outperforms a broader 2mm fiber tip every time.
Stain Formulation and Color Fastness
The chemistry inside that pen matters enormously. Top-tier formulations now incorporate nano-pigments that penetrate deeper into wood fibers while maintaining color consistency. Look for pens advertising “UV-stable” or “non-fading” formulations—these contain light stabilizers that prevent the ambering and color shift that plague cheaper alternatives. Oil-based stains traditionally offered richer color but suffered from long drying times. Modern water-based formulas in 2026’s pens have closed that gap, delivering comparable depth with faster curing and easier cleanup. The key is checking whether the manufacturer lists the Lightfastness Rating; aim for ASTM I or II ratings for projects exposed to sunlight.
Drying Time and Curing Mechanisms
Time is money, especially for professional restorers. The best stain pens of 2026 feature advanced curing agents that reduce tack-free time to under 30 minutes while allowing full cure within 4-6 hours. Some incorporate moisture-cure technology that actually strengthens the bond as it reacts with ambient humidity—perfect for workshops in variable climates. Quick-dry formulas prevent dust contamination and allow faster handling, but be wary of pens that dry too fast; you need adequate working time to blend and feather edges. The sweet spot lies in formulas that remain workable for 2-3 minutes but set within 15-20 minutes.
Ergonomics and User Control
Never underestimate the importance of a comfortable grip during extended touch-up sessions. Premium pens feature contoured barrels with non-slip grip zones that reduce hand fatigue during detailed work. The balance point should fall naturally where you hold the pen—typically one-third up from the tip. Some innovative designs include transparent windows showing remaining stain levels, eliminating the frustration of a pen running dry mid-repair. Weight matters too; a pen that’s too light feels cheap and uncontrollable, while excessive heft causes tremors during precision work. The ideal weight ranges between 15-20 grams, similar to a quality fountain pen.
Understanding Stain Types and Their Applications
Matching the stain type to your specific project requirements determines success or failure. The market now offers specialized formulations that address virtually every woodworking scenario imaginable.
Oil-Based vs. Water-Based Stain Pens
Oil-based pens remain the gold standard for depth and richness on dense hardwoods like walnut and mahogany. They penetrate deeply, enhancing grain figure and creating that classic hand-rubbed appearance. However, they require mineral spirits for cleanup and emit higher VOC levels. Water-based pens have surged in popularity due to their eco-friendliness, soap-and-water cleanup, and dramatically reduced odor. The latest water-based formulations in 2026 incorporate co-solvents that improve penetration on oily woods like teak and rosewood, historically problematic for water-based products. For most interior projects, water-based pens now match oil-based performance while offering superior convenience.
Gel Stain Pens for Vertical Surfaces
Gel stain technology has finally been adapted to pen format, solving one of woodworking’s most persistent challenges: staining vertical surfaces without drips and runs. These thickened formulations cling to wood surfaces, allowing you to work on cabinet doors, furniture legs, and architectural trim without constant worry about gravity. The gel consistency also provides more uniform color on blotch-prone woods like pine and maple, as it sits on the surface rather than soaking in unevenly. The trade-off is slightly longer drying times and a more opaque finish that obscures some grain character—ideal for painted pieces needing stain-matched repairs.
Hybrid Formulations: The Best of Both Worlds
The most exciting development in 2026 is the emergence of hybrid stain pens that combine oil penetration with water-based cleanup. These formulations use oil-modified urethane carriers that flash off quickly but leave behind oil-compatible dyes. The result is deep, rich color with 30-minute drying times and simple soap-and-water cleanup of tools and mistakes. Hybrids also offer superior inter-coat adhesion, allowing you to layer colors or apply topcoats without extended waiting periods. While priced 20-30% higher than conventional pens, they eliminate the need to maintain separate oil and water-based inventories.
Color Matching Mastery for Seamless Repairs
The true test of any stain pen lies in its ability to blend invisibly with existing finishes. Mastering color matching requires understanding both the pen’s capabilities and the wood’s characteristics.
Working With Wood Grain Patterns
Always stain with the grain, never across it. This fundamental rule becomes even more critical with pens, where precision can highlight mistakes. On open-grain woods like oak or ash, use the pen tip to work stain deep into the pores, then immediately wipe across the grain with a clean cloth to remove surface excess. This technique fills the grain with color while keeping the surrounding wood lighter, mimicking how traditional wiping stains interact with porous wood. For tight-grain woods like cherry or maple, apply feather-light strokes, building color gradually in multiple passes rather than attempting full coverage in one go.
Layering Techniques for Depth
Professional restorers rarely achieve perfect matches with a single color. Instead, they layer complementary tones to replicate the complexity of aged finishes. Start with a base color slightly lighter than your target, then add darker tones in specific areas to simulate wear patterns or sun-fading. Use a pen with a fine tip to apply darker colors along edges, in corners, and around hardware where natural aging concentrates. Follow with a broader tip pen in the main color, working while the underlying layers remain slightly tacky to create natural blending. This approach creates dimension that single-color applications simply cannot achieve.
Advanced Application Techniques for Professional Results
Owning quality tools means nothing without proper technique. The subtleties of professional stain pen application separate amateur repairs from museum-quality restorations.
Prepping Your Surface: The Non-Negotiable First Step
Even the finest stain pen cannot compensate for poor preparation. Begin by cleaning the repair area with a tack cloth to remove all dust and debris. For scratches that have penetrated the finish, lightly scuff the surrounding area with 320-grit sandpaper, feathering out at least an inch beyond the damage. This creates a mechanical tooth for the stain to grip while blending the repair edge. On previously finished surfaces, apply a drop of denatured alcohol to test the existing finish—if it gets tacky, you’re dealing with shellac; if not, it’s likely polyurethane or lacquer. This knowledge determines whether you need to seal before staining or can apply directly.
The Art of Controlled Application
Hold the pen at a 45-degree angle, similar to a writing instrument, with your index finger positioned just above the tip for maximum control. Apply pressure gradually rather than pressing firmly—quality pens release stain in proportion to pressure, and heavy-handed application leads to pooling. For hairline scratches, use the very tip of the pen in short, stippling motions rather than drawing lines. This deposits tiny dots of color that visually blend from a distance while preventing the stain from bleeding along the scratch channel. Work in sections no larger than 2-3 inches at a time, especially with fast-drying formulas.
Blending and Feathering Strategies
The moment of stain application is just the beginning. Professional results demand immediate follow-through with blending tools. Keep a selection of lint-free cloths, cotton swabs, and even makeup applicators (the wedge-shaped ones work brilliantly) at hand. After applying stain, use a slightly dampened cloth to feather the edges outward, creating a gradient that fades into the surrounding wood. For ultra-precise blending, wrap a cotton swab with a single layer of cheesecloth—this creates a firm yet absorbent tool that can feather edges within millimeter tolerances. Some experts keep a small brush dampened with mineral spirits (for oil-based stains) or water (for water-based) to subtly pull color into surrounding areas, mimicking natural wood tone variations.
Troubleshooting Common Staining Challenges
Even experienced woodworkers encounter problems with stain pens. Knowing how to correct mistakes without starting over separates the pros from the hobbyists.
Managing Bleed-Through and Over-Application
When stain bleeds beyond your intended area, immediate action is critical. For water-based stains, a damp cloth can lift fresh stain within the first 30 seconds. For oil-based formulas, keep a cloth lightly moistened with mineral spirits ready. If the stain has already begun to set, use a fine artist’s brush dipped in sanding sealer to create a barrier, stopping the bleed. For severe over-application, allow the stain to dry completely, then sand back with 400-grit paper using a sanding block to keep the area level. Apply a thin wash of sealer before restaining to prevent the same issue.
Fixing Color Mismatches and Uneven Tones
Discovered your repair is too dark after the stain dried? Don’t panic. Lightly rub the area with 0000 steel wool dipped in mineral spirits to lift some color. For water-based stains, use a Magic Eraser lightly dampened with water. If the repair is too light, you have options: either apply another layer of the same color, or for more nuance, use a slightly darker shade in a fine-tip pen to add artificial grain lines and depth. Uneven tones often result from inconsistent pressure or tip wear. Maintain steady pressure and replace pens when tips begin to fray—most professionals swap pens after 50-75 linear feet of application to ensure consistency.
2026 Innovations in Stain Pen Technology
This year’s crop of stain pens incorporates technologies that seemed like science fiction just five years ago, fundamentally changing what’s possible in touch-up work.
Smart Dye Indicators and UV-Reactive Formulations
Leading manufacturers now integrate UV-reactive dyes that appear invisible under normal light but glow under UV inspection lamps. This allows you to see exactly where you’ve applied stain, ensuring complete coverage without overlapping. Once exposed to ambient light for 24 hours, these indicators permanently fade, leaving only the true stain color. Some premium pens also feature “smart” dyes that shift slightly in hue as they cure, giving visual feedback about drying progress. This prevents the common mistake of topcoating before full cure, which can cause adhesion failures or color shift.
Eco-Friendly and Low-VOC Developments
Environmental regulations and consumer demand have driven remarkable advances in sustainable stain technology. The newest pens boast VOC levels below 50 grams per liter—down from 250+ grams in older formulations—while maintaining performance. Some brands use bio-based solvents derived from citrus or soy, reducing petroleum dependence. Packaging innovations include refillable pen systems that cut plastic waste by 70%, and tips made from biodegradable materials rather than synthetic fibers. These eco-options perform comparably to traditional formulas, making them the responsible choice for environmentally conscious woodworkers without sacrificing quality.
Cost Analysis: Investment vs. Performance
Price points for quality wood stain pens in 2026 range from $8 to $35 per pen, creating a significant decision point for both hobbyists and professionals.
When to Choose Premium Over Budget Options
Budget pens ($8-$12) work adequately for single-use repairs or when color matching isn’t critical. They typically use simpler dye formulations that may fade within 2-3 years and fiber tips that degrade after 20-30 uses. Mid-range pens ($15-$22) offer the best value for most users, featuring decent tip durability, UV-stable colors, and consistent flow control. Premium pens ($25-$35) justify their cost through ceramic tips that last hundreds of applications, advanced formulations with 10+ year color guarantees, and ergonomic designs that reduce fatigue during marathon restoration sessions. For professionals who stake their reputation on invisible repairs, premium pens aren’t an expense—they’re cheap insurance against callbacks and dissatisfied clients.
Safety and Environmental Considerations
Even “low-VOC” products require proper handling to protect your health and achieve optimal results.
Proper Ventilation and Protective Equipment
Always work in areas with active ventilation—an open window with a box fan exhausting outward is the minimum requirement. While modern stains are safer, they still contain solvents and dyes that can cause respiratory irritation. Wear nitrile gloves to prevent skin absorption and staining of your fingers. For extended sessions or when using oil-based formulas, consider a half-face respirator with organic vapor cartridges. This isn’t overkill; professional restorers often work with multiple pens daily, and cumulative exposure matters. Keep a spray bottle of water nearby for water-based stains or mineral spirits for oil-based to immediately clean skin contact.
Storage and Shelf Life Best Practices
Stain pens last longest when stored horizontally at room temperature. Vertical storage causes pigments to settle at one end, leading to inconsistent color. Extreme temperatures degrade formulations—never leave pens in a garage that drops below freezing or exceeds 90°F. Most quality pens include a manufacturing date stamp; plan to use them within 18-24 months for optimal performance. To test viability, press the tip on scrap wood—if the stain appears watery or separated, or if the tip feels hardened, replace the pen. Some professionals store pens in airtight containers with a small humidity control packet, mimicking cigar storage, which can extend usable life by 6-12 months.
Frequently Asked Questions
How do I choose between a fine-tip and broad-tip stain pen for my project?
Select tip size based on your smallest detail. For hairline scratches under 1mm, choose 0.5mm fine tips. For general touch-ups and blending, 1-2mm medium tips offer versatility. Broad tips (3mm+) excel at covering larger damaged areas but sacrifice precision. Most professionals keep a set of three sizes in their most-used colors.
Can wood stain pens be used on top of existing polyurethane finishes?
Yes, but success requires surface prep. Lightly scuff the polyurethane with 400-grit sandpaper to create mechanical adhesion, then apply a thin coat of dewaxed shellac as a bonding agent before staining. Without this step, the stain will sit on the surface and wipe away. Some 2026 hybrid formulas advertise “direct to poly” application, but independent testing shows improved longevity with proper prep.
Why does my stain pen color look different on my project than on the cap?
Cap colors are approximations; wood species, existing finish, and application technique all affect final appearance. Always test on an inconspicuous area or scrap piece of the same wood. Apply, let dry for 24 hours, then topcoat with your intended finish, as topcoats can shift stain color by 10-15%. For critical matches, purchase three pens in slightly different tones and blend.
How long should I wait before applying a topcoat over stain pen work?
Drying times vary by formulation. Water-based stains typically require 1-2 hours before handling and 4-6 hours before topcoating. Oil-based stains need 6-8 hours before handling and a full 24 hours before topcoating. Hybrid formulas fall in the middle at 2-4 hours to handle, 8-12 hours to topcoat. Always test dryness by gently pressing a clean cloth—if any color transfers, wait longer.
What’s the best way to clean stain pen tips between colors?
For water-based stains, wipe the tip thoroughly with a damp cloth, then press on paper towel until the tip runs clear. For oil-based, use mineral spirits on a cloth, then wipe dry. Never submerge the entire tip assembly in solvent, as this can draw liquid back into the pen body and dilute the stain. Some professionals dedicate specific pens to specific colors to avoid cross-contamination entirely.
Can I refill wood stain pens, or are they single-use?
Several manufacturers introduced refillable systems in 2025-2026. These feature replaceable ink cartridges and reusable tip assemblies, reducing cost per use by 60% and environmental impact significantly. However, refilling requires careful technique to avoid air bubbles that cause inconsistent flow. Most refilling kits include syringes for precise filling. For casual users, disposable pens remain more convenient, but professionals using high volumes should consider refillable systems.
How do I prevent stain pens from bleeding into surrounding wood?
Bleed-through occurs when stain follows wood grain or finish cracks beyond the intended area. Prevent it by applying a sanding sealer or thin shellac wash to the repair area first, which stabilizes the surface. Work in small sections, and keep a clean, slightly dampened cloth ready to immediately wipe any bleed. For fine cracks, use a fine-tip pen with minimal pressure, applying stain in dots rather than lines to avoid capillary action pulling stain along the crack.
Are stain pen colors compatible with traditional canned stains from the same manufacturer?
Generally, yes, but with caveats. Most manufacturers use the same dye lots across product lines, but the carriers differ. Pen formulations are thinner to flow through tips, which can result in slightly different color saturation. For best results when using both pens and canned stains on one project, apply the pen work first, let it cure, then use the canned stain around it, feathering to blend. Test compatibility on scrap wood, as some pen sealers can repel traditional stains.
What’s the shelf life of an unopened wood stain pen vs. an opened one?
Unopened pens stored properly last 24-36 months from manufacture date. Once opened, the clock starts ticking—expect 12-18 months of optimal performance. The tip begins drying from the moment you uncap it, and solvents slowly evaporate through the seal. Mark the opening date on each pen with a permanent marker. If a pen has been unused for several months, test it on scrap and press the tip firmly several times to re-saturate it before important work.
Can I mix colors from different wood stain pens to create custom shades?
Absolutely, and this is where stain pens truly shine for custom work. Apply one color, let it become tacky (about 30-60 seconds), then apply the second color directly over it, blending with a cloth or brush. For more precise mixing, you can empty small amounts onto a palette and blend them like paint, applying with a separate fine brush. Some professionals create custom color charts by blending their standard pen colors in various ratios, documenting the formulas for future reference. Just ensure both pens use the same base formulation (oil with oil, water with water) to prevent compatibility issues.
See Also
- 10 Must-Have Wood Stain Pens for Detailed Woodworking Projects in 2026
- 10 Best Value Wood Stain Sprays for Large Surface Projects Under $20
- 10 Beginner-Friendly Stain Pens for Toy Repair Projects This Year
- 10 Fast-Drying Wood Stain Sprays for Large Surface Projects in 2026
- 10 Wood Stain Pens for Detail Work Every Miniaturist Needs in 2026