Table of Contents
Wood crafting has experienced a renaissance among DIY enthusiasts and professional makers alike, and nothing transforms a project quite like the rich, vibrant tones of quality wood dye. But here’s the thing: you don’t need to drain your wallet to achieve gallery-worthy results. In 2026, the market is flooded with surprisingly sophisticated wood dyes that punch well above their price point, proving that “budget-friendly” and “professional-quality” aren’t mutually exclusive. Whether you’re breathing new life into thrifted furniture, creating custom jewelry boxes, or experimenting with woodturning, understanding how to navigate the sub-$15 dye landscape can be the difference between a mediocre finish and a masterpiece that stops scrollers in their tracks.
The secret lies not in brand names or fancy packaging, but in knowing what chemical compositions, application techniques, and wood preparation methods actually matter. This comprehensive guide dives deep into the science and strategy behind selecting and using wood dyes under $15, equipping you with the knowledge to make informed decisions that stretch every dollar without compromising on depth of color, durability, or that satisfying “wow” factor. We’ll explore everything from the molecular behavior of different dye carriers to the nuanced ways various wood species accept color, ensuring your next project looks like it cost ten times what you actually spent.
Top 10 Wood Dye
Detailed Product Reviews
1. Wood Dye - Aniline Dye 5 Color Kit - Wood Stain Powder
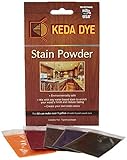
Overview: The Keda Dyes Aniline Dye Kit delivers five powdered wood dyes capable of producing five quarts of vibrant stain. This eco-friendly formulation emphasizes color intensity and environmental responsibility, making it suitable for woodworkers seeking powerful results without harsh chemicals. Each kit contains five exotic colors, providing a solid foundation for various projects from furniture to crafts.
What Makes It Stand Out: This kit’s primary distinction lies in its aniline dye composition, which penetrates deeply into wood fibers for rich, translucent colors that won’t mask grain patterns. The eco-friendly formulation appeals to environmentally conscious users, while the powder format ensures extended shelf life and reduced shipping weight. The five-quart yield from a single kit represents significant concentration, allowing users to mix custom colors and adjust intensity precisely.
Value for Money: Priced competitively against premium wood stains, this kit offers exceptional value through its concentration. Five quarts of ready-to-use stain from one package beats most pre-mixed alternatives cost-wise. The powder format eliminates paying for water weight, and the ability to create custom shades effectively provides unlimited color options without additional purchases.
Strengths and Weaknesses: Strengths include deep penetration, vibrant colors, eco-friendly formulation, excellent mixing flexibility, and substantial yield. Weaknesses involve required mixing time, potential for inconsistent results without careful measurement, and limited color guidance for beginners. Powder dyes also require proper storage to prevent moisture contamination.
Bottom Line: Ideal for intermediate to advanced woodworkers prioritizing environmental responsibility and color customization. The Keda kit delivers professional-grade results with excellent economy, though beginners should expect a learning curve with mixing ratios.
2. Wood Stain Powdered Solvent - Wood Dye - Indoor and Outdoor Furniture and More - Fast Drying - Wood Dye Powder - Wood Stain for Crafts - 5 Color Kit

Overview: This comprehensive five-color powdered dye kit targets both indoor and outdoor woodworking applications. The set includes primary colors (black, blue, brown, red, yellow) that mix with water to create one quart of stain per color. Designed for fast drying with minimal odor, it addresses common frustrations with traditional oil-based stains while maintaining versatility across furniture, fences, cabinets, and craft projects.
What Makes It Stand Out: The dual indoor/outdoor capability distinguishes this kit from water-based competitors limited to interior use. Fast-drying formulation significantly accelerates project timelines, while the primary color palette enables extensive custom mixing. The ability to layer under canned stains for added dimension demonstrates sophisticated finishing potential rarely found in entry-level kits.
Value for Money: Creating five quarts of premium stain from one affordable kit presents outstanding value. The weatherproof formulation eliminates need for separate exterior products, effectively doubling value for users tackling diverse projects. Compared to purchasing individual pre-mixed stains, cost savings exceed 60% while providing superior customization.
Strengths and Weaknesses: Strengths include indoor/outdoor versatility, rapid drying, low odor, primary color mixing system, and excellent layering capability. Weaknesses involve water-based formulation raising grain requiring pre-treatment, limited exotic colors in base kit, and dependence on proper mixing technique for consistent results.
Bottom Line: A versatile workhorse for hobbyists and professionals alike. This kit excels when projects demand both interior and exterior applications with custom color matching. The fast-drying feature and primary color system make it particularly valuable for high-volume workshops.
3. Transtint Dyes, Dark Walnut
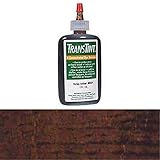
Overview: Transtint’s Dark Walnut offers professional-grade liquid dye concentrate in a compact 2-ounce bottle, yielding approximately two quarts of stain. This single-color solution targets serious woodworkers seeking consistent, premium results. The alcohol-soluble formula enables fast-drying applications without grain raising, while water-mixing option provides flexibility. Designed specifically for interior projects, it integrates seamlessly into existing finishing systems.
What Makes It Stand Out: Transtint’s reputation for unparalleled colorfastness and clarity sets it apart. The ability to mix directly into water-based finishes and solvents creates unique toning capabilities impossible with conventional stains. Alcohol-mixing option delivers rapid drying times essential for production environments, while the concentrated formula ensures deep penetration and grain definition.
Value for Money: While pricier per ounce than powdered alternatives, the professional-grade results justify the premium. Two quarts of high-performance dye from a small bottle demonstrates excellent concentration. For users focused on walnut tones, it eliminates waste from unused colors in multi-packs, making it economical for specialized applications.
Strengths and Weaknesses: Strengths include exceptional color clarity, versatile mixing options (water/alcohol/finishes), fast alcohol-based drying, professional-grade concentration, and consistent batch-to-batch quality. Weaknesses are limited to interior use only, single-color limitation requiring additional purchases for variety, and higher initial cost per unit.
Bottom Line: Perfect for professional finishers and serious hobbyists specializing in interior work. The Dark Walnut shade provides unmatched depth and clarity. While not the most economical for occasional users, its performance and versatility make it indispensable for fine furniture and cabinetry.
4. Vibrant Wood Dye Liquid Offered in 5 Color Liquid Dye Kit - Solvent Alcohol Dye
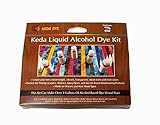
Overview: Keda’s alcohol-based liquid dye kit provides five one-ounce concentrated colors designed for solvent-based applications. When mixed with lacquer thinner or denatured alcohol, this kit produces an impressive 2.5 gallons of stain. The formulation targets advanced users requiring compatibility with lacquers, shellac, epoxy, and non-oil based topcoats, offering superior versatility in professional finishing environments.
What Makes It Stand Out: Alcohol-based chemistry enables exceptionally fast drying without grain raising, critical for production workflows. The extensive 2.5-gallon yield from such small bottles showcases remarkable concentration. Unparalleled compatibility with various solvent systems allows integration into existing finishing schedules, while the liquid format ensures precise, repeatable mixing ratios essential for commercial operations.
Value for Money: Despite higher upfront cost, the 2.5-gallon output represents extraordinary value-per-volume. For shops already using solvent-based systems, this eliminates purchasing separate pre-mixed stains. The ability to tint topcoats directly provides additional value streams, making it a cost-effective solution for professional finishers requiring volume and versatility.
Strengths and Weaknesses: Strengths include rapid solvent drying, zero grain raise, massive yield, exceptional compatibility with finishing systems, and professional-grade concentration. Weaknesses involve flammability concerns requiring ventilation, incompatibility with oil-based systems, higher skill requirements for safe handling, and limited appeal for casual hobbyists.
Bottom Line: Best suited for professional woodworking shops and experienced finishers working with solvent-based systems. The alcohol dye chemistry delivers unmatched speed and clarity. While overkill for occasional DIY projects, it’s an economical powerhouse for high-volume production environments requiring consistent, rapid results.
5. NINESUNG Professional 5-Colors Wood Dye Powder Set - 2oz Each for Furniture, Decks & DIY Crafts - Fast-Acting, Weatherproof Pigment - Works on Indoor/Outdoor Wood Surfaces (5 Colors)

Overview: NINESUNG’s professional powder dye set features five unique colors (Purple, Rose Red, Navy Blue, Green, Black) in convenient 2-ounce resealable canisters. Each container yields substantial coverage, with just 0.5 ounces coating approximately 50 feet of wood. The weatherproof formulation serves both indoor and outdoor applications, while the 2-5% mixing ratio provides precise control over color intensity for furniture, decks, and craft projects.
What Makes It Stand Out: The distinctive color palette differentiates this kit from traditional primary-color sets, offering contemporary hues for modern designs. Resealable, moisture-proof canisters ensure long-term storage stability rarely found in bag-packaged dyes. The explicit weatherproofing claim provides confidence for exterior applications, while the precise mixing ratio guidance simplifies the learning curve for beginners.
Value for Money: Five colors with substantial individual quantities deliver excellent value for users seeking variety. The weatherproof feature eliminates need for separate exterior stains, effectively doubling utility. While slightly higher-priced than basic kits, the professional packaging, unique colors, and clear instructions justify the premium for users valuing convenience and specialized hues.
Strengths and Weaknesses: Strengths include unique contemporary colors, excellent packaging, weatherproof versatility, beginner-friendly instructions, and low-toxicity formulation. Weaknesses involve non-traditional palette limiting classic woodworking applications, powder format requiring careful mixing, and potential color unpredictability on different wood species.
Bottom Line: Excellent choice for DIY enthusiasts and modern furniture makers seeking contemporary color options. The weatherproof capability and user-friendly packaging make it particularly valuable for exterior projects. While traditionalists may prefer classic wood tones, this kit excels for creative applications requiring bold, modern aesthetics.
6. Navy Blue Wood Stain Powder, Wood Dye Powder- Just Add Water - Water Based - for Indoor and Outdoor Wooden Crafts - Fast Drying - Dye Powder 2 oz Makes 2.2 Gallon of Stain (Navy Blue, 2 oz)

Overview: This highly concentrated navy blue wood dye powder from NINESUNG transforms 2 ounces of dry pigment into an impressive 2.2 gallons of stain. The water-based formula activates with simple mixing, offering a fast-drying solution for both interior and exterior woodworking projects. Designed for craftspeople and DIY enthusiasts, this product promises even color penetration across furniture, fences, cabinets, and musical instruments.
What Makes It Stand Out: The exceptional yield sets this product apart—2.2 gallons from a small foil package provides remarkable coverage for large projects or multiple smaller pieces. The navy blue shade delivers a deep, sophisticated tone that works beautifully on both modern and rustic wood pieces. Its eco-friendly, non-toxic composition produces minimal odor, making it suitable for indoor use without harsh ventilation requirements. The quick 3-5 minute penetration time accelerates project completion.
Value for Money: At this concentration level, the cost per gallon is substantially lower than pre-mixed liquid stains. A single 2 oz package can stain approximately 25 feet of wood, making it economical for extensive projects. Compared to traditional oil-based stains, you save on both product cost and cleanup supplies. The resealable packaging prevents waste, allowing precise portion control for custom mixing.
Strengths and Weaknesses: Strengths: Outstanding coverage and yield; environmentally safe with low VOCs; fast drying time reduces project duration; simple water activation; even color distribution; suitable for diverse applications from guitars to fencing.
Weaknesses: Requires careful mixing to achieve consistent color; powder color doesn’t indicate final result, necessitating test pieces; may raise wood grain requiring light sanding; needs clear sealer topcoat for durability; color accuracy depends on wood species and preparation.
Bottom Line: Ideal for budget-conscious woodworkers tackling large navy-blue projects, this powder dye delivers professional results with minimal environmental impact. Perfect for those comfortable with mixing who want maximum coverage from minimal product.
7. Ninesung Wood Stain Powder, 10 Colors/Set, Wood Dye Powder, Colored Wooden Stain, Furniture Color Dye for Outdoor Indoor Wooden (10 Colors)

Overview: This comprehensive set from NINESUNG includes ten vibrant wood dye powders—Purple, Red, Yellow, Blue, Green, Black, Pink, Navy Blue, Rose Red, and Orange—each in a 2 oz resealable foil bag. The water-activated formula provides the same fast-drying, non-toxic performance as their single-color offerings, giving crafters a complete palette for creative woodworking projects.
What Makes It Stand Out: The sheer variety in one purchase eliminates the need to buy multiple individual packages, making it perfect for multi-color furniture restoration, artistic crafts, or experimental work. Each color maintains the brand’s high concentration, requiring only 2-5% mixing ratio. The foil bags protect unused powder from moisture, ensuring longevity. This set particularly appeals to furniture flippers and toy makers needing diverse color options.
Value for Money: Purchasing this set offers significant savings compared to buying ten individual colors separately. Each 2 oz package covers approximately 25 feet of wood, providing substantial total coverage across all colors. For workshops undertaking varied projects, the cost-per-color is exceptionally reasonable. The ability to blend custom shades further extends the value, essentially creating an infinite color palette from ten base powders.
Strengths and Weaknesses: Strengths: Unmatched color variety; economical bulk purchase; consistent quality across all shades; safe for children’s toys and indoor furniture; excellent for color mixing and custom tones; fast application process; minimal environmental impact.
Weaknesses: Individual colors yield less total stain than the 2.2-gallon single-color version; may include hues you rarely use; requires significant storage space; same mixing challenges as single powders; color results vary dramatically by wood type.
Bottom Line: A must-have for creative woodworkers and professional craftspeople who need color flexibility. The set provides exceptional value and versatility, making it the smartest choice for those who regularly work with multiple colors.
8. TransTint Dyes, Dark Vintage Maple, 2 oz

Overview: TransTint’s Dark Vintage Maple is a professional-grade liquid dye concentrate favored by master woodworkers and luthiers. This 2 oz bottle yields approximately 2 quarts of dye-stain and mixes seamlessly with water, alcohol, shellac, or lacquer. The fully dissolved formula eliminates the grain-raising issues common with powdered dyes while delivering transparent, vibrant color that enhances wood’s natural character.
What Makes It Stand Out: The versatility of mixing mediums allows unparalleled control over drying time, penetration depth, and final sheen—critical for fine furniture and instrument finishing. Unlike powder alternatives, this liquid concentrate dissolves completely, ensuring batch-to-batch consistency. The Dark Vintage Maple shade provides a rich, warm brown with subtle amber undertones that excel at aging new wood or matching antique finishes. Its compatibility with General Finishes topcoats creates a trusted system for professional results.
Value for Money: While priced higher than consumer-grade powders, the professional results justify the cost for serious woodworkers. The 2 oz concentrate produces half a gallon of stain, making it economical for high-end projects where consistency matters. The ability to mix with existing finishes reduces waste and eliminates the need for multiple stain types. For restoration work or guitar building, the price is negligible compared to the value of flawless color matching.
Strengths and Weaknesses: Strengths: Superior grain clarity without muddying; compatible with multiple solvents and finishes; predictable, repeatable results; no grain raising; trusted by professionals; excellent for color matching; long shelf life; precise color control.
Weaknesses: Premium price point; requires careful measurement for proper dilution; not water-only like some DIY alternatives; alcohol mixing requires ventilation; limited quantity for large surface areas; color mixing requires experience.
Bottom Line: The gold standard for discerning woodworkers who demand professional, repeatable results. Worth every penny for fine furniture, instrument making, and restoration where color accuracy and grain enhancement are paramount.
9. Ninesung Red Wood Stain | Wood Dye Powder for Indoor and Outdoor | Furniture Dye | Fast Drying | Furniture Stain for Wooden Pigment Coloring Powder (Red, 2 Ounces)

Overview: This vibrant red wood dye powder from NINESUNG delivers the same water-activated, fast-drying formula as their multi-color set but focuses on a single bold hue. The 2 oz package produces a substantial quantity of stain for targeted projects requiring consistent red tones. Suitable for indoor and outdoor applications, this non-toxic powder offers an eco-friendly alternative to conventional stains for furniture, crafts, and decorative pieces.
What Makes It Stand Out: The intensity of this red pigment provides excellent coverage with just one coat, making it ideal for statement pieces and restoration work where rich color is paramount. The powder format allows users to control concentration—from subtle washes to deep crimson—by adjusting the 2-5% mixing ratio. Its quick 3-5 minute penetration time speeds up project completion, while the low-odor formula enables indoor use without disruption. The resealable packaging maintains freshness for future touch-ups.
Value for Money: For projects specifically requiring red, this single-color purchase is more economical than the full 10-color set. Each 2 oz package covers approximately 25 feet of wood, offering reasonable coverage for focused applications. However, it lacks the volume economy of the navy blue 2.2-gallon version. Compared to pre-mixed red stains, the powder format reduces cost per use and eliminates waste from unused product drying out in cans.
Strengths and Weaknesses: Strengths: Bold, consistent red color; adjustable intensity through mixing ratios; safe for indoor use and children’s items; fast drying; minimal environmental impact; good coverage per ounce; easy water cleanup.
Weaknesses: Single-color limitation reduces versatility; requires mixing and testing; final color varies by wood species; may need multiple coats for desired depth; powder form less convenient than liquid; grain raising requires extra sanding step.
Bottom Line: Perfect for woodworkers committed to red finishes who want the flexibility of custom mixing. Consider the 10-color set if you anticipate needing other hues, but this delivers excellent value for dedicated red projects.
10. General Finishes Water Based Dye, 1 Quart, Medium Brown
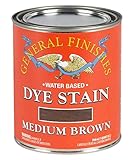
Overview: General Finishes delivers a ready-to-use, professional-quality water-based dye in a convenient quart container. This Medium Brown shade provides deep, rich tones that penetrate wood fibers thoroughly, enhancing grain patterns without obscuring natural character. Designed to perform like solvent-based stains, this product eliminates harsh fumes and simplifies cleanup while delivering professional results on furniture, cabinetry, and millwork.
What Makes It Stand Out: The ready-to-use formula eliminates mixing errors and ensures consistent color from the first drop to the last, crucial for large projects requiring uniform appearance. General Finishes’ reputation for quality guarantees reliable performance across diverse wood species. The Medium Brown shade offers versatile, timeless appeal suitable for both contemporary and traditional pieces. Its compatibility with water-based topcoats creates a complete system without adhesion concerns.
Value for Money: While more expensive upfront than powder concentrates, the convenience and consistency justify the cost for professionals and serious hobbyists. The quart size provides ample coverage for medium-to-large projects without the need for mixing equipment or test batches. Compared to other premium ready-to-use dyes, General Finishes offers competitive pricing with superior penetration and color quality. The time saved on preparation and troubleshooting represents additional value.
Strengths and Weaknesses: Strengths: Consistent, predictable results; no mixing required; excellent grain enhancement; low odor and easy water cleanup; multiple application methods (brush, rag, pad, spray); professional brand reliability; ready when inspiration strikes.
Weaknesses: Higher cost per volume than concentrates; single color commitment; requires proper storage to prevent freezing; water-based formula may raise grain; limited to water-based topcoats without compatibility testing; less economical for small projects.
Bottom Line: The ultimate convenience choice for woodworkers who prioritize time and consistency over maximum economy. Ideal for professionals and dedicated hobbyists who want reliable, beautiful results without the learning curve of mixing concentrates.
Understanding Wood Dye Chemistry for Better Results
Wood dye isn’t just colored liquid—it’s a carefully formulated solution where microscopic color molecules penetrate deep into wood fibers, creating a translucent effect that enhances rather than masks natural grain. Unlike paint that sits on the surface, dye forms a chemical bond with the lignin in wood cells. The size of these color molecules determines how deeply they penetrate and how lightfast the final result will be. In budget-friendly options under $15, manufacturers often use synthetic dyes that offer excellent color stability while keeping costs manageable.
The carrier solvent—whether water, alcohol, or oil—acts as the delivery vehicle. Each carrier interacts differently with wood’s cellular structure. Water-based dyes cause wood fibers to swell slightly, which can raise the grain but also allows for easier color correction. Alcohol-based formulas evaporate rapidly, reducing the risk of over-saturation but requiring faster work. Oil-based dyes penetrate deepest and provide the most uniform color on dense hardwoods, though they typically take longer to dry. Understanding these fundamentals helps you predict how a dye will behave on your specific project before you even open the bottle.
Why $15 Is the Sweet Spot for Crafting Wood Dyes
The $15 price point represents a fascinating intersection of manufacturing efficiency and consumer demand. At this level, manufacturers can afford to use quality dye concentrates while maintaining profit margins through streamlined packaging and focused color ranges. You’re essentially getting professional-grade colorants without the markup that comes from extensive marketing campaigns or boutique branding. For crafters working on small to medium projects, these dyes offer enough volume—typically 4 to 8 ounces—to complete multiple pieces while remaining fresh enough to use before degradation occurs.
Quality vs. Quantity: What You’re Really Paying For
When evaluating wood dyes under $15, the value isn’t measured in ounces alone. A concentrated 4-ounce bottle that requires dilution often outperforms a pre-mixed 8-ounce bottle because you’re paying for pure colorant rather than diluted solution. Look for products that specify “concentrated” or “mixing strength” on the label. These typically contain 2-3 times the dye load of their ready-to-use counterparts, meaning you can customize intensity while effectively reducing the per-project cost to pennies. The real metric is how many square feet of wood surface you can cover with rich, even color, not how much liquid comes in the container.
Budget-Friendly Doesn’t Mean Low-Quality
Modern manufacturing has democratized dye quality. Many sub-$15 dyes use the same aniline-derived colorants found in premium products, sourced from the same handful of global chemical suppliers. The difference often lies in auxiliary ingredients—premium lines might include flow agents, stabilizers, or UV inhibitors that extend shelf life. However, for indoor crafting projects that won’t face direct sunlight, these additives matter less than proper application technique. Independent testing shows that many budget dyes achieve 90% of the lightfastness and color depth of their expensive counterparts when applied correctly to properly prepared wood.
Types of Wood Dyes Available in the Sub-$15 Range
The budget category includes four primary formulations, each with distinct advantages for different crafting scenarios. Water-based dyes dominate this price point due to lower manufacturing costs and easier cleanup. They typically come as powders or concentrated liquids that mix with tap water. Alcohol-based dyes appear frequently in small bottles perfect for detail work and touch-ups. Oil-based options are rarer under $15 but exist, usually in smaller volumes ideal for jewelry boxes or turned pens. Hybrid dyes that combine water and alcohol carriers are emerging in 2026, offering fast drying times with reduced grain raising.
Water-Based Dyes: Pros and Cons
Water-based dyes offer unparalleled ease of use and safety. They clean up with soap and water, produce minimal fumes, and allow for infinite working time since you can rewet the surface to adjust color. The downside is grain raising—water causes wood fibers to swell, creating a fuzzy texture that requires additional sanding between coats. On the positive side, water-based dyes provide the most transparent, natural-looking results because they don’t contain binders that could obscure grain. For beginners, the forgiving nature and easy correction make them the ideal starting point, especially on open-grain woods like oak and ash.
Alcohol-Based Dyes: Fast-Drying Solutions
Alcohol-based dyes evaporate within minutes, making them perfect for layered applications and multi-color projects where you need to work quickly. They penetrate less deeply than water-based dyes but create incredibly sharp, defined color transitions. The rapid drying prevents over-saturation and reduces the risk of blotching on problematic woods like pine or maple. However, the fumes require good ventilation, and the quick drying leaves little room for error. For experienced crafters creating intricate patterns or gradient effects, alcohol dyes offer precision that’s worth the learning curve.
Oil-Based Dyes: Deep Penetration Benefits
Oil-based dyes use mineral spirits or similar petroleum distillates as carriers, allowing them to penetrate the densest hardwoods like ebony, rosewood, and exotic species. They dry slowly—often 24-48 hours—which provides ample time for manipulation and ensures even color distribution. The oil content slightly conditions the wood, reducing the need for additional sanding. The trade-off is stronger fumes, longer wait times between finishing steps, and more difficult cleanup. In the sub-$15 category, these typically come in 2-4 ounce bottles, making them economical for small projects requiring rich, deep tones.
Powdered vs. Pre-Mixed: Which Offers Better Value?
Powdered dyes represent the ultimate value proposition. A $12 jar of dye powder can make 16-32 ounces of liquid dye depending on concentration, effectively reducing your cost to under $0.50 per ounce. The powder format also guarantees maximum shelf life—unmixed dye remains viable for years if kept dry. Pre-mixed liquids offer convenience and consistency, eliminating the guesswork in mixing ratios. For crafters who experiment with color intensity or work on varied project sizes, powders provide flexibility. For those who value speed and repeatability, pre-mixed solutions justify their slightly higher per-ounce cost.
Key Features to Evaluate Before Purchasing
Before clicking “add to cart,” examine the product specifications with a critical eye. The most important metric is the Color Index (CI) number, which identifies the specific dye molecule used. Common ones include CI 50420 for basic browns and CI 42535 for vibrant blues. Higher CI numbers often indicate newer, more stable formulations. Check for any mention of “metal complex” dyes—these offer superior lightfastness by chelating dye molecules to metal ions, creating a more durable bond with wood fibers.
Color Concentration and Pigment Load
Manufacturers rarely disclose exact percentages, but you can gauge concentration by checking mixing instructions. A dye that recommends 1-2 drops per ounce of solvent is highly concentrated. One that suggests using full-strength or minimal dilution likely contains more filler than colorant. Shake the bottle if possible—high-quality dyes feel slightly viscous and coat the sides evenly. Thin, watery consistencies often indicate over-dilution at the factory. For powders, finer granules dissolve more completely and indicate better manufacturing processes.
Lightfastness Ratings Explained
Lightfastness measures how well color resists fading when exposed to light, typically rated on a scale of 1-8 (with 8 being most resistant). Budget dyes rarely advertise ratings above 5-6, which suffices for decorative items kept indoors away from windows. For pieces near natural light, look for dyes mentioning “UV stabilizers” or “enhanced lightfastness.” In 2026, many manufacturers are adopting the Blue Wool Scale rating system, which provides more accurate predictions of fading. A rating of 4-5 on this scale equals several years of indoor display before noticeable fading occurs.
Coverage Area: Getting the Most Bang for Your Buck
Coverage depends on wood porosity and desired intensity, but most 4-ounce bottles of concentrated dye cover 50-100 square feet at medium intensity. Calculate your project’s surface area in square inches, then convert to square feet (divide by 144). Add 20% for waste and touch-ups. Powdered dyes offer the best coverage-to-cost ratio—a $10 jar might cover 500+ square feet when diluted appropriately. Always check if the manufacturer provides coverage estimates, and be skeptical of claims exceeding 150 square feet per ounce unless the dye is specifically marketed as ultra-concentrated.
Essential Tools That Maximize Dye Performance
Your dye is only as good as your application tools. For water-based dyes, synthetic bristle brushes hold less dye than natural hair brushes, giving you more control and reducing drips. Foam brushes work surprisingly well for flat surfaces, creating thin, even coats. For alcohol-based dyes, use only synthetic materials—natural fibers can dissolve in alcohol. Invest in a set of small, inexpensive detail brushes for tight corners and edge work. These tools cost under $3 each but dramatically improve results.
Applicator Options That Affect Your Final Result
Cotton rags remain the most economical and effective applicator for large surfaces, allowing you to wipe on dye in thin, controllable layers. Paper towels, while convenient, can leave lint and create uneven absorption. For spray applications, even a $10 harbor-freight-style spray bottle can achieve professional results if you strain the dye first through a coffee filter to remove particles. Sponges create interesting texture effects but absorb excessive dye, wasting product. Silicone applicator pads, new to the market in 2026, provide the most even distribution and can be cleaned and reused indefinitely.
Sanding Techniques That Prep Wood for Dye
Proper sanding creates the foundation for dye absorption. Start with 120-grit to remove machine marks, then progress to 180-grit for open-grain woods or 220-grit for tight-grain species like maple. The crucial step is a final pass with 320-grit or higher after raising the grain with a damp cloth. This final ultrafine sanding shears off raised fibers without closing pores. Always sand in the direction of the grain, and never skip grits—each level of abrasion removes the scratches from the previous grit. For end grain, which absorbs dye aggressively, pre-seal with a 10% diluted shellac solution to prevent oversaturation.
Color Theory Basics for Wood Crafters
Understanding how dye colors interact with wood’s natural undertones prevents disappointing results. Most woods have underlying hues: maple leans yellow, cherry has pink undertones, and walnut contains gray notes. When you apply dye, you’re not replacing these undertones but mixing with them. A blue dye on yellow-toned pine creates greenish results. A red dye on cherry intensifies the pink, sometimes to an unnatural degree. Always test on scrap wood from your project, not just any piece of the same species—different boards can have varying tannin levels that affect color uptake.
Understanding Undertones in Different Wood Species
Softwoods like pine, fir, and cedar contain more sap and resin, which can repel water-based dyes and create blotchy results. They also have pronounced earlywood and latewood differences that absorb color unevenly. Hardwoods vary dramatically: oak’s open grain creates a textured color effect, while maple’s tight grain shows every application mark. Exotic woods often contain oils that resist dye entirely. Research your specific wood species before selecting a dye type and color. For unpredictable woods, a pre-dye conditioner (a $5 investment) controls absorption and ensures even color.
Creating Custom Colors by Mixing Dyes
The real value of budget dyes emerges when you start mixing custom colors. Since you’re not paying premium prices per bottle, experimenting becomes affordable. Mix dyes of the same carrier type—never combine water and alcohol bases, as they separate. Start with a base color (typically a brown or gray) and add small amounts of primary colors. Record your ratios meticulously: “3 drops brown + 1 drop red + 2 drops yellow per ounce of water.” Test on scrap wood, let it dry completely, then apply your topcoat before judging the final color, as finishes alter the appearance. Keep a notebook of successful formulas for future projects.
The Role of Wood Grain in Color Perception
Grain pattern dramatically influences how we perceive dyed color. Open-grain woods like oak and ash create a two-tone effect as dye pools in the pores while staining the surrounding wood lighter. This can be desirable for a rustic look or problematic for modern aesthetics. To minimize grain contrast, apply a thin coat of clear sanding sealer before dyeing, which partially fills pores. Conversely, to emphasize grain, apply dye liberally, let it dry, then sand back the surface lightly with 400-grit paper—this removes dye from the surface while leaving it deep in the pores, creating dramatic dark lines against a lighter background.
Application Techniques for Professional Results
The difference between amateur and professional results often comes down to application strategy, not product quality. Professionals apply multiple thin coats rather than one heavy coat, building color gradually to avoid blotching and maintain grain clarity. They also control evaporation rates—covering the workpiece with a plastic sheet between coats slows drying, allowing dye molecules to penetrate more deeply and evenly. For large surfaces, work in sections no wider than your arm’s reach to maintain a wet edge and prevent lap marks.
The Wipe-On Method for Beginners
Wiping remains the most forgiving application technique. Pour a small amount of dye into a shallow container, saturate a clean cotton cloth, and apply in circular motions to work the dye into the wood. Immediately follow with straight, overlapping strokes along the grain to remove excess and ensure even distribution. The key is controlling the amount of dye on your cloth—it should feel damp, not dripping. Work quickly, as dye begins penetrating within seconds. For larger pieces, have a helper follow behind you with a dry cloth to catch runs and drips. This method uses minimal product while providing maximum control.
Spray Application for Advanced Crafters
Spraying creates the most uniform color on complex shapes and carved details. Thin your dye to the consistency of skim milk—typically 1 part dye to 1-2 parts solvent for concentrated formulas. Use a spray bottle with a fine mist setting, holding it 6-8 inches from the surface. Apply 3-5 ultra-thin mist coats, allowing each to flash-dry for 30-60 seconds before the next. This builds color gradually without oversaturation. Always spray in a well-ventilated area and strain your dye through a coffee filter to prevent nozzle clogging. The technique uses more product but achieves flawless results on difficult woods.
Layering and Blending for Depth
Professional color depth comes from layering complementary colors. Start with a light base color (yellow or amber) to warm the wood and provide uniform absorption. Once dry, apply a darker, contrasting color (brown or gray) and immediately wipe back the surface, leaving the darker shade primarily in pores and crevices. This two-step process creates dimensional color that shifts in different lighting. For a third level of complexity, add a tint to your topcoat—mixing a few drops of dye into polyurethane or shellac adds a subtle tone shift that unifies the entire piece.
Common Mistakes That Waste Your Dye and Money
Even the best dye performs poorly when misused. The most expensive error is over-application. Excess dye sits on the surface and rubs off during finishing, creating a muddy appearance and wasting product. A single 4-ounce bottle should dye dozens of small projects; if you’re emptying it after two coats on a jewelry box, you’re applying too much. Another costly mistake is working in direct sunlight or under hot workshop lights, which causes rapid evaporation and uneven color. Dye in ambient room temperature (65-75°F) with indirect lighting.
Over-Saturation and Blotching Prevention
Blotching occurs when wood absorbs dye unevenly, creating dark splotches. Prevention starts with wood selection—avoid pieces with wild grain patterns or resin pockets for solid colors. Apply a thin coat of wood conditioner (diluted glue size or commercial pre-stain) 30 minutes before dyeing. This partially seals absorbent areas, creating more uniform absorption. When dyeing, work in small sections and wipe off excess immediately. If blotching occurs, quickly wipe the entire surface with a cloth dampened with the dye’s carrier solvent—this lifts dye from the wood and allows you to restart that section.
Skipping the Critical Prep Steps
Rushing preparation wastes more dye than any other mistake. New wood requires sanding to 220-grit minimum; reclaimed wood needs stripping and neutralizing. Every trace of old finish, oil from your hands, or dust particle creates a barrier that prevents dye penetration. Wipe the entire piece with a tack cloth, then with a cloth dampened with denatured alcohol (for alcohol-based dyes) or mineral spirits (for oil-based dyes) just before application. This final wipe removes microscopic contaminants and slightly opens the grain for better absorption. The five minutes this takes saves hours of reworking blotchy results.
Ignoring Temperature and Humidity Factors
Dye behavior changes dramatically with environmental conditions. Below 60°F, dyes dry slowly and can penetrate too deeply, creating dull color. Above 80°F, they flash-dry before leveling, leaving lap marks. Ideal humidity ranges from 40-60%; higher humidity slows drying, while low humidity accelerates it. In dry climates, mist the wood lightly with water 10 minutes before applying water-based dye—this prevents the wood from drawing dye too quickly into its pores. In humid conditions, use a fan set to low speed to maintain air circulation without creating dust problems.
Project-Specific Considerations
Different projects demand different dye strategies. Cutting boards and food-contact items require food-safe dyes, which are rare under $15 but do exist—look for “FDA-approved” or “food-grade” labels. Children’s toys need non-toxic, saliva-resistant formulas. Wall art prioritizes color vibrancy over durability, allowing you to use less expensive dyes with lower lightfastness. Understanding your project’s end use helps you select appropriately without overpaying for features you don’t need.
Small Decorative Items vs. Larger Furniture Pieces
For small items like coasters, ornaments, or jewelry boxes, concentrated dyes offer the best value since you can mix tiny batches. A single 4-ounce bottle might last 50+ small projects. Apply dye with a small artist’s brush for precision. For larger furniture, coverage area becomes critical. Calculate total surface area and ensure you have enough dye mixed before starting—stopping mid-project to mix more creates visible color differences. Consider using a foam roller for broad, flat surfaces followed by immediate back-brushing with a bristle brush to eliminate bubbles and even out the color.
Indoor vs. Outdoor Project Requirements
Outdoor projects demand dyes with UV inhibitors and water resistance, features rarely found in sub-$15 products. However, you can work around this limitation by applying a UV-resistant topcoat. Spar urethane with UV blockers costs about $8-12 and protects budget dye effectively. For outdoor pieces, choose darker colors (browns, dark grays) that show fading less obviously than bright reds or blues. Apply 2-3 thin dye coats rather than one heavy coat—this builds more stable color that weathers evenly. Indoor projects have no such restrictions, allowing full creative freedom with colors and application methods.
Matching Existing Wood Finishes on a Budget
Color matching requires patience and a systematic approach. Start with the lightest color in your target piece and find a dye close to it. Apply to scrap wood, let dry, then compare in natural daylight. If it’s too light, add small amounts of a darker dye; if the hue is wrong, add complementary colors in tiny increments. Document your formula precisely. For complex matches, consider that old finishes often amber with age—add a drop of yellow or amber dye to replicate this effect. Remember that wood age and species affect the final appearance; a match on pine won’t look identical on oak even with the same dye formula.
Safety and Environmental Factors
Budget dyes sometimes cut corners on safety, but modern regulations have improved even entry-level products. However, always assume dyes contain chemicals requiring precautions. Work in a space with active ventilation—an open window with a box fan exhausting outward suffices for most water-based dyes. For alcohol or oil-based products, consider a respirator with organic vapor cartridges, available for under $15. This small investment protects your health and allows you to work comfortably for extended periods.
VOC Content and Workspace Ventilation
Volatile Organic Compounds (VOCs) evaporate from dyes as they dry, creating fumes that can cause headaches and respiratory irritation. Water-based dyes typically contain under 50 grams per liter VOC, making them safe for home use. Alcohol-based dyes range from 300-700 g/L, requiring good airflow. Oil-based products can exceed 500 g/L. Check the label for VOC content; products under 250 g/L are considered low-VOC. If your workspace lacks windows, work in a garage with the door open or use a bathroom with the exhaust fan running. Never use any dye in a completely enclosed space.
Protective Gear Essentials
At minimum, wear nitrile gloves—latex allows dye to penetrate and stain your skin for days. Safety glasses prevent splashes, especially when mixing powders. A long-sleeve shirt protects arms from accidental contact. For spraying or working with oil-based dyes, add a respirator. Keep a box of baking soda nearby; it neutralizes spills on skin (mix with water to form a paste). Dye stains on clothing are permanent, so designate old clothes as workshop wear. These precautions cost less than $10 total but prevent costly mistakes and health issues.
Eco-Friendly Options in the Budget Category
Environmental consciousness doesn’t require premium prices. Look for dyes labeled “biodegradable” or “plant-based.” These use natural colorants from walnut hulls, logwood, or berries, though colors are more muted than synthetic dyes. Some companies offer “take-back” programs where you return empty containers for recycling, often providing a small discount on future purchases. Water-based dyes are inherently more eco-friendly than solvent-based options. Dispose of dye-soaked rags properly—lay them flat to dry completely before discarding to prevent spontaneous combustion, especially with oil-based products. Never pour leftover dye down drains; evaporate water-based dyes in a pan or take solvents to hazardous waste collection.
Storage and Shelf Life: Protecting Your Investment
Proper storage extends dye viability from months to years. All dyes suffer from three enemies: light, air, and temperature extremes. Store bottles in a dark cabinet or box—exposure to light, even artificial light, degrades color molecules over time. Ensure caps are tightly sealed; oxygen causes oxidation that changes dye chemistry. Ideal storage temperature is 60-70°F; freezing separates components and high heat accelerates degradation. A simple plastic storage bin with a lid, kept in a climate-controlled room, protects your entire dye collection for under $5.
Proper Sealing and Temperature Control
After opening, transfer powdered dyes to airtight glass jars with rubber gaskets—plastic bags allow moisture infiltration. For liquid dyes, add a few drops of a product like Bloxygen (an inert gas that displaces oxygen) before resealing, though simply squeezing the bottle to raise the liquid level before capping achieves similar results. If you must store dyes in a garage or shed, insulate them in a cooler with a small thermometer to monitor temperature. Temperatures below 40°F or above 90°F can ruin dyes in weeks. Consider bringing temperature-sensitive dyes indoors during extreme weather.
Signs Your Dye Has Gone Bad
Water-based dyes develop mold or a sulfur smell when contaminated. Alcohol-based dyes that have separated into layers or formed precipitates can sometimes be revived by vigorous shaking, but if particles don’t dissolve, the dye is spent. Oil-based dyes thicken or develop a skin on the surface—remove the skin and thin with the appropriate solvent if the remaining liquid flows smoothly. Powdered dyes that have clumped due to moisture can be broken up and sifted, but if they’ve changed color or smell musty, discard them. When in doubt, test on scrap wood; if color is weak or inconsistent, replace the dye.
Troubleshooting Guide for Common Issues
Even experienced crafters encounter problems. The key is diagnosing the cause quickly and knowing the remedy. Uneven color usually stems from inconsistent wood preparation or application technique, not defective dye. Bleed-through occurs when dye hasn’t fully dried before applying topcoat. Color that’s too dark can often be lightened; color that’s too light simply needs another coat. Keep a troubleshooting journal documenting problems and solutions—this becomes invaluable for avoiding repeat mistakes.
Uneven Color Absorption Fixes
If your project absorbs dye unevenly, stop immediately. Wipe the entire surface with a cloth dampened with the dye’s carrier solvent to remove as much color as possible. Let it dry completely, then sand lightly with 320-grit paper to open the grain uniformly. Apply a thin coat of wood conditioner, let it soak for 15 minutes, then wipe off excess. Reapply dye in thinner coats, working faster to maintain a wet edge. For severe cases, spray a light mist of water on the wood 5 minutes before dyeing—this pre-saturates thirsty areas, allowing more uniform absorption when you apply the dye.
Dealing with Dye Bleed-Through
Bleed-through happens when dye hasn’t fully cured and migrates into your topcoat, creating pinkish or bluish discoloration. Prevention is key: let dyes dry at least 24 hours before applying any finish, longer in humid conditions. Test dryness by pressing a white cloth firmly against the wood—any color transfer indicates it’s not ready. If bleed-through occurs, stop applying finish immediately. Wipe off uncured topcoat with the appropriate solvent, let the dye dry another 24 hours, then spray a light coat of shellac as a barrier before resuming your regular finish schedule. The shellac locks in the dye without affecting color.
Correcting Color That’s Too Dark or Too Light
Color that’s too light is easy—simply apply another thin coat of dye. For color that’s too dark, you have options. For water-based dyes, lightly wipe the surface with a damp cloth immediately after application to lift some color. For dried dye, sand with 400-grit paper to mechanically remove surface dye. For alcohol or oil-based dyes, wipe with a cloth dampened with the carrier solvent, working quickly before the dye resets. In extreme cases, use a two-part wood bleach (under $10) to strip all color and restart. Always test correction methods on scrap first, as aggressive removal can damage wood texture.
Maximizing Value: Stretching Your Dye Further
Smart crafters treat dye as a precious resource. Mix only what you need for each session—dyed solvent can’t be stored once mixed. Use shallow containers to prevent spills and allow easy dipping of brushes. When dyeing small parts, place them in a zip-lock bag with a few drops of dye, seal, and massage to distribute color evenly; this uses mere drops instead of ounces. Save dye-soaked rags in a sealed container—slightly dried rags work perfectly for applying subtle color to touch-up areas. These habits can extend a single bottle across 100+ small projects.
Dilution Techniques That Maintain Quality
Diluting concentrated dyes properly maintains color integrity while stretching volume. Always use distilled water for water-based dyes—minerals in tap water can react with dye molecules, causing precipitation or color shift. For alcohol-based dyes, use denatured alcohol from the hardware store, not rubbing alcohol which contains water and oils. Record your dilution ratios in ratios like “1:10” (one part dye to ten parts solvent) rather than drops, ensuring repeatability. For subtle tints, dilute to 1:20 or beyond. Remember that diluted dyes require more coats to build color, but each coat penetrates more deeply, often creating more stable final color.
Reusing and Refreshing Leftover Dye
Don’t discard leftover mixed dye immediately. For water-based dyes, cover the container tightly and refrigerate—it remains viable for 3-5 days. Bring to room temperature before using. For alcohol-based dyes, the mixture stays stable for weeks if sealed. Oil-based dyes last months when covered. If a dye seems weak after storage, add 10% fresh concentrate to revitalize it. For powder dyes, save the dust that accumulates when measuring—this “fines” portion often contains the purest color and can be used for touch-ups. When a bottle is nearly empty, add a small amount of solvent, shake vigorously, and use this “dye wash” for subtle background coloring or pre-toning wood.
2026 Market Trends in Budget Wood Dyes
The wood dye market in 2026 reflects broader crafting trends toward customization and sustainability. Manufacturers are responding with smaller, more concentrated packaging that reduces waste and shipping costs. We’re seeing an expansion of “mixing kits” that include three primary colors plus black and brown, allowing infinite custom mixing for under $12. There’s also a trend toward water-based dyes that mimic the fast-drying properties of alcohol formulas through evaporation accelerators that don’t increase VOC content.
Emerging Color Palettes for Crafting
Color trends for 2026 emphasize natural, muted tones with sophisticated undertones. “Mushroom” grays with warm brown bases, “sage” greens with gray undertones, and “clay” reds with orange rather than blue bases dominate. These colors work beautifully on wood because they complement rather than overpower grain. Bright, saturated colors are falling out of favor for furniture but remain popular for small decorative items. Manufacturers are releasing “historical” color lines that replicate 18th and 19th-century wood tones, using traditional dye formulations that cost no more than modern synthetics but offer unique, complex colors.
Packaging Innovations That Save Money
Smart packaging is revolutionizing the budget category. Single-use “dye pods” that dissolve in water eliminate measuring errors and waste—you use exactly what you need. Squeeze bottles with built-in mixing caps allow you to shake and apply without separate containers. Some brands now offer “refill” pouches that cost 30% less per ounce than bottles, designed to refill existing containers. These pouches use less plastic and pack more efficiently for shipping, savings passed to consumers. Look for dyes in opaque bottles rather than clear—light protection extends shelf life significantly, especially for colors prone to fading like reds and purples.
Frequently Asked Questions
How long does wood dye under $15 typically last before fading?
With proper application and indoor use away from direct sunlight, quality budget dyes maintain rich color for 5-10 years. Adding a UV-protective topcoat extends this to 15+ years. Fading is most noticeable in the first year as surface dye molecules oxidize; deeper-penetrating dye remains stable much longer.
Can I mix different brands of wood dye if they’re the same type?
Yes, but with caution. Mixing water-based with water-based (or alcohol with alcohol) generally works if both use similar dye chemistry. However, different brands may use different stabilizers that could react. Always test your mixture on scrap wood and let it dry completely before applying to your project. Mixing different carrier types (water and alcohol) will cause separation and poor results.
What’s the best way to achieve a weathered gray look with budget dyes?
Create a custom mix using a brown dye as a base with small amounts of black and a touch of blue. Apply thin coats, allowing wood grain to show through. For authentic weathering, apply the dye unevenly—dab and wipe rather than brushing smoothly. After drying, lightly sand raised areas to create natural wear patterns. A final coat of thinned white or pickling stain over the gray adds authentic sun-bleached highlights.
How do I prevent dye from bleeding when applying a topcoat?
Ensure the dye cures completely—wait 24-48 hours depending on humidity. Test dryness by pressing a white paper towel against the wood; any color transfer means it’s not ready. Apply a thin “wash coat” of dewaxed shellac (2-pound cut) as a barrier. This seals the dye without affecting color. Once the shellac dries, proceed with your regular finish. Water-based topcoats are less likely to reactivate dye than oil-based ones.
Is it better to apply dye before or after assembly for multi-part projects?
Dye individual components before assembly whenever possible. This ensures complete coverage in corners and prevents glue squeeze-out from blocking dye absorption later. However, sand any glue joints lightly after assembly and touch up those areas with a small brush. Pre-assembly dyeing also lets you correct any issues before parts are joined permanently.
Can wood dye be used on non-wood materials like cork or wicker?
Yes, if the material is porous. Water-based dyes work on cork, wicker, raw wicker, and even unfinished paper mâché. The color will be less controlled than on wood and may require sealing afterward. Test absorption on a hidden area first. Non-porous materials like finished wicker or plastic-based cork composites won’t accept dye. For these, consider dyeing a primer coat first or using a dye-infused finishing product.
Why does my dye look different on different boards of the same wood species?
Natural variation in wood density, resin content, and tannin levels affects dye uptake. Boards from different trees or even different parts of the same tree absorb differently. Sapwood (outer growth rings) absorbs more dye than heartwood. To minimize variation, sort boards by appearance before starting, and apply a wood conditioner to the most absorbent pieces to slow dye penetration. For critical color matching, dye all boards before cutting to final size, then select the most uniform pieces for visible surfaces.
How can I tell if a budget dye is high quality before buying?
Check the label for specific information: mixing ratios (concentrated dyes list drops per ounce), lightfastness ratings, and chemical composition. Quality dyes specify the Color Index number. Read reviews focusing on color consistency and ease of application rather than brand loyalty. Avoid dyes that list “proprietary blend” without further detail. Transparent bottles let you see if dye has separated or formed precipitates. Finally, reputable budget brands often have websites with detailed technical data sheets—if this information is available, the manufacturer stands behind their product.
What’s the difference between wood dye and wood stain in the under $15 category?
Wood dye contains microscopic color molecules that penetrate deeply into wood fibers, creating transparent color that enhances grain. Wood stain contains pigment particles that sit partially on the surface, partially obscuring grain. Dyes typically cost the same or slightly less than stains in the budget category but require more careful application. Dyes offer more vibrant, translucent colors; stains provide more hiding power for uneven wood. For crafting where grain beauty matters, dye is usually the better choice.
Can I save money by making my own wood dye from natural materials?
Absolutely, though results are less predictable. Boil walnut husks, avocado pits, or black tea to create free or nearly free dyes. These natural dyes produce muted earth tones and require a mordant (like vinegar and iron) to set the color. The process is time-consuming and colors fade faster than synthetic dyes, but it’s essentially free and eco-friendly. For consistent, vibrant colors on a budget, commercial dyes under $15 offer better value in terms of time and reliability, but natural dyes make a fun, cost-free experiment for rustic projects.
See Also
- 10 Best Value Wood Stain Sprays for Large Surface Projects Under $20
- How to Choose the 10 Best Wood Dyes for Exotic Hardwoods in 2026
- How to Solve Orange Tones: 10 Best Wood Dyes for Natural Walnut Look in 2026
- 10 Premium Wood Dyes for Vibrant Custom Colors Worth the Splurge in 2026
- 10 Best Value Oil-Based Wood Stains for Large Surface Projects in 2026