Table of Contents
That gorgeous walnut table you spent weeks crafting has developed an unfortunate pumpkin-like hue, or perhaps your store-bought walnut bookshelf screams “orange oak” instead of rich chocolate-brown sophistication. You’re not alone—this color shift is the bane of woodworkers and furniture enthusiasts everywhere. The good news? Modern wood dye technology has evolved dramatically, and 2026 brings unprecedented control over color correction without sacrificing that coveted natural walnut depth.
Understanding how to neutralize orange tones isn’t about masking problems with dark stains; it’s about mastering the chemistry of color and light. Whether you’re refinishing a family heirloom or creating a custom piece from scratch, the right dye approach transforms orange-tinged wood into the elegant, expensive-looking walnut finish you’ve always envisioned. Let’s dive into the expert strategies that separate amateur hour from professional results.
Top 10 Wood Dye
Detailed Product Reviews
1. Wood Dye - Aniline Dye 5 Color Kit - Wood Stain Powder
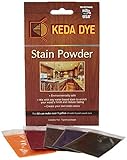
Overview: This aniline dye kit from Keda Dyes delivers professional-grade wood coloring in a versatile powder format. Each kit produces five quarts of vibrant liquid stain across five exotic colors, offering exceptional mixing flexibility. The eco-friendly formulation appeals to environmentally conscious woodworkers while providing powerful pigment concentration that penetrates deeply into wood grain for rich, lasting results.
What Makes It Stand Out: The powder format is this product’s defining feature, allowing precise control over color intensity by adjusting mixing ratios. Unlike pre-mixed stains, you can create anything from subtle tints to bold, saturated hues. The five exotic colors provide a sophisticated palette beyond basic primary shades, enabling unique custom finishes. The eco-friendly composition eliminates harsh solvents without compromising vibrancy.
Value for Money: At approximately $30-35 per kit, you’re paying under $7 per quart of premium dye—significantly less than comparable pre-mixed liquid stains that run $12-18 per quart. The concentration level means a little powder goes remarkably far, and the ability to mix custom colors eliminates buying multiple single-color products. For serious hobbyists or professionals, the cost-per-project savings accumulate quickly.
Strengths and Weaknesses: Strengths:
- Exceptional color concentration and vibrancy
- Unlimited custom color mixing potential
- Eco-friendly, low-toxicity formulation
- Excellent penetration for blotchy woods
- Cost-effective for multiple projects
Weaknesses:
- Requires careful mixing and measurement
- Learning curve for color matching
- Powder can be messy if not handled properly
- No included mixing containers or instructions
Bottom Line: Ideal for intermediate to advanced woodworkers who value customization and eco-friendliness over convenience. The learning curve pays dividends in creative control and long-term value.
2. Wood Stain Powdered Solvent - Wood Dye - Indoor and Outdoor Furniture and More - Fast Drying - Wood Dye Powder - Wood Stain for Crafts - 5 Color Kit

Overview: This comprehensive five-color powdered dye kit targets both indoor and outdoor woodworking applications. The primary color set (black, blue, brown, red, yellow) provides a complete mixing laboratory for creating custom shades. By adding powder to water, each color yields one quart of stain, making it suitable for furniture, fences, cabinets, and craft projects.
What Makes It Stand Out: The dual indoor/outdoor formulation distinguishes this kit from water-only dyes. Fast-drying, low-odor performance keeps projects moving efficiently without harsh fumes. The primary color system functions like a painter’s palette—mixing these five hues generates an infinite spectrum. You can also layer it under canned stains to add dimensional depth that commercial stains alone cannot achieve.
Value for Money: Priced similarly to other powder kits at $30-40, the versatility justifies the investment. You’re essentially getting five base stains that can create hundreds of custom colors, replacing dozens of individual products. The ability to use one kit for both interior furniture and exterior fencing projects multiplies its value proposition compared to specialty indoor-only products.
Strengths and Weaknesses: Strengths:
- Fast-drying, low-odor water-based formula
- Suitable for interior and exterior applications
- Primary colors enable precise color theory mixing
- Can be layered with other finishes
- Versatile across furniture, crafts, and structural wood
Weaknesses:
- Water-based version may raise wood grain
- Color mixing requires experimentation
- Exterior durability depends on topcoat quality
- Powder consistency varies between colors
Bottom Line: A workhorse kit for versatile woodworkers tackling diverse projects. The indoor/outdoor capability and primary color system make it a smart, flexible choice for those willing to experiment.
3. Transtint Dyes, Dark Walnut
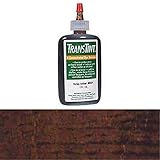
Overview: Transtint’s Dark Walnut represents premium liquid dye concentrate for discerning woodworkers seeking professional results. This 2-ounce bottle yields two quarts of dye-stain when mixed with water or alcohol, delivering consistent, rich brown tones. Designed specifically for interior applications, it excels at creating deep, transparent walnut shades that enhance rather than obscure wood grain.
What Makes It Stand Out: The ability to mix directly into water-based finishes sets Transtint apart—add it to topcoats for toning without a separate staining step. Mixing with alcohol creates a fast-drying, non-grain-raising stain that professionals appreciate for efficiency. The liquid concentrate ensures batch-to-batch color consistency impossible with powders, and the Dark Walnut shade is meticulously formulated to replicate authentic aged walnut.
Value for Money: At $15-20 for 2 ounces, this is a premium-priced product. However, the concentration and professional results justify the cost for fine furniture makers. When mixed with alcohol, it eliminates sanding between staining and finishing, saving valuable labor time. For those specifically needing Dark Walnut, it outperforms generic brown dyes that require complex mixing.
Strengths and Weaknesses: Strengths:
- Professional-grade color consistency
- Can be mixed into finishes for toning
- Alcohol option dries extremely fast
- Non-grain-raising formulation
- Authentic, rich walnut color
Weaknesses:
- Single color limits versatility
- Not suitable for exterior projects
- Higher cost per quart than powder kits
- Requires separate purchase of alcohol or solvents
Bottom Line: Perfect for fine furniture makers and professionals who prioritize color accuracy and application speed. The premium price delivers premium results for walnut-specific interior projects.
4. Wood Stain Liquid Solvent - Wood Dye - Indoor and Outdoor Furniture and More - Fast Drying - Wood Dye Powder - Wood Stain for Crafts - 5 Color Kit

Overview: This confusingly titled product appears to be a powdered dye kit despite its “liquid solvent” name. Following the description, it offers five powdered primary colors that mix with water to create one quart each of fast-drying, low-odor stain. Marketed for both indoor and outdoor applications, it covers furniture, crafts, and structural woodworking projects with versatile color-mixing capabilities.
What Makes It Stand Out: The product’s emphasis on speed and practicality sets expectations for efficient workflow. The water-based, low-odor formula allows comfortable indoor use without ventilation concerns. Like similar kits, its primary color system enables custom mixing, while the ability to layer under other stains adds dimensional possibilities. The indoor/outdoor claim suggests added UV inhibitors or binders not found in basic dyes.
Value for Money: Assuming standard pricing of $30-40, the value aligns with comparable powder kits. However, the contradictory product listing raises concerns about quality control. If the title error reflects manufacturing confusion, consistency might suffer. For risk-tolerant buyers, the potential reward is a versatile dual-use kit at competitive pricing.
Strengths and Weaknesses: Strengths:
- Fast-drying, low-odor formulation
- Alleged indoor/outdoor versatility
- Primary colors for unlimited mixing
- Can be used as base layer
- Cost-effective if specifications are accurate
Weaknesses:
- Title/description contradiction causes confusion
- Unclear if truly outdoor-suitable
- Quality control concerns due to listing errors
- No brand name for accountability
- Vague concentration specifications
Bottom Line: Proceed with caution. Verify product details before purchasing. If the outdoor claims prove true, it’s a versatile value; the listing inconsistencies suggest buying from a more reliable source.
5. Vibrant Wood Dye Liquid Offered in 5 Color Liquid Dye Kit - Solvent Alcohol Dye
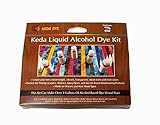
Overview: Keda’s alcohol-based liquid dye kit provides five concentrated colors designed for solvent-based applications. Each 1-ounce bottle mixes with lacquer thinner, denatured alcohol, or acetone to produce vibrant stains that integrate seamlessly with non-oil finishes. The kit yields up to 2.5 gallons of stain, making it ideal for large projects or production environments where speed and compatibility matter.
What Makes It Stand Out: True solvent-based dyes are rare in consumer markets, and this kit’s versatility across multiple reagents is exceptional. The alcohol-base enables lightning-fast drying without raising wood grain, crucial for production work. Unlike water-based dyes, these mix directly into lacquers, shellac, epoxy, and polycrylic for toning and glazing. The five colors provide both primary mixing capability and immediate access to standard shades.
Value for Money: At $40-50, this premium kit delivers extraordinary volume—2.5 gallons at roughly $16 per gallon, compared to $30+ for pre-mixed solvent stains. The concentration allows precise dilution control, and compatibility with existing finish systems eliminates buying separate toners. For professionals, the time saved on drying and sanding pays for itself within one project.
Strengths and Weaknesses: Strengths:
- Extremely fast alcohol-based drying
- No grain raising issues
- Mixes into finishes for toning
- Massive 2.5-gallon yield
- Versatile solvent compatibility
Weaknesses:
- Flammable solvents require ventilation and safety precautions
- Not suitable for oil-based systems
- Strong fumes unsuitable for enclosed spaces
- Higher initial cost than water-based kits
- Requires solvent purchases separately
Bottom Line: Best suited for experienced woodworkers and professionals comfortable with solvent safety. The speed, finish compatibility, and volume make it a production shop essential despite the premium price and ventilation requirements.
6. Navy Blue Wood Stain Powder, Wood Dye Powder- Just Add Water - Water Based - for Indoor and Outdoor Wooden Crafts - Fast Drying - Dye Powder 2 oz Makes 2.2 Gallon of Stain (Navy Blue, 2 oz)

Overview: This Navy Blue Wood Stain Powder from NINESUNG delivers professional results in a concentrated, water-activated format. The 2-ounce package produces 2.2 gallons of stain, making it ideal for both small crafts and larger outdoor projects. Its fast-drying formula penetrates wood evenly, providing rich color in a single coat while remaining safe for indoor use.
What Makes It Stand Out: The powder format offers unmatched shelf life and concentration—just 0.5 ounces per 1/8 gallon of water creates vibrant stain. The navy blue produces a deep, sophisticated finish that rivals pre-mixed liquid stains costing significantly more. Its versatility across furniture, fences, guitars, and crafts makes it exceptionally practical for multi-project DIYers who need reliable, consistent results.
Value for Money: Exceptional. Competing liquid stains cost $8-15 per quart, while this $12-18 powder creates over 8 quarts. The resealable foil bag prevents spoilage, and precise mixing eliminates waste. For occasional users, the indefinite storage alone justifies the purchase, though frequent stainers might prefer the convenience of ready-to-use liquids despite higher per-use costs.
Strengths and Weaknesses: Strengths include outstanding concentration, low environmental impact, non-toxic composition, and rapid drying time. Mixing allows custom color intensity, and one-coat coverage saves time. Weaknesses: powder handling can be messy; color varies by wood species; requires careful measurement for consistency; short 3-5 minute penetration window demands quick work; final color differs from powder appearance.
Bottom Line: Perfect for budget-conscious crafters and eco-minded woodworkers willing to trade convenience for value. The navy blue shade is rich and professional, making this powder stain a smart choice for projects where preparation time is acceptable. Not ideal for those needing immediate, grab-and-go application.
7. Ninesung Wood Stain Powder, 10 Colors/Set, Wood Dye Powder, Colored Wooden Stain, Furniture Color Dye for Outdoor Indoor Wooden (10 Colors)

Overview: This comprehensive 10-color wood dye powder set from NINESUNG provides exceptional versatility for creative woodworking projects. Each 2-ounce resealable bag contains highly concentrated pigment that activates with water, delivering fast-drying, non-toxic stain for indoor and outdoor applications. The collection spans from primary colors to nuanced shades like rose red and navy blue, making it perfect for artistic furniture restoration and custom crafts.
What Makes It Stand Out: The breadth of color options in a single purchase sets this apart—ten distinct shades allow for endless custom blending without buying separate containers. Each color maintains the same impressive concentration as individual packages, coating approximately 25 linear feet per 2-ounce bag. The resealable foil packaging ensures multi-year shelf life, while the powder format eliminates solvent odors entirely, creating a family-safe creative environment.
Value for Money: Outstanding value for multi-project woodworkers. Individual powder packets typically cost $10-15 each; this set likely offers 30-40% savings compared to separate purchases. The ability to mix custom colors exponentially increases value, reducing need for additional specialty stains. For those needing only one or two colors, however, the set may represent unnecessary expense.
Strengths and Weaknesses: Strengths include remarkable color variety, excellent concentration, eco-friendly formulation, and infinite storage potential. The powder system enables precise color matching and intensity control. Weaknesses involve potential waste if many colors go unused; mixing requires careful measurement; powder can be messy; colors appear different on various woods; instruction clarity varies; and the 3-5 minute working window demands efficiency.
Bottom Line: Ideal for creative DIYers, art teachers, and furniture restorers who value color flexibility. The 10-color set offers professional-grade results at amateur-friendly prices. Skip if you only need one specific shade, but for exploration and custom work, this collection is unbeatable.
8. NINESUNG Professional 5-Colors Wood Dye Powder Set - 2oz Each for Furniture, Decks & DIY Crafts - Fast-Acting, Weatherproof Pigment - Works on Indoor/Outdoor Wood Surfaces (5 Colors)

Overview: The NINESUNG Professional 5-Color Set targets serious woodworkers with a curated selection of dyes in moisture-proof canisters. This collection includes Purple, Rose Red, Navy Blue, Green, and Black—each 2-ounce container providing concentrated, water-activated stain for professional-grade results. The upgraded packaging and focused color palette emphasize quality over quantity for furniture makers and deck refinishing projects.
What Makes It Stand Out: The moisture-proof canisters represent a significant upgrade from foil bags, ensuring powder remains dry and free-flowing in humid workshop conditions. This professional packaging, combined with a thoughtfully selected color range, positions the set for serious applications rather than casual crafts. The concentrated formula maintains consistent mixing ratios across all colors, crucial for achieving predictable results on fine furniture or large outdoor structures.
Value for Money: Strong value for targeted applications. While costing more per-color than the 10-piece set, the canister packaging justifies the premium for professionals in damp climates. Each 2-ounce container covers approximately 25 feet, making it economical for medium projects. The focused palette reduces decision fatigue while covering most woodworking needs, though missing primary colors limits custom mixing potential.
Strengths and Weaknesses: Strengths include superior moisture-proof packaging, professional-grade concentration, low toxicity, and excellent color penetration. The curated colors work beautifully for sophisticated projects. Weaknesses: limited color range restricts creative options; higher price point than foil-bag alternatives; powder handling requires careful technique; short working time demands experience; color predictability varies by wood species; and the “professional” label may intimidate beginners.
Bottom Line: Perfect for intermediate to advanced woodworkers in humid environments who prioritize product stability. The canister packaging and refined color selection justify the premium. Less suitable for casual crafters or those wanting maximum color variety, but excellent for consistent, professional results on furniture and decks.
9. TransTint Dyes, Dark Vintage Maple, 2 oz

Overview: TransTint’s Dark Vintage Maple represents the gold standard in professional liquid wood dyes. This 2-ounce bottle of highly concentrated dye yields approximately 2 quarts of stain, delivering rich, transparent color that enhances wood grain without cloudiness. Unlike powder alternatives, this ready-to-dissolve liquid formulation ensures consistent results and seamless blending, making it the preferred choice among luthiers and fine furniture makers.
What Makes It Stand Out: The liquid concentrate’s universal compatibility sets it apart—mixing effortlessly with water, alcohol, shellac, lacquer, and General Finishes products. This versatility enables infinite finishing system integration. The Dark Vintage Maple shade provides a classic, warm tone that highlights grain structure without muddying, a common powder dye pitfall. Its fully dissolved formula eliminates speckling risks, ensuring flawless, repeatable results critical for professional work.
Value for Money: Premium-priced but justified for serious woodworkers. At $15-20 for 2 ounces, it costs more than powder equivalents, but the liquid format saves time and eliminates mixing inconsistencies. The ability to integrate directly into topcoats reduces steps and material costs. For hobbyists, the price may seem steep, but professionals will appreciate the reliability and time savings that justify the investment.
Strengths and Weaknesses: Strengths include exceptional versatility, professional-grade transparency, grain-clarity preservation, seamless finish integration, and trusted reputation among experts. The liquid format ensures consistent color batch-to-batch. Weaknesses: higher cost than powders; requires careful dilution; limited to stain applications (unlike powders that can be used dry); alcohol compatibility demands ventilation; dark vintage maple may be too specific for some projects; and availability can be inconsistent.
Bottom Line: The professional’s choice for fine woodworking and instrument making. If you demand flawless grain definition and finish system integration, TransTint is worth every penny. For casual DIYers or single projects, more economical powders suffice. This is a specialist tool for craftsmen who prioritize perfection over price.
10. Furniture Clinic Wood Stain | Dark Oak | Water Based | Fast Drying, Low Odor, & Non-Toxic | for Indoor & Outdoor Furniture and More | Multiple Finishes | (8.5oz / 250ml)

Overview: Furniture Clinic’s Dark Oak Wood Stain offers a ready-to-use water-based solution for quick furniture refinishing. This 8.5-ounce (250ml) bottle covers approximately 32 square feet, drying to a natural matte finish in just 10 minutes. The low-odor, non-toxic formula makes it ideal for indoor use without harsh ventilation requirements, targeting homeowners seeking professional results with minimal fuss.
What Makes It Stand Out: The remarkably fast 10-minute drying time revolutionizes project workflow, allowing multiple coats or same-day sealing. Unlike powders requiring mixing, this pre-mixed stain delivers consistent Dark Oak color straight from the bottle. The water-based formula cleans up with soap and water while providing excellent grain penetration. Its integration with Furniture Clinic’s complementary waxes, varnishes, and oils creates a complete system approach for finishing enthusiasts.
Value for Money: Moderate value for convenience-seekers. At $15-20 for 250ml, it costs more per square foot than concentrated powders but saves significant preparation time. The predictable coverage (3m² per bottle) eliminates mixing guesswork. For single projects or occasional users, the convenience justifies the premium. High-volume users will find powders more economical, but the time savings make this attractive for busy DIYers.
Strengths and Weaknesses: Strengths include lightning-fast drying, ready-to-use convenience, low odor, excellent coverage clarity, and system compatibility. The matte finish looks natural and professional. Weaknesses: higher cost per project than powders; limited to water-based applications; dark oak shade may not suit all aesthetics; requires Furniture Clinic topcoats for optimal protection; smaller bottles limit large project efficiency; and color matching can be challenging across batches.
Bottom Line: Excellent for time-pressed DIYers prioritizing convenience over absolute economy. The 10-minute dry time and ready-to-use formula eliminate barriers to entry. If you’re staining a single piece of furniture and want quick, reliable results without mixing mess, this is your solution. For workshops or frequent use, consider concentrated alternatives.
Understanding the Orange Tone Dilemma in Wood Finishing
Walnut’s reputation as a premium hardwood comes from its naturally rich, chocolate-brown heartwood with subtle purple-gray undertones. However, many woodworkers discover their “walnut” projects develop an unmistakable orange cast that cheapens the entire appearance. This phenomenon isn’t your imagination—it’s a complex interaction of wood chemistry, finish degradation, and light exposure that demands a strategic approach.
Why Walnut Turns Orange Over Time
The orange shift typically stems from three culprits: the natural lignin in wood yellows with UV exposure, oil-based finishes amber as they age, and many “walnut” stains contain warm pigments that oxidize toward orange. Even genuine walnut can develop brassy undertones if finished incorrectly. The key is understanding that orange resides on the color wheel opposite blue and adjacent to yellow, making it particularly stubborn to neutralize without going muddy.
The Science Behind Wood Oxidation and UV Exposure
Wood is a photochemical reactor. When UV photons strike the surface, they break down lignin polymers, creating chromophoric groups that absorb blue light and reflect yellow-orange wavelengths. This process accelerates with heat and moisture. In 2026, we’re seeing advanced dye formulations with built-in HALS (hindered amine light stabilizers) and UV absorbers that interrupt this chain reaction at the molecular level—something traditional stains simply cannot do.
Wood Dye vs. Wood Stain: Why Dyes Offer Superior Control
The distinction between dyes and stains isn’t just semantic—it’s fundamental to solving orange tones. While stains contain suspended pigment particles that sit on the wood surface, dyes are molecular colorants that penetrate deeply, creating translucent color that doesn’t obscure grain.
The Molecular Difference: Penetration vs. Surface Coating
Pigment stains work like tiny paint particles lodged in wood pores, creating opacity and a painted appearance that can appear flat and lifeless. Dyes, conversely, dissolve completely into the wood’s cellular structure, bonding at a molecular level. This means when you apply a blue-gray dye to orange wood, you’re actually altering how light interacts with the wood itself, not just coating it with a masking color.
Why Dyes Excel at Color Correction
Color correction requires precision that only dyes provide. Because they don’t add film-building solids, you can layer complementary colors in sheer veils, neutralizing orange without creating a muddy brown mess. A whisper of blue dye cancels orange without darkening the wood excessively, while green undertones neutralize red-orange casts. This surgical color control is impossible with pigment stains, which would require heavy, opaque application to achieve similar results.
Types of Wood Dyes for Walnut Color Correction
Not all dyes are created equal when battling orange tones. Each chemistry offers distinct advantages depending on your project, skill level, and environmental considerations. Understanding these differences prevents costly mistakes and ensures your walnut finish ages gracefully.
Water-Based Dyes: Eco-Friendly Precision
Water-based dyes have revolutionized color correction with their zero-VOC formulations and exceptional transparency. They raise grain minimally compared to early versions, especially when paired with modern grain-raising pre-treatments. Their primary advantage lies in color purity—without amber solvents, what you see is what you get. For orange neutralization, water-based dyes offer the cleanest blues and grays, though they require careful sealing to prevent reactivation.
Alcohol-Based Dyes: Fast-Drying Professional Results
Shellac-based and alcohol-soluble dyes remain the professional’s secret weapon for furniture work. They dry within minutes, allowing rapid layering and color adjustments. The alcohol carrier doesn’t raise grain and penetrates dense hardwoods like walnut effortlessly. However, their fast dry time demands confidence—mistakes dry almost instantly. For 2026, we’re seeing slower-evaporating alcohol blends that extend working time while maintaining quick recoat windows.
Oil-Based Dyes: Deep Penetration for Exterior Projects
While less common for interior walnut furniture, oil-based dyes excel for exterior applications where deep penetration matters. They integrate beautifully with oil finishes but require careful color selection—many traditional oil dyes have inherently warm bases that can exacerbate orange tones. Modern 2026 formulations use synthetic carriers with cool undertones specifically designed for color correction.
Hybrid Dyes: The Best of Both Worlds
The most exciting 2026 development involves hybrid dyes that combine water-based purity with alcohol-based performance. These formulations use proprietary co-solvent systems that flash off quickly but clean up with water. They offer exceptional lightfastness and the ability to fine-tune colors without the typical trade-offs, making them ideal for complex walnut matching projects.
The Color Theory Behind Neutralizing Orange
Successfully killing orange requires more than grabbing a “walnut” dye off the shelf. You need to think like a painter, understanding that color exists in relationships, not isolation. The orange in your wood has a specific temperature and intensity that dictates your correction strategy.
Using Complementary Colors: Blue-Based Toners
On the color wheel, blue sits opposite orange. A dye with a subtle blue cast physically cancels orange wavelengths through subtractive color mixing. The trick is using the minimum effective dose—a 5% dilution of a blue-brown dye often suffices. Go too heavy and your walnut turns gray and lifeless. The 2026 trend favors “smoked walnut” tones achieved with barely-there blue-gray dyes that read as sophisticated rather than synthetic.
The Role of Green and Gray Undertones
Not all orange is created equal. Red-orange (common in cherry and some walnuts) responds better to green undertones, while yellow-orange (typical in oak and pine) needs pure blue. Gray dyes act as desaturants, reducing the intensity of orange without shifting hue dramatically. Master finishers often create custom blends: a touch of forest green to kill red-orange, a whisper of Payne’s gray to mute brightness, all suspended in a walnut-brown base.
Essential Features to Evaluate in 2026 Wood Dyes
With dozens of formulations available, focusing on key performance indicators separates professional-grade dyes from hobbyist products. These features directly impact your ability to achieve and maintain a natural walnut appearance.
Lightfastness Ratings: What the Numbers Really Mean
Lightfastness is measured on the Blue Wool Scale from 1-8, with 8 being museum-grade permanence. For walnut furniture in sunny rooms, accept nothing below rating 6. The 2026 standard includes nano-sized pigment dispersions that scatter UV before it damages dye molecules, effectively giving water-based dyes the lightfastness previously reserved for alcohol formulations. Always request technical data sheets—reputable manufacturers provide spectral analysis showing color shift over 1,000+ hours of xenon arc exposure.
VOC Compliance and Environmental Regulations
California’s SCQAMD standards and evolving EPA regulations have pushed dye chemistry forward. 2026’s best formulations achieve <50 g/L VOC while maintaining performance, using bio-derived solvents like 2-methyltetrahydrofuran. For indoor air quality, look for GreenGuard Gold certification and Declare labels. The environmental benefit extends beyond air quality—low-VOC dyes often have better color stability since they lack reactive solvent impurities.
Concentration Levels and Custom Mixing Potential
Professional dyes come as concentrates (typically 10-25% solids) allowing custom dilution. This flexibility is crucial for walnut work—you might use full strength on the first coat, then 30% strength with added blue toner for subsequent coats. Avoid pre-mixed “walnut” colors; instead, build your color from primaries. Check if the manufacturer provides mixing software or spectrophotometer integration for precise color matching.
Preparing Your Wood Surface: The Non-Negotiable Steps
Even the most advanced dye cannot compensate for poor preparation. Orange tones become more pronounced on uneven surfaces where dye absorbs inconsistently, creating blotchy warm spots that fight your color correction efforts.
Sanding Grit Progression for Optimal Dye Absorption
The sweet spot for dye absorption is 180-220 grit. Coarser grits create uneven pores that grab dye unevenly; finer grits polish the surface closed. Use a progression: 120, 150, 180, always sanding with the grain. For figured walnut, stop at 220 to prevent pore clogging. Critical: vacuum thoroughly between grits—stray 120-grit particles can create dark spots that read as orange when surrounded by cooler tones.
Grain Raising Techniques for Water-Based Dyes
If using water-based dyes, raise the grain before final sanding. Mist the surface with distilled water, let it dry completely, then lightly sand with 220 grit. This prevents post-dye grain raising that can disturb your carefully neutralized color. For 2026’s advanced dyes, some manufacturers now offer “grain stabilizing additives” that minimize raising without pre-treatment, though traditionalists still prefer the control of manual grain raising.
Cleaning and Dewaxing: The Often-Missed Step
Walnut naturally contains waxes and oils that repel dye unevenly. Wipe the entire surface with denatured alcohol or a specialized wood prep solution before dyeing. This removes handling oils, sanding residues, and natural exudates. Skip this step and you’ll fight “fish eyes” and streaks that destroy color uniformity. For reclaimed walnut, consider a mild oxalic acid wash to remove iron stains that can create orange halos.
The Art of Sample Testing: Your Roadmap to Success
Never—ever—apply dye to your final piece without exhaustive testing. Orange tones reveal themselves differently on various grain patterns, and your lighting conditions dramatically affect perceived color. Professional finishers spend 40% of their time on samples.
Creating Gradient Test Boards
Prepare test boards using the exact same wood from your project, sanded identically. Apply your base walnut dye at full strength, then create a series of dilutions (100%, 75%, 50%, 25%) with your blue or gray toner added at varying percentages. Label everything meticulously. View samples in both natural and artificial light, and crucially, apply your intended topcoat—many topcoats add warmth that can reintroduce orange tones.
Documenting Your Process for Reproducibility
Use a finishing diary: record dye lot numbers, dilution ratios, ambient temperature, humidity, and application method. Photograph each stage with a color checker in frame. This discipline seems excessive until you need to match a repair three years later or replicate a color for a client. In 2026, apps like “FinishTracker Pro” allow you to log spectral data from smartphone photos, creating digital color recipes you can share or replicate precisely.
Professional Application Techniques for Flawless Results
Application method determines whether your walnut looks like a factory finish or a DIY disappointment. Orange tones become more visible under uneven application, as thin spots allow wood’s natural warmth to peek through.
Wiping vs. Spraying: Choosing Your Method
Wiping offers control and forgiveness, ideal for beginners and furniture pieces. Use lint-free cotton cloths, applying dye in circular motions to work it into the grain, then immediately “tipping off” with long grain-direction strokes. Spraying, using HVLP equipment, provides unparalleled uniformity on large surfaces like cabinetry but demands perfect technique—orange peel or dry spray creates color variation that amplifies warm undertones. For 2026, air-assisted airless systems now offer fine atomization previously only possible with compressed air, making spray application more accessible.
The “Tipping Off” Technique for Even Coverage
Whether wiping or brushing, the final pass must be with the grain using light pressure. This aligns dye molecules and prevents lap marks that catch light differently, creating visual hot spots. Work in sections no larger than you can manage before the dye flashes off—typically 2-3 square feet for alcohol-based dyes, 4-6 square feet for water-based. Keep a “wet edge” and never go back over drying dye.
Managing Dye Lots and Batch Consistency
Dye lots can vary slightly, especially with natural colorants. For large projects, buy all your dye at once from the same lot number. If you must purchase additional dye mid-project, mix the new lot 50/50 with the old to average out differences. This is critical for walnut—minute color shifts can turn a neutral brown into an orange-tinged disappointment when viewed across a large surface.
Strategic Layering: Building Depth Without Orange
Single-step coloring rarely achieves sophisticated walnut tones. Professional results come from building color in translucent layers, each contributing to depth while the cumulative effect neutralizes orange.
The “Dye-Seal-Dye” Method
Apply your base walnut dye, seal with a thin washcoat of dewaxed shellac (1 lb. cut), then apply a second, cooler-toned dye layer. The washcoat prevents the second dye from reactivating the first, allowing you to add blue-gray tones only to the surface while preserving warm depth underneath. This creates three-dimensional color that shifts beautifully in changing light—impossible with a single application.
Glazing Between Layers for Complex Colors
Glazes are pigmented suspensions applied over sealed dye. For walnut, a thin glaze of raw umber and black in a water-based medium can push the color cooler while adding artificial “age.” The key is keeping glazes extremely thin—think translucent veils, not opaque coats. Multiple thin glazes beat a single heavy application every time, preventing the muddy look that screams “faux finish.”
Sealing and Topcoating: Locking in the Perfect Walnut Tone
Your dye work is only as permanent as the sealer protecting it. Many topcoats yellow with age, undoing your orange-neutralization efforts within months. Choosing the right sealer is as important as the dye itself.
Choosing Sealers That Won’t Reactivate Your Dyes
Water-based dyes require a non-reactive sealer. Dewaxed shellac is the universal problem-solver—it seals any dye type and bonds to any topcoat. For alcohol-based dyes, you can often apply oil-based polyurethane directly, but test first. In 2026, catalyzed water-based sealers offer the chemical resistance of conversion varnish without the toxicity, making them ideal for high-wear walnut surfaces.
UV-Inhibiting Topcoats for Long-Term Color Stability
Look for topcoats specifically labeled “non-yellowing” with UV absorbers. Water-based acrylic polyurethanes now contain benzotriazole compounds that preferentially absorb UV before it reaches the dye. For showpiece furniture, consider a two-part polyurethane with HALS stabilizers—overkill for a side table, but essential for a dining table that sits in direct sunlight. Apply at least three thin coats, sanding between with 320-grit for maximum clarity.
Common Mistakes That Lead to Orange Tones (And How to Avoid Them)
Even experienced woodworkers fall into these traps. Recognizing them beforehand saves hours of sanding and frustration.
Over-Sanding and Pore Closure
That final pass with 320-grit feels satisfying but can polish walnut’s surface closed, causing dye to sit on top rather than penetrating. This creates a uniform wash that lacks depth and often reads as orange because the dye hasn’t reached the wood’s cooler heartwood tones. Stop at 220 for open-grain woods, and never sand between dye coats—only after sealing.
Inadequate Mixing and Pigment Settlement
Many dyes, especially metallized acid dyes, settle rapidly. Shake concentrates vigorously for at least two minutes, then stir continuously during application. Failing to do so results in inconsistent color: the first portion of dye applied is weak (reading orange), while the last portion is oversaturated (turning muddy). Use magnetic stirrers for large batches, and never pour dye back into the container after it sits.
Rushing the Drying Process
Using fans or heat to accelerate drying seems efficient but causes the dye to “skin over” before penetrating fully. This leaves color on the surface that wears off and reveals orange undertones. Allow alcohol-based dyes to air dry 30 minutes minimum, water-based dyes 2-4 hours. The 2026 “rapid-cure” dyes still require full chemical drying time—manufacturers’ “dry to touch” times are marketing, not chemistry.
2026 Trends in Wood Dye Technology
The finishing industry has experienced a renaissance, driven by environmental regulations and digital color management. Staying current with these trends gives you access to tools previous generations of woodworkers could only dream of.
Nano-Pigment Advancements
Nano-pigments smaller than 100 nanometers penetrate as deeply as traditional dyes while offering pigment-grade lightfastness. These “hybrid colorants” are game-changers for walnut, providing the subtlety of dye with the permanence of pigment. They’re particularly effective at creating “espresso walnut” tones that remain stable for decades.
Bio-Based Solvent Innovations
Petroleum-derived solvents are rapidly being replaced by bio-based alternatives derived from corn and sugarcane. These solvents offer identical performance profiles but with 90% lower carbon footprints and no harsh odors. For indoor projects, this means you can dye in occupied spaces—a massive shift from traditional practices.
Smart Color-Matching Systems
Spectrophotometer apps now integrate with dye manufacturer databases, allowing you to scan a walnut sample (or a competitor’s furniture) and receive a precise dye recipe. These systems account for wood species, grain density, and even your local water chemistry. While expensive, they’re revolutionizing commercial furniture production and are increasingly accessible to serious hobbyists.
Project-Specific Considerations
Walnut finishing isn’t one-size-fits-all. The approach for a jewelry box differs dramatically from a kitchen island, and outdoor projects demand entirely different chemistry.
Furniture vs. Flooring: Different Approaches
Furniture benefits from the nuanced color shifts possible with multiple dye layers and glazes. Flooring requires robust, single-step dyes with extreme abrasion resistance—multiple layers create failure points under foot traffic. For walnut floors, use dye concentrates designed for flooring with built-in crosslinkers, then seal with a two-part water-based polyurethane. Never use alcohol-based dyes on floors; they dry too fast for large areas and create lap marks that appear as orange stripes.
Exterior Walnut Finishes: Weathering Challenges
Exterior walnut faces UV, moisture, and temperature swings that destroy dyes quickly. Use oil-based dyes with transoxide pigments, which are essentially transparent iron oxides offering dye-like clarity with paint-like durability. Follow with a marine spar varnish containing UV inhibitors, and plan to recoat annually. Accept that exterior walnut will never be maintenance-free—aim for graceful fading rather than orange streaking.
Matching Existing Walnut: The Art of Color Matching
Matching aged walnut is where theory meets art. Old walnut develops a honey-brown patina that’s cooler than fresh-cut wood. Start with a dye that’s 20% lighter than you think you need, then add tiny amounts of raw umber and Van Dyke brown to replicate age. Always match in the final lighting environment—a color perfect in your shop can look completely wrong in a client’s home with LED bulbs.
Safety and Environmental Best Practices
Modern dyes are safer than their toxic predecessors, but “water-based” doesn’t mean “harmless.” Proper safety protocols protect your health and ensure consistent results.
Respiratory Protection for Fine Particulates
Dye powders and nano-pigments can penetrate deep into lungs. Use N95 masks at minimum when mixing powders, and consider P100 respirators for frequent use. Even liquid dyes aerosolize during spraying—ventilation alone isn’t sufficient. The 2026 standard includes integrated spray booths with downdraft ventilation and real-time air quality monitoring.
Disposal Regulations for Dye Concentrates
Never pour dye waste down the drain. Heavy metals in some dyes (particularly older formulations) contaminate waterways. Collect all waste in sealed containers and contact your local hazardous waste facility. Many manufacturers now take back spent dye through mail-in programs. For water-based dyes, evaporation in a designated area is sometimes permissible, but check local regulations—what’s legal in rural Montana may violate codes in Los Angeles.
Frequently Asked Questions
Why does my walnut always turn orange even when I use “walnut” stain?
Most commercial walnut stains contain warm pigments that oxidize over time, plus oil-based binders that amber with age. The wood itself also contains compounds that yellow with UV exposure. Using a cool-toned dye with UV inhibitors prevents this cascade effect at the molecular level.
Can I dye over an existing orange finish without stripping?
Sometimes. If the existing finish is sound, scuff-sand with 320-grit, apply a shellac seal coat, then use a glaze or toner to shift the color cooler. However, this is a temporary fix—true color correction requires removing the old finish and dyeing the bare wood.
How do I know if I need a blue toner or a gray toner?
Test both on scrap wood from your project. Blue toners neutralize yellow-orange; gray toners desaturate red-orange. Take a photo under your final lighting and examine the RGB values—if the red channel is high, go gray; if the yellow channel dominates, go blue.
What’s the difference between dye, stain, and toner?
Dyes penetrate and color the wood itself. Stains contain pigment that sits on the surface. Toners are thin, dye-based finishes applied over sealed wood to adjust color. For orange correction, start with dye, then use toner for final tweaks.
How many dye coats should I apply for a natural walnut look?
Typically 2-3 coats. One coat often looks flat and orange; two coats build depth; a third coat with a cooler toner refines the color. More than three coats risk muddying the grain. Always seal between coats if adjusting temperature.
Will water-based dyes raise the grain badly on walnut?
Modern water-based dyes raise grain minimally, especially with pre-raising. Walnut is relatively stable compared to oak or maple. Use distilled water, apply quickly, and sand lightly after the first coat with 320-grit if needed.
Can I mix different dye types (water and alcohol based)?
Not directly—they’re incompatible. However, you can apply water-based dye, seal it, then apply alcohol-based toner, or vice versa. The sealer prevents chemical interaction while allowing color layering.
How long should I wait before applying a topcoat over dye?
Longer than you think. Alcohol dyes: 2-4 hours. Water-based dyes: 4-6 hours minimum, preferably overnight. Oil-based dyes: 24-48 hours. Test by pressing a clean cloth firmly—any color transfer means it’s not ready.
What’s the best way to match new walnut to existing walnut furniture?
Create test boards with your base dye, then adjust with small amounts of raw umber, Van Dyke brown, and either blue or gray toner. View samples in the final room lighting, and apply the same topcoat you’ll use on the existing piece. Expect to make 5-10 test samples for a perfect match.
Are expensive dyes really worth it compared to hardware store brands?
Absolutely. Premium dyes offer better lightfastness (rating 6-8 vs. 3-4), finer particle dispersion for more even color, and pure pigments that mix predictably. The $20 difference in dye cost is negligible compared to the value of your time and materials. For walnut, invest in professional-grade concentrates—you’ll use less and achieve better results.
See Also
- 10 Best Value Wood Dyes Under $15 for Crafting in 2026
- How to Choose the 10 Best Wood Dyes for Exotic Hardwoods in 2026
- How to Choose the 10 Best Wood Stains for Walnut Wood in 2026
- 10 Expert Wood Stains for Achieving a Weathered Gray Look in 2026
- 10 Exterior Wood Stains That Solve Mold and Mildew Problems This Year