Table of Contents
There’s a moment in every guitar maker’s journey when the binding process transforms from a dreaded chore into a meditative art form. That shift doesn’t happen by accident—it occurs when you finally understand that perfect binding isn’t about steady hands alone, but about the silent partners working alongside you. Edge clamps are those unsung heroes, the precision tools that apply exactly the right pressure, at exactly the right angle, for exactly the right amount of time. Without them, even the most meticulously cut binding strips will fail to create that seamless, professional transition between top, back, and sides.
The difference between a binding job that lasts decades and one that develops gaps within months often comes down to clamp selection and technique. Seasoned luthiers know that different binding materials, body shapes, and wood species demand specific clamping solutions. What works beautifully on a flattop dreadnought might crush the delicate purfling on an archtop’s recurve. This guide dives deep into the ten essential categories of edge clamps that belong in every serious guitar maker’s workshop, exploring not just what to buy, but why each design matters and how to evaluate quality without getting lost in marketing hype.
Top 10 Edge Clamps
Detailed Product Reviews
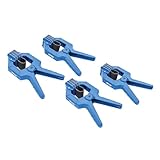
1. Semble Edge Band Spring Clamp Set, 10 Piece Pack, 3" Opening, Non-Marring + Anti-Slip, Durable Plastic Construction for Edge Banding, Molding, and Trim BANDCLAMP-10P

Overview: The Semble Edge Band Spring Clamp Set delivers a comprehensive solution for woodworkers tackling edge banding projects. This ten-pack provides ample clamps for securing veneer, trim, and molding while adhesive cures. The 3-inch jaw opening accommodates standard cabinetry and furniture components, making it versatile for both shop and job site applications. Designed for one-handed operation, these clamps prioritize efficiency without compromising on surface protection.
What Makes It Stand Out: The non-marring rubber bands set this set apart from traditional metal clamps, ensuring your finished surfaces remain pristine. The anti-slip design maintains consistent pressure across the entire clamping surface, eliminating the hot spots that cause glue lines to fail. With ten clamps included, you can work continuously across long runs of edge banding without stopping to reposition, dramatically improving workflow for both professionals and dedicated hobbyists.
Value for Money: Priced competitively for a ten-pack, these clamps offer significant savings over purchasing individually. For cabinetmakers and furniture builders who regularly apply edge banding, the cost per clamp represents excellent value compared to metal alternatives that can damage delicate veneers. While plastic construction keeps costs down, the durability proves sufficient for typical woodworking applications, making this set a smart investment for those starting or expanding their clamp collection.
Strengths and Weaknesses: Strengths include the generous quantity, genuine one-handed operability, and superior surface protection. The wide 3-inch opening handles most trim sizes comfortably. Weaknesses involve the plastic construction, which may fatigue after extensive use under maximum tension, and the uniform pressure isn’t adjustable for varying workpiece thicknesses. The spring strength, while adequate for most gluing, might struggle with extremely resilient hardwood edging.
Bottom Line: This ten-pack excels for cabinetmakers, furniture makers, and serious DIYers who need reliable, surface-safe clamping for edge banding projects. The quantity and thoughtful design outweigh durability concerns for most users.
2. Olympia Tools 3-Way Edging Clamp, 38-192,Black

Overview: The Olympia Tools 38-192 represents a professional-grade approach to edge clamping with its precision-engineered three-way design. Unlike spring-loaded alternatives, this malleable iron clamp provides targeted pressure from multiple directions, ensuring trim and molding seat perfectly against substrates. The 2.75-inch throat depth handles substantial workpieces while heavy-duty swivel saddles adapt to irregular surfaces, making it indispensable for fine furniture and detailed millwork.
What Makes It Stand Out: The three-way adjustment mechanism delivers unparalleled control, allowing woodworkers to apply pressure precisely where needed most. The black oxide spindle resists corrosion while maintaining smooth operation, and the reinforced iron frame provides the rigid backbone necessary for high-pressure applications. This clamp excels in situations where uniform spring pressure simply isn’t enough, offering surgical precision for critical joints and expensive materials.
Value for Money: As a single premium clamp, the Olympia demands a higher investment than multi-pack spring alternatives. However, for professionals working with high-value materials or requiring absolute precision, the durability and control justify the cost. This tool replaces several lesser clamps over its lifetime, making it economical for serious craftspeople. Hobbyists may find the price steep, but those tackling complex trim work will appreciate the professional results.
Strengths and Weaknesses: Strengths include exceptional pressure control, robust iron construction, and swivel saddles that protect workpieces while ensuring even force distribution. The ergonomic handle provides comfortable torque application. Weaknesses center on the single-unit nature—large projects require multiple purchases—and the learning curve associated with three-way adjustment. The weight and bulk also make it less convenient for quick, repetitive tasks compared to spring clamps.
Bottom Line: Ideal for professional woodworkers and advanced hobbyists demanding precision and durability. Invest in this clamp for high-stakes projects where control trumps speed, but supplement with spring clamps for production work.
3. Semble Edge Band Spring Clamp Set, 2 Piece (Pair), 3" Opening, Non-Marring + Anti-Slip, Durable Plastic Construction for Edge Banding, Molding, and Trim BANDCLAMP-2P

Overview: The Semble two-pack offers an entry point into professional edge banding techniques without committing to a full set. These clamps share the same design DNA as their ten-pack sibling, featuring the same 3-inch jaw opening and non-marring rubber bands. Perfect for hobbyists tackling occasional furniture repairs or small cabinet projects, this pair provides essential clamping power while maintaining the brand’s focus on surface protection and ease of use.
What Makes It Stand Out: This minimal set allows users to test Semble’s clamping philosophy with minimal financial risk. The identical construction to larger sets means you’re not sacrificing quality for quantity—you’re simply purchasing exactly what you need for modest projects. For those who already own traditional clamps, this pair serves as specialized supplementary tools for delicate veneering tasks where metal jaws would cause catastrophic damage.
Value for Money: While the per-clamp cost runs higher than the ten-pack, the two-pack’s low total price makes it accessible for beginners or those with limited storage space. It’s an economical way to determine if spring-style edge clamps suit your workflow before investing in bulk. For professionals needing only a few additional clamps for specific tasks, avoiding over-purchase represents its own value proposition.
Strengths and Weaknesses: Strengths include the same protective rubber bands, one-handed operation, and wide jaw opening as larger sets, packaged in an affordable duo. They’re lightweight and store easily. Weaknesses mirror the ten-pack: plastic construction has finite lifespan, and pressure isn’t adjustable. The limited quantity severely restricts workflow efficiency on longer edge banding runs, requiring constant repositioning that slows project completion considerably.
Bottom Line: Perfect for beginners, occasional DIYers, or professionals needing a specialized supplement. Purchase this pair for small projects or testing purposes, but invest in larger sets for serious production work.
4. BUILDSOMETHING Edge Band Spring Clamp - Home Improvement Hand Tools - Adjustable Band Clamps for Woodworking, Carpentry & More - Set of 4

Overview: BUILDSOMETHING positions its four-pack as the durability-focused middle ground in the edge clamp market. Featuring special-grade spring steel construction rather than pure plastic, these clamps promise extended lifespan for serious DIYers and professionals. The set of four hits the sweet spot for moderate-sized projects, providing enough clamps for continuous work without the storage demands of larger sets. Movable jaws with rubber pads adapt to various workpiece profiles.
What Makes It Stand Out: The spring steel internal mechanism distinguishes this set from all-plastic competitors, resisting fatigue and maintaining consistent pressure over countless cycles. Movable jaw design accommodates irregular trim profiles that fixed-jaw clamps struggle with, expanding versatility beyond standard edge banding. The brand’s focus on home improvement suggests user-friendly design considerations that pure professional tools might overlook.
Value for Money: Priced between budget plastic sets and premium single clamps, this four-pack offers compelling value for those prioritizing longevity. The steel springs justify a modest price premium over all-plastic alternatives, potentially outlasting several cheaper sets. For the semi-professional or enthusiastic hobbyist, the cost-per-use over the tool’s lifetime makes this a financially sound choice that balances initial investment with durability.
Strengths and Weaknesses: Strengths include the durable steel spring construction, adaptable movable jaws, and sufficient quantity for most moderate projects. Rubber pads provide reliable surface protection. Weaknesses include the lesser-known brand reputation compared to established competitors, and the four-count may still prove insufficient for large casework. The clamping force, while improved by steel springs, remains non-adjustable like all spring-style clamps.
Bottom Line: An excellent choice for serious DIYers and semi-professionals seeking durability without bulk. The steel springs and adaptable jaws make this four-pack a smart compromise between economy and performance.
5. VMTW Band Clamp 12 pack for edge clamping, banding on shelving, cabinet edges, plywood edging, laminations

Overview: VMTW’s twelve-pack dominates the bulk market, offering the highest quantity for woodworkers managing extensive edge banding operations. These clamps feature rugged engineered plastic construction with notably strong springs, optimized for production environments. The 2-1/8 inch opening handles typical plywood edging and laminations, while the 2-1/2 inch depth provides secure engagement. Designed specifically for repetitive shelving and cabinet work, this set emphasizes quantity and consistency.
What Makes It Stand Out: The twelve-count immediately distinguishes this offering, enabling continuous clamping across long runs without workflow interruption. Exceptionally strong springs deliver robust clamping pressure that rivals some metal alternatives, ensuring reliable adhesion even with stubborn hardwood edging. The engineered plastic resists glue adhesion, simplifying cleanup after messy epoxy or PVA applications—a critical feature in high-volume production.
Value for Money: This pack delivers the lowest per-clamp cost in the category, making it unbeatable for large projects or professional shops. While the initial investment exceeds smaller sets, the unit economics favor anyone regularly building multiple cabinets or shelving units. The durability of engineered plastic combined with strong springs means these clamps survive production abuse, maximizing return on investment through extended service life.
Strengths and Weaknesses: Strengths include unmatched quantity, powerful spring tension, glue-resistant construction, and excellent bulk pricing. The clamps work consistently across hundreds of cycles. Weaknesses include the slightly smaller 2-1/8 inch opening, which may limit compatibility with thicker trim, and all-plastic construction still carries some durability questions compared to steel-reinforced alternatives. The lack of anti-slip branding may concern users with ultra-smooth veneers.
Bottom Line: The definitive choice for production shops, professional cabinetmakers, and ambitious DIYers undertaking major built-in projects. Buy this twelve-pack when quantity and consistent performance matter most.
6. VMTW Band Clamp 6 pack for edge clamping, banding on shelving, cabinet edges, plywood edging, laminations

Overview: The VMTW Band Clamp 6-pack delivers functional edge banding solutions for budget-conscious woodworkers tackling plywood shelving and cabinetry projects. These engineered plastic clamps provide consistent spring pressure for securing edge banding while adhesive cures, offering a practical alternative to traditional bar clamps for narrow stock applications.
What Makes It Stand Out: This six-pack provides exceptional quantity for the price, allowing simultaneous clamping of multiple workpieces. The rugged engineered plastic construction resists glue adhesion, preventing messy buildup that plagues metal clamps. With a 2-1/8" opening and 2-1/2" depth, they accommodate most standard edge banding scenarios. The strong spring mechanism maintains adequate pressure without crushing delicate veneer edges.
Value for Money: As a six-pack, the per-clamp cost is significantly lower than premium alternatives, making this set ideal for hobbyists and occasional users. While professional shops might prefer metal clamps, DIYers gain six functional clamps for the price of one or two premium brands. The glue-resistant property extends lifespan, adding long-term value over cheaper all-metal options that require constant cleaning.
Strengths and Weaknesses: Pros include the six-clamp quantity, glue-resistant plastic construction, adequate spring pressure, and budget-friendly pricing. Cons involve potential durability concerns with heavy use, limited jaw opening for thicker stock, and plastic construction that may fatigue over time compared to metal alternatives.
Bottom Line: Perfect for home workshops and occasional edge banding tasks, these clamps deliver practical functionality without premium cost. For professional daily use, consider upgrading to metal clamps, but for most DIY plywood projects, this six-pack offers outstanding utility and value.
7. Rockler Small Spring Clamps (Pair) – Easy Squeeze Bandy Clamps Woodworking for Thinner Stock, & Delicate Moldings – One-Handed Operation – Easy to Grip Nylon Hand Clamps

Overview: Rockler’s Small Spring Clamps represent premium engineering for fine woodworking applications requiring delicate touch and precision. These bandy-style clamps combine nylon fiberglass construction with ergonomic design, specifically targeting thin stock and intricate molding profiles where traditional clamps cause damage or misalignment.
What Makes It Stand Out: The high-strength nylon with fiberglass fill provides exceptional durability while remaining lightweight. One-handed operation enables quick adjustments without releasing your workpiece, crucial for complex glue-ups. The over-molded rubber grip offers superior comfort during extended use, while the super-tough rubber band distributes pressure evenly across irregular contours without marring surfaces.
Value for Money: Priced as a premium pair, these clamps cost more than generic alternatives but justify the expense through material quality and ergonomic benefits. The fiberglass-reinforced nylon resists breakage and wear, outlasting cheaper plastic clamps. For woodworkers regularly working with delicate moldings, the time saved and damage prevented provides excellent return on investment.
Strengths and Weaknesses: Pros include one-handed operation, non-marring rubber band, comfortable grip, durable construction, and versatility beyond woodworking (cable management). Cons are the limited two-clamp quantity, higher price point, and small size restricting capacity for larger stock.
Bottom Line: An essential tool for fine furniture makers and trim carpenters working with delicate materials. The quality justifies the premium price for professionals, while serious hobbyists will appreciate the precision and durability. For heavy stock, consider the medium version instead.
8. Kreg Edge Band Spring Clamp - One-Handed Edge Banding Clamp with Stretch Band - Non-Marring with Pivoting Jaws for Uniform Pressure Glue-Ups - For Cabinetry, Trim & More - Set of 4
Overview: Kreg’s Edge Band Spring Clamps deliver specialized precision for edge banding applications, combining innovative pivoting jaw technology with stretchable band design. This set of four clamps addresses the specific challenges of veneer and trim work, offering professional-grade control for cabinetry and furniture projects where uniform pressure is critical.
What Makes It Stand Out: Pivoting jaws maintain full contact across varying material thicknesses, eliminating pressure points that cause glue starvation or veneer cracking. The stretchable band accommodates stock up to 1-inch thick while adapting to curved profiles. GripMaxx pads provide non-marring protection for finished surfaces, and the glue-resistant design ensures easy cleanup. True one-handed operation speeds workflow significantly.
Value for Money: Positioned at a premium price point, these clamps reflect Kreg’s reputation for problem-solving tools. While more expensive than basic spring clamps, the specialized features—particularly the pivoting jaws and uniform pressure distribution—prevent costly material waste from failed glue-ups. For professionals, the efficiency gains justify the investment.
Strengths and Weaknesses: Pros include pivoting jaws for uniform pressure, stretchable band versatility, non-marring pads, one-handed use, and glue resistance. Cons involve higher cost per clamp, limited to edge banding applications, and the four-clamp set may be insufficient for larger projects without multiple purchases.
Bottom Line: The best-in-class solution for dedicated edge banding work. Cabinetmakers and furniture builders will appreciate the precision and reliability. While overkill for occasional DIY use, professionals should consider these an essential investment that pays dividends in quality and efficiency.
9. ProGrip Straight Edge Clamp Ideal for Cutting Large Sheets of Plywood and Dado Slots

Overview: The ProGrip Straight Edge Clamp transforms circular saw use by providing a rigid, low-profile guide system for cutting large sheet goods and dado slots. This tool eliminates the need for cumbersome straightedges and C-clamps, offering an integrated solution for achieving factory-straight cuts on plywood and other panel materials without a table saw.
What Makes It Stand Out: The lightweight 2-3/16" tube rail construction delivers exceptional rigidity without the weight of traditional extruded aluminum guides. The low-profile design allows your saw base to glide smoothly without obstruction. One fixed jaw and one adjustable jaw enable rapid setup and alignment, while the clamping mechanism secures firmly to panels without damaging edges. It doubles as a straightedge for marking and measuring.
Value for Money: Mid-range priced, the ProGrip replaces multiple tools—a straightedge, several clamps, and a cutting guide. For woodworkers without a table saw, it enables accurate breakdown of sheet goods that would otherwise require expensive panel saws or imprecise freehand cutting. The durability and multi-functionality provide strong value for small shops and job sites.
Strengths and Weaknesses: Pros include lightweight rigidity, easy alignment, low-profile design, adjustable capacity, and versatility for various power tools. Cons are limited clamping force compared to dedicated bar clamps, not suitable for general workpiece clamping, and requires careful setup for perfect alignment.
Bottom Line: An indispensable tool for anyone processing sheet goods regularly. The ProGrip delivers professional results without professional machinery investment. While specialized, its ability to produce straight, accurate cuts makes it a workshop essential for cabinetmakers and DIY enthusiasts alike.
10. Rockler Medium Spring Clamps (Pair) – Easy Squeeze Bandy Clamps Woodworking for Thinner Stock, & Delicate Moldings – One-Handed Operation Medium Clamps – Easy to Grip Nylon Hand Clamps w/Fiberglass

Overview: Rockler’s Medium Spring Clamps expand their bandy clamp line, offering increased capacity while maintaining the refined features of their smaller sibling. These medium-sized clamps target woodworkers working with slightly larger delicate stock and moldings, providing the same ergonomic benefits and durable construction in a more versatile size package.
What Makes It Stand Out: The medium size bridges the gap between delicate work and moderate stock thickness, offering broader utility without sacrificing precision. High-strength nylon with fiberglass fill ensures durability, while the over-molded rubber grip provides comfort during repetitive tasks. The super-tough rubber band distributes pressure evenly across profiles, preventing marring on finished surfaces. One-handed operation remains effortless, allowing quick repositioning during complex assemblies.
Value for Money: Priced similarly to the small version, these medium clamps offer better value for most users due to their increased capacity. The two-clamp set costs more than generic alternatives, but the reinforced construction and ergonomic design justify the premium. For woodworkers needing versatility across various molding sizes, this medium size eliminates the need for multiple specialized clamps.
Strengths and Weaknesses: Pros include greater capacity than small version, durable nylon/fiberglass construction, comfortable grip, one-handed operation, and even pressure distribution. Cons remain the limited two-clamp quantity and higher price compared to basic spring clamps. Some users may find the medium size still insufficient for larger stock.
Bottom Line: The most versatile size in Rockler’s bandy clamp range, ideal for general trim and molding work. The quality construction and thoughtful design make these worthwhile for serious woodworkers. Consider purchasing multiple pairs for larger projects, as two clamps often prove insufficient for longer glue-ups.
The Critical Role of Edge Clamps in Guitar Binding
Binding does more than protect edges from dings and moisture—it seals the end grain, prevents top and back cracks from spreading, and creates that visual frame that defines a guitar’s silhouette. Achieving this requires pressure that’s both firm enough to close invisible gaps and gentle enough to avoid crushing the binding or marring the finish. Standard bar clamps simply can’t navigate the complex curves and delicate nature of guitar binding work.
Why Standard Clamps Fall Short for Binding Work
The typical woodworking clamp excels at 90-degree joints on straight boards, but guitar bodies are anything but straight. The waist cut, upper and lower bouts, and cutaways create compound curves that demand clamps with specialized jaw shapes, flexible pressure points, and the ability to sit flush against carved tops. Using generic clamps often leads to pressure points that distort binding strips, creates uneven glue lines, or leaves unsightly dimples in soft woods like mahogany or cedar.
The Physics of Proper Binding Pressure
Understanding clamp pressure distribution is fundamental to successful binding. The ideal clamp exerts perpendicular force directly into the binding channel, compressing the glue line without flexing the binding strip itself. This requires a jaw face that matches the contour of your guitar’s edge and padding that conforms to the binding’s profile. Too much pressure squeezes all the glue from the joint, creating a starved bond; too little leaves microscopic voids that eventually crack. Professional edge clamps give you the feedback to feel this sweet spot.
Spring-Powered Edge Clamps: Your First Line of Defense
Spring clamps represent the workhorse of guitar binding, offering quick placement and removal—crucial when you’re racing against glue setup times. Their one-handed operation lets you hold binding in position while placing the clamp, a seemingly small advantage that becomes invaluable during complex glue-ups.
Understanding Spring Tension and Jaw Design
Not all spring clamps are created equal. Look for models with progressive tension that builds gradually as you open the jaws, rather than those with sudden, harsh resistance. The jaw profile should feature a deep throat—at least 1.5 inches—to reach over binding and into the channel. Professional-grade clamps use tempered steel springs that maintain consistent pressure over thousands of cycles, while budget versions lose tension after a few dozen uses.
Material Considerations for Spring Clamps
The jaw material dramatically affects performance. Nylon-jawed clamps prevent marring but can flex under pressure, reducing clamping force on the binding itself. Brass-jawed models offer the perfect balance of strength and softness, conforming slightly to the binding without damaging it. Some makers prefer aluminum for its lightweight feel during extended sessions, though it requires careful padding to avoid leaving marks on delicate bindings.
Cam-Action Clamps: Precision Pressure Control
Cam clamps bring surgical precision to binding work through their lever-operated mechanism that provides mechanical advantage. A slight press of the lever generates significant, controllable pressure, then releases instantly when you lift the cam. This makes them ideal for situations where you need to adjust pressure incrementally or remove clamps quickly for cleanup.
How Cam Mechanisms Work for Binding
The cam’s eccentric shape creates a variable pressure curve—light initial contact that firms up as the lever approaches its locked position. This progressive action lets you sneak up on the perfect pressure, feeling the binding seat into the channel before fully committing. Quality cam clamps feature adjustable pivot points that let you modify the throw distance, adapting to different binding thicknesses from thin black/white purfling to chunky celluloid binding.
Adjusting Cam Pressure for Different Wood Species
Hard maple bindings require considerably more pressure than soft ivoroid or fiber bindings. Professional cam clamps include micro-adjustment screws that change the cam’s eccentricity, effectively tuning the maximum pressure output. For figured woods prone to splitting, you can dial back the cam’s throw to apply gentle, even pressure across the strip’s length. This level of control separates dedicated luthier’s cam clamps from generic hardware store versions.
Elastic Band Clamps: Even Pressure Distribution Masters
Band clamps excel at applying uniform pressure across long, curved sections like the lower bout of a dreadnought. The continuous elastic strap conforms to any shape, eliminating the pressure points that individual clamps create. When you’re binding a full body in one session, band clamps reduce setup time by half while improving consistency.
Width and Elasticity: What Matters Most
The strap’s width determines pressure distribution—narrower bands concentrate force, while wider straps spread it thin. For most binding work, 1-inch wide bands hit the sweet spot, though some makers keep 2-inch versions for delicate purfling work. The elasticity rating, typically measured in pounds of pull per inch of stretch, should fall between 15-25 lbs for guitar work. Too stretchy and you can’t generate enough pressure; too stiff and you’ll struggle to stretch them over the body.
Layering Techniques with Band Clamps
Advanced luthiers often layer multiple band clamps, offsetting them by a few inches to create overlapping pressure zones. This technique proves especially valuable on cutaway guitars, where the tight curve needs extra attention. Place the first band at the binding’s centerline, then add secondary bands above and below, creating a pressure gradient that prevents the binding from lifting at the edges.
Go-Bar Deck Clamps: The Luthier’s Classic Choice
The go-bar system—upright posts with flexible dowels wedged between the deck and workpiece—represents perhaps the most traditional luthier’s clamping method. While it requires a dedicated deck and takes longer to set up, go-bars apply pressure that’s both firm and forgiving, perfect for delicate binding work on carved tops where rigid clamps might crush the arch.
Setting Up Your Go-Bar System
A proper go-bar deck needs to be rock-solid, typically built from 3/4-inch plywood reinforced with 2x4s underneath. The spacing of the holes—usually drilled in a 4-inch grid—determines your clamping flexibility. Drill holes slightly oversized (1/16 inch larger than your dowels) to allow angle adjustment. The deck height should position your guitar body at chest level when seated, letting you lean into the go-bars for precise pressure control.
Selecting the Right Dowel Material and Flex
Go-bar dowels traditionally use flexible hardwoods like hickory or ash, though many modern makers prefer fiberglass rods for consistency. The dowel’s diameter controls flex—3/8-inch rods work for most binding, while 1/2-inch versions handle heavier purfling stacks. The key is matching the rod’s stiffness to the pressure needed: you should be able to deflect the center of a 24-inch rod about 3-4 inches with moderate hand pressure. Any more and you’ll struggle to generate enough force; any less and you risk cracking delicate bindings.
Caul-Assisted Bar Clamps: Heavy-Duty Binding Solutions
For thick, multi-ply binding or difficult grain situations, conventional bar clamps paired with custom cauls provide the brute force needed. The caul—a shaped block that interfaces between the clamp jaw and binding—distributes the clamp’s pressure across the binding’s full height, preventing the thin strip from buckling under concentrated force.
Custom Caul Design for Binding Channels
Effective binding cauls match the radius of your guitar’s edge, with a slight hollow ground into the face to concentrate pressure at the glue line. Make them from dense, stable hardwood like maple or rosewood, and line the contact surface with 1/8-inch cork or leather. The caul should extend 1/2 inch beyond the binding on both top and back sides, ensuring even pressure distribution. For cutaways, create a series of cauls in 2-inch lengths that can be placed individually.
Padding and Protection Strategies
The interface between caul and binding demands careful consideration. Unlined hardwood cauls inevitably leave marks, especially on celluloid or ivoroid bindings. Leather provides excellent grip and conforms to minor irregularities, while cork offers more compression for uneven surfaces. Some makers use UHMW polyethylene sheet for its non-stick properties, crucial when working with CA glue that might squeeze out and bond the caul permanently.
Magnetic Binding Clamps: Modern Innovation
Rare-earth magnet clamps represent the newest evolution in binding technology, using powerful magnets on either side of the guitar side to squeeze the binding in place. Their primary advantage is complete access to the binding edge—no clamp bodies protruding to interfere with cleanup or inspection. They shine on thin-bodied instruments where traditional clamps struggle for purchase.
Understanding Magnetic Force Ratings
Magnet strength is measured in pull force—typically 25-50 pounds for guitar binding work. However, the effective pressure depends on the gap between magnets. With 1/8-inch side thickness plus binding, you’re looking at actual forces of 15-30 pounds per magnet pair. For tight curves, use multiple smaller magnets (1-inch diameter) rather than few large ones, allowing better contour following. Always test magnet strength on scrap wood first; excessive force can dimple soft side woods like Spanish cedar.
Setup Jigs for Magnetic Clamps
Magnetic clamps require a steel plate or another magnet on the interior of the guitar body. Many luthiers create a flexible internal caul with embedded steel strips, letting the external magnets pull against a contoured surface. For cutaways, you can stack smaller magnets on the inside, building up thickness to match the contour. Keep a non-magnetic spacer handy—when glue starts to set, slide it between magnet and binding to break the magnetic bond without disturbing the joint.
Vacuum Clamping Systems: Professional-Grade Uniformity
Vacuum bags and pods represent the pinnacle of even pressure distribution, applying perfectly uniform force across the entire binding perimeter simultaneously. While the setup cost and complexity limit these systems to professional shops, the results speak for themselves—flawless binding joints with zero pressure marks and consistent glue lines.
Pump Requirements for Binding Work
Binding requires surprisingly little vacuum—just 10-15 inches of mercury (inHg) generates over 7 pounds per square inch of clamping pressure, more than sufficient for most applications. A diaphragm pump rated for continuous duty will serve you better than a venturi system that wastes compressed air. Look for pumps with built-in vacuum regulators; too much vacuum can collapse lightweight sides or force glue deep into the end grain, creating finishing problems later.
Bag vs. Pod Systems for Guitars
Vacuum bags envelop the entire guitar, requiring careful placement of internal forms to prevent the bag from crushing the body. Pods—flexible rubber bladders that press directly against the binding—offer more targeted pressure but need precise positioning. For most luthiers, a bag system with a dedicated binding caul inside provides the best balance. The caul supports the guitar’s shape while the bag applies even pressure to the binding strip, eliminating the need for dozens of individual clamps.
Specialized Purfling Clamps: For the Fine Details
Purfling—the decorative lines inside the binding—demands even more delicate handling. Purfling clamps feature tiny jaws, sometimes as narrow as 1/8 inch, that fit into the tight channel between binding and top. Their pressure is measured in ounces rather than pounds, protecting these fragile strips while ensuring they seat fully.
Micro-Adjustable Purfling Clamps
The best purfling clamps include fine-thread adjustment screws that move the jaw in increments of a few thousandths of an inch. This precision lets you sneak up on perfect seating without overshooting and crushing the purfling. Look for models with ball-shaped jaw tips that pivot slightly, maintaining flat contact even when the clamp body sits at an angle. Some makers prefer all-brass construction for its softness and traditional feel.
Multi-Stage Clamping Sequences
Professional binding jobs often use three stages of clamps: initial spring clamps to position the binding, cam clamps to apply firm pressure at key points, and purfling clamps for the final detail work. This progressive approach lets you work methodically around the instrument, addressing issues at each stage rather than discovering problems after the glue sets. Always start at the center of each body section and work outward, allowing the binding to stretch slightly rather than bunching up.
Radiused Edge Clamps: For Curved Binding Work
Standard flat-jawed clamps struggle on carved tops and arched backs, where the binding follows a compound radius. Radiused clamps feature jaws ground to match common archtop profiles—typically 15-foot, 20-foot, or 25-foot radii. Using the correct radius ensures pressure concentrates at the glue line rather than bridging across the arch and leaving gaps.
Matching Clamp Radius to Body Contours
Before buying radiused clamps, measure your guitar’s arch using a radius gauge set. Many archtops vary radius from neck block to tail block, requiring multiple clamp sets. Some premium clamps feature interchangeable jaw faces, letting you swap radii as you work around the instrument. For one-off builds, you can modify standard clamps by gluing radiused wooden pads to the jaws, though this sacrifices some precision.
Compound Curve Challenges
The cutaway region presents the ultimate clamping challenge: a curve in both plan view and elevation. Here, flexible jaw clamps that conform to the local radius outperform rigid radiused models. Some makers use short sections of PVC pipe split lengthwise, creating a flexible caul that bends to match the compound curve while distributing clamp pressure evenly. The key is working in small sections—never try to bend binding around a cutaway in one continuous piece.
Features That Separate Professional-Grade Clamps from Budget Options
Price alone doesn’t define a professional clamp, but certain features consistently appear on tools that last decades rather than months. Understanding these details helps you invest wisely, building a collection that grows with your skills rather than limiting them.
Jaw Padding and Protection
Professional clamps use replaceable padding systems. Look for jaws with shallow grooves or attachment points that hold leather, cork, or silicone pads securely. The padding should be thick enough to protect the work but thin enough to feel the binding seating through the clamp. Avoid clamps with permanently bonded foam padding—it compresses permanently over time and can’t be replaced when saturated with glue.
Adjustability and Fine-Tuning Mechanisms
The hallmark of a quality clamp is the range of adjustment. Premium spring clamps include tension adjustment screws that let you dial back the force for delicate work. Cam clamps should offer variable throw settings. Even simple band clamps benefit from buckles that allow micro-adjustment of tension. This adaptability means one clamp serves multiple purposes, reducing the total number needed in your shop.
Build Quality and Durability Expectations
Examine the pivot points and springs. Professional clamps use bronze bushings or polished steel pins that won’t develop play over time. Springs should be fully enclosed or coated to resist rust from workshop humidity. The frame should feel solid, with no flexing when you apply maximum pressure. A good clamp is an investment; expect to pay more for features like stainless steel hardware and precision-machined jaws that maintain alignment after years of use.
Building a Progressive Clamping Strategy
Randomly placing clamps around a guitar body invites disaster. A methodical, progressive strategy ensures even pressure distribution and gives you time to address issues before the glue sets. This approach separates hobbyists from professionals.
Dry Runs and Pressure Testing
Always perform a complete dry run, placing every clamp on unglued binding to check for fit issues, interference, and pressure patterns. Use feeler gauges to verify the binding seats fully in the channel with clamp pressure applied. Look for spots where clamps bridge over low points or where pressure seems excessive. This rehearsal reveals problems when you can still solve them easily, not when glue is dripping everywhere.
Staged Glue-Up Techniques
Consider a two-stage glue-up for difficult bindings. First, apply a thin sizing coat of glue to the channel and let it tack up for 10 minutes. This seals the end grain and prevents the main glue application from being absorbed. Then apply fresh glue to the binding, position it, and clamp. This technique reduces clamping time and ensures a stronger bond, especially on porous woods like mahogany or rosewood that can drink up glue before the binding seats.
Maintenance and Care for Longevity
Quality clamps last generations with proper care, but neglect them and they’ll fail when you need them most. Glue residue, rust, and lost tension are the enemies, all preventable with simple maintenance habits.
Cleaning Glue Residue
Develop the habit of wiping clamps with a damp cloth immediately after glue-up, before the adhesive cures. For dried glue, use a plastic scraper followed by a solvent appropriate for your glue type—warm water for hide glue, acetone for CA, and mineral spirits for aliphatic resin. Never soak clamps in solvent, as it can degrade padding and seep into spring mechanisms. A quick wipe-down after each use takes seconds and preserves the tool.
Spring Tension Preservation
Store spring clamps in the open position when not in use. Constant compression weakens springs over time, reducing their effectiveness. For cam clamps, release the tension completely after each session. If you notice a spring clamp losing its bite, some models allow you to adjust tension or replace the spring entirely—check the manufacturer’s design before discarding a favorite tool.
Storage Solutions
Magnetic strips mounted under your bench keep clamps organized and within reach. For band clamps, wind them onto spools to prevent tangling. Go-bar dowels store best in vertical tubes that support them without bending. A dedicated clamp rack might seem like luxury, but it protects your investment and saves countless hours hunting for the right clamp during a critical glue-up.
Frequently Asked Questions
How many edge clamps do I actually need for a standard dreadnought binding job?
For a full perimeter binding on a dreadnought, plan on 20-24 individual clamps minimum: 12-16 spring clamps for general positioning, 4-6 cam clamps for pressure points at the waist and corners, and 2-4 specialized clamps for the cutaway if present. Band clamps can reduce this number significantly—two 60-inch bands often replace a dozen individual clamps on the lower and upper bouts.
Can I adapt standard woodworking clamps for binding work, or is that asking for trouble?
While you can modify bar clamps with custom cauls, standard F-style clamps rarely work well for binding. Their jaws are too deep, the pressure is difficult to control, and they inevitably mar the binding or top. The exception is small 4-inch bar clamps used with thick, radiused cauls on flat sections. For the investment in time and materials to modify them, you’re usually better off purchasing purpose-built binding clamps.
What’s the sweet spot for clamping pressure on celluloid binding versus wood binding?
Celluloid binding requires surprisingly light pressure—just enough to close the joint without squeezing out all the glue, typically 5-10 pounds of force. Wood bindings can handle 15-25 pounds, depending on species. Hard maple needs more pressure than soft ivoroid. The key indicator is a thin, consistent glue line with minimal squeeze-out. If you’re crushing the binding’s profile or forcing glue to pour from the joint, back off the pressure.
How do I prevent those annoying small dimples that sometimes appear in my binding after clamping?
Dimples usually come from concentrated pressure points or contaminated padding. Ensure your clamp jaws are perfectly flat and your padding is clean and uncompressed. Rotate padding regularly, and replace it at the first sign of hardening. For extremely soft bindings, use a thin sheet of silicone rubber as an interface—it distributes pressure so evenly that dimples become impossible. Also, check that your binding channel depth matches the binding thickness; shallow channels force clamps to press on the binding’s top edge rather than its back.
Is there a universal clamp that works for both flat tops and carved archtops?
Unfortunately, no single clamp excels at both. Flat tops favor spring clamps and band clamps for their speed and even pressure. Archtops demand radiused clamps or go-bar systems that conform to the carved surface. However, cam clamps with interchangeable radiused jaw faces come closest to universal utility. Invest in a quality set of cam clamps first, then add specialized tools as your work demands.
What’s the best approach for clamping binding around a tight cutaway curve?
Cutaways require a multi-pronged strategy. First, pre-bend your binding using a heating blanket or pipe to reduce spring-back. Then use short, 2-inch sections of flexible band clamp or multiple small spring clamps placed every inch. Some luthiers create a custom flexible caul from thin stainless steel sheet that conforms to the cutaway’s shape, distributing pressure from a single larger clamp. Work in small sections, letting each set partially cure before moving to the next.
How often should I expect to replace my binding clamps?
With proper care, professional-grade clamps last decades. Spring clamps might need new springs every 5-7 years of heavy use. Cam clamps and bar clamps essentially last forever if kept clean and rust-free. Band clamps lose elasticity over time—expect 3-5 years before they stretch permanently. The clamps that fail first are always the budget versions with non-replaceable parts. Buy once, cry once.
Are vacuum clamping systems worth the investment for a small home workshop?
For most hobbyists, vacuum systems are overkill both in cost and complexity. However, if you’re building more than six guitars annually or working with extremely brittle bindings, a basic vacuum bag setup becomes worthwhile. The entry cost has dropped significantly, with decent systems available for the price of 20-30 high-end clamps. The time savings alone—clamping an entire guitar in minutes rather than an hour—can justify the expense for serious builders.
What’s the trick to clamping multi-ply purfling without it shifting or buckling?
Multi-ply purfling shifts because each layer moves slightly under pressure, accumulating into visible misalignment. The solution is twofold: first, use a very thin glue application so layers can’t float, and second, apply pressure perpendicular to the layers using narrow-jawed purfling clamps. Some luthiers pre-bind their purfling stacks with thin CA glue, creating a single rigid unit that behaves like solid binding. Work in 3-inch sections, seating each perfectly before moving on.
How do I know when I’m ready to upgrade from beginner clamps to professional-grade tools?
The upgrade moment arrives when you can consistently identify clamp-related problems in your work—dimples, gaps, uneven glue lines—and understand that tool quality, not technique alone, is limiting you. If you’re building more than three guitars per year, professional clamps pay for themselves in reduced frustration and rework. Another indicator: you find yourself buying the same cheap clamp for the third time because the previous ones failed. That’s when you should invest in one quality clamp that will last decades instead.
See Also
- 10 Essential Edge Clamps Every Furniture Maker Needs in 2026
- 10 Essential Bar Clamps Every Furniture Maker Needs This Year
- Stop Slipping Joints: 10 Best Edge Clamps for Perfect Alignment This Year
- How to Choose 10 Best Edge Clamps for Perfect Banding in 2026
- 10 Essential Band Clamps Every Chair Builder Needs in 2026