Table of Contents
Nothing derails a flawless veneer project faster than the sinking feeling of discovering bubbles beneath that paper-thin sheet of exotic wood. You’ve meticulously matched grain patterns, mixed the perfect adhesive, and yet those stubborn air pockets still appear, mocking your craftsmanship. As we move through 2026, the evolution of edge clamping technology has transformed bubble prevention from an art of guesswork into a science of precision pressure distribution. Today’s sophisticated clamping systems don’t just hold veneer in place—they actively work to evacuate air, maintain consistent force, and adapt to the unique challenges of modern woodworking materials.
Whether you’re restoring a mid-century modern credenza or crafting a contemporary marquetry masterpiece, understanding the nuanced relationship between clamp design and bubble prevention will elevate your work from amateur to gallery-worthy. This comprehensive guide dives deep into the mechanics, materials, and methodologies that define exceptional edge clamping performance, helping you navigate the increasingly sophisticated landscape of veneer tools without getting lost in marketing hype. We’ll explore what truly matters when selecting clamps that deliver glass-smooth results every single time.
Top 10 Edge Clamps For Veneer
Detailed Product Reviews
1. Semble Edge Band Spring Clamp Set, 2 Piece (Pair), 3" Opening, Non-Marring + Anti-Slip, Durable Plastic Construction for Edge Banding, Molding, and Trim BANDCLAMP-2P

Overview: The Semble 2-piece spring clamp set delivers a straightforward solution for edge banding and trim work. With a 3-inch jaw opening and non-marring rubber bands, these clamps target hobbyists and DIYers tackling occasional cabinetry or furniture projects. The simple squeeze-action design enables quick one-handed operation, making them accessible for users of all skill levels who need reliable pressure during glue curing without complex adjustments.
What Makes It Stand Out: This pair excels as an entry point into edge banding clamps. The 3-inch capacity handles most standard trim and veneer thicknesses, while the anti-slip rubber band distributes pressure evenly across surfaces without damaging delicate finishes. Unlike metal spring clamps that can mar wood, the plastic construction with integrated rubber gripping surface offers peace of mind when working with pre-finished materials or expensive veneers that cannot be sanded after installation.
Value for Money: At the 2-piece price point, these represent a low-risk investment for those uncertain about committing to larger sets. The cost per clamp is reasonable for occasional use, though professionals will find the 10-pack more economical. For weekend warriors completing a single kitchen refacing or furniture restoration project, this minimal quantity prevents over-purchasing while delivering essential functionality comparable to more expensive alternatives.
Strengths and Weaknesses: Strengths include impressive affordability, genuine one-handed operation, and effective non-marring protection across various profiles. The 3-inch opening covers most residential applications. Weaknesses involve the all-plastic construction, which may fatigue over time with heavy use, and the limited quantity that restricts simultaneous glue-ups. The rubber band’s longevity under constant stretching remains questionable for high-volume professional shop environments.
Bottom Line: Perfect for DIYers and occasional woodworkers needing reliable edge banding pressure without a major investment. Buy this 2-pack for small projects, but consider the 10-piece set if you regularly work with veneers or trim. These clamps earn their place in any hobbyist’s toolkit.
2. Semble Edge Band Spring Clamp Set, 10 Piece Pack, 3" Opening, Non-Marring + Anti-Slip, Durable Plastic Construction for Edge Banding, Molding, and Trim BANDCLAMP-10P

Overview: This 10-piece Semble set scales up the same proven design as the 2-pack, targeting serious hobbyists and professionals who need multiple clamps for complex glue-ups. The identical 3-inch jaw opening and non-marring rubber bands allow simultaneous pressure across cabinet runs or multiple furniture pieces. The bulk packaging eliminates repeated purchases and ensures consistent clamp performance across your entire project, making it ideal for production environments or large-scale renovations where efficiency matters.
What Makes It Stand Out: The quantity advantage immediately distinguishes this set. Having ten clamps enables continuous workflow during edge banding sessions, crucial when working with fast-setting adhesives. The uniform construction ensures predictable pressure distribution across all clamps, eliminating variables that can compromise glue joints. For cabinetmakers installing edge banding on entire kitchens, this set provides enough clamps to secure long runs without repositioning, dramatically reducing workflow interruptions.
Value for Money: Bulk purchasing delivers significant per-unit savings compared to the 2-pack, making this the economical choice for frequent users. The upfront investment pays dividends through reduced project time and consistent results. While the initial cost exceeds the pair, the cost-per-clamp analysis strongly favors this 10-pack for anyone edge banding more than occasionally. Consider it shop infrastructure rather than a consumable purchase.
Strengths and Weaknesses: Strengths include exceptional value at scale, consistent performance across the set, and sufficient quantity for professional workflows. The 3-inch capacity remains versatile. Weaknesses mirror the 2-pack: all-plastic construction may not withstand daily commercial abuse, and the rubber bands remain the potential failure point. Storage becomes a consideration with ten clamps requiring organization.
Bottom Line: The smart buy for serious woodworkers, cabinetmakers, and active DIYers. The 10-pack transforms edge banding from a tedious chore into an efficient assembly-line process. Accept the plastic construction limitations and these deliver outstanding workshop value.
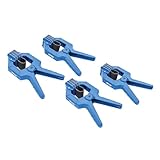
3. BUILDSOMETHING Edge Band Spring Clamp - Home Improvement Hand Tools - Adjustable Band Clamps for Woodworking, Carpentry & More - Set of 4

Overview: BUILDSOMETHING positions its 4-piece set as a heavy-duty alternative to all-plastic clamps, emphasizing special-grade spring steel construction. These clamps target DIYers and semi-professionals seeking durability beyond typical hobbyist tools. The movable jaws with rubber pads adapt to various workpiece shapes, making them suitable for general woodworking beyond dedicated edge banding. This versatility appeals to users wanting multi-purpose clamps that justify toolbox space through broader application across diverse projects.
What Makes It Stand Out: The spring steel internal mechanism differentiates these from purely plastic competitors, promising extended durability and consistent clamping force over time. Movable jaw design accommodates irregular profiles and non-standard trim pieces that fixed-band clamps struggle with. The set of four hits a sweet spot for moderate projects—more than the minimal pair, but without the storage demands of ten-clamp collections. This balance serves serious hobbyists well who need flexibility without clutter.
Value for Money: Mid-range pricing reflects the upgraded materials without reaching premium brand premiums. The steel construction suggests longer service life, improving long-term value. For woodworkers regularly transitioning between edge banding, general assembly, and light cabinetry, these eliminate buying separate specialized clamps. The 4-pack quantity supports modest production while remaining affordable for semi-professional use.
Strengths and Weaknesses: Strengths include durable steel internals, versatile movable jaws, and smart quantity for active hobbyists. The rubber pads protect surfaces effectively. Weaknesses include a less-established brand reputation compared to Rockler or Kreg, and potentially less specialized edge-banding optimization than dedicated designs. The “adjustable” claim may oversimplify jaw movement limitations for some users.
Bottom Line: A solid middle-ground choice for versatile woodworkers prioritizing durability over specialized features. The steel construction justifies the modest price premium over all-plastic options. Consider these if your projects extend beyond pure edge banding into general carpentry where flexibility matters most.
4. Rockler Small Spring Clamps (Pair) – Easy Squeeze Bandy Clamps Woodworking for Thinner Stock, & Delicate Moldings – One-Handed Operation – Easy to Grip Nylon Hand Clamps

Overview: Rockler’s small spring clamps carve a niche for delicate, thin-stock applications where standard 3-inch clamps prove excessive. The nylon-with-fiberglass construction and ergonomic over-molded handles target fine woodworkers and trim carpenters working with fragile moldings. This pair excels at securing thin veneers, delicate trim, and small decorative elements without overwhelming them with excessive pressure or bulky clamp bodies that obstruct delicate work and fine detail.
What Makes It Stand Out: The high-strength nylon composite material resists chemicals and wear better than standard plastics, while the over-molded rubber handles provide superior comfort during extended use. These clamps specifically address thinner stock—many edge banding clamps struggle with materials under 1/2 inch. The compact size improves visibility and access in intricate work. Rockler’s reputation for woodworking-specific design shows in details like the optimized spring tension for delicate work requiring finesse.
Value for Money: Premium pricing reflects Rockler’s brand reputation and material upgrades. For fine furniture makers and trim carpenters, the investment prevents costly material damage on high-end projects. The pair configuration suits specialized tasks rather than bulk production. While expensive compared to plastic alternatives, the durability and precision justify costs for professionals working with expensive materials where mistakes are costly and time-consuming.
Strengths and Weaknesses: Strengths include superior material quality, ergonomic design, specialized thin-stock optimization, and trusted brand support. The non-marring performance excels on delicate surfaces. Weaknesses include limited jaw capacity restricting versatility, premium pricing, and only two clamps limiting simultaneous use. Not ideal for standard 3/4-inch plywood edge banding applications.
Bottom Line: Essential for fine woodworkers and trim specialists working with thin, delicate materials. The premium construction and ergonomic design justify the higher price for those needing precision over brute force. Avoid for general edge banding; embrace for specialty trim work where control is paramount.
5. Kreg Edge Band Spring Clamp - One-Handed Edge Banding Clamp with Stretch Band - Non-Marring with Pivoting Jaws for Uniform Pressure Glue-Ups - For Cabinetry, Trim & More - Set of 4
Overview: Kreg’s 4-piece set represents the premium tier of edge banding clamps, introducing innovative features like pivoting jaws and stretchable bands. Designed for discerning woodworkers and professional cabinetmakers, these clamps address common edge-banding frustrations: uneven pressure and limited profile adaptability. The GripMaxx pads and pivoting mechanism ensure consistent contact across varying material thicknesses, making them ideal for challenging profiles and high-visibility cabinetry where perfection matters and rework is unacceptable.
What Makes It Stand Out: The pivoting jaw system maintains full contact across irregular or curved profiles, eliminating pressure points that cause glue starvation or veneer cracking. The stretchable band accommodates materials up to 1-inch thick while adapting to contours in real-time. Kreg’s GripMaxx pads provide exceptional non-marring protection. These features combine to solve problems that plague standard spring clamps, particularly on complex moldings or when working with expensive pre-finished plywood that tolerates no mistakes.
Value for Money: Premium pricing aligns with Kreg’s reputation and genuine innovation. For professionals installing high-end cabinetry or expensive hardwood trim, preventing a single ruined piece justifies the entire set’s cost. The durability and consistent performance reduce rework, saving labor costs. While hobbyists may find the price steep, serious woodworkers recognize the value in precision engineering that eliminates common failure modes and ensures first-time success.
Strengths and Weaknesses: Strengths include revolutionary pivoting jaws, superior stretch band adaptability, exceptional non-marring pads, and professional-grade construction. The four-clamp quantity suits serious projects without excess. Weaknesses center on premium pricing that may deter casual users and the specialized design that offers diminishing returns for simple, straight edge banding tasks on standard materials.
Bottom Line: The top choice for professionals and perfectionists demanding flawless edge banding results. The pivoting jaw innovation solves real problems on complex profiles. Invest in these if your work justifies the premium or if you’ve experienced frustration with standard clamps. For basic edge banding, less expensive options suffice.
6. VMTW Band Clamp 12 pack for edge clamping, banding on shelving, cabinet edges, plywood edging, laminations

Overview: The VMTW Band Clamp 12-pack provides woodworkers with a specialized solution for edge banding and lamination tasks. These clamps deliver consistent pressure along the entire length of thin stock, making them indispensable for applying solid wood edging to plywood or creating laminated curves. Each clamp features rugged engineered plastic construction with a robust spring mechanism that opens to 2-1/8 inches and reaches 2-1/2 inches deep.
What Makes It Stand Out: The sheer quantity in this 12-pack sets it apart, offering enough clamps for substantial projects without breaking the bank. The engineered plastic design ensures glue won’t adhere to the surface—a frequent frustration with metal clamps. The strong spring provides ample holding power while remaining lightweight enough for extended use.
Value for Money: At bulk pricing, these clamps cost significantly less per unit than traditional metal band clamps. For professionals and serious hobbyists who regularly work with edge banding, the 12-pack represents substantial savings over purchasing individually. They deliver 80% of the functionality of premium clamps at a fraction of the cost.
Strengths and Weaknesses: Strengths include excellent glue resistance, lightweight design, strong clamping pressure, and exceptional value in bulk. The plastic construction, while durable, may not match the longevity of steel clamps under heavy professional use. Thin stock requires numerous clamps for even pressure distribution, which this pack fortunately provides.
Bottom Line: This 12-pack is ideal for woodworkers who frequently apply edge banding or work with laminations. The value proposition is compelling, offering functional performance at an accessible price point.
7. VMTW Band Clamp 6 pack for edge clamping, banding on shelving, cabinet edges, plywood edging, laminations

Overview: The VMTW Band Clamp 6-pack offers the same reliable edge-clamping performance as its larger sibling but in a more modest quantity. Perfect for occasional woodworkers or those with limited storage space, these clamps excel at securing edge banding, veneer, and thin laminations to core materials. Each clamp features identical specifications to the 12-pack version.
What Makes It Stand Out: This half-sized package makes professional-grade edge clamping accessible to hobbyists and DIY enthusiasts who don’t need a dozen clamps. The same rugged engineered plastic construction and non-stick properties remain, ensuring clean glue-ups without the investment in a full dozen.
Value for Money: While the per-clamp cost runs higher than the 12-pack, the lower total price point makes these specialized clamps accessible for smaller budgets. You’re not paying for clamps that will sit idle, making it economically sensible for intermittent use.
Strengths and Weaknesses: Strengths mirror the 12-pack: glue-resistant plastic, strong spring mechanism, and adequate pressure for most edge-banding tasks. However, six clamps may prove insufficient for larger projects requiring continuous pressure along lengthy edges. The plastic construction trades some durability for weight savings and cost reduction.
Bottom Line: The 6-pack serves hobbyists and occasional woodworkers perfectly. If you’re starting your edge-banding journey or have modest project needs, this package delivers essential functionality without unnecessary excess.
8. NECAMOCU Edge Banding Trimmer - 2025 Upgraded Mini Edge Band Trimmer & Cutter, Stainless Steel Blade Veneer Edge Trimmer for Woodworking, Durable Edgebanding Trimming Tool for Wood, Veneer, PVC, ABS

Overview: The NECAMOCU Edge Banding Trimmer represents the 2025 upgrade to manual edge banding tools, offering woodworkers a precision instrument for trimming veneer, PVC, and laminate edging flush with substrate surfaces. This handheld tool combines stainless steel durability with thoughtful ergonomics for clean, consistent results.
What Makes It Stand Out: The upgraded thicker blade with larger cutting edges and robust screws delivers noticeably smoother trimming action than previous generations. The double-sided 420 stainless steel blade design effectively doubles the tool’s lifespan, while the V-shaped blade configuration prioritizes user safety without sacrificing cutting efficiency.
Value for Money: Compared to electric edge banders costing hundreds of dollars, this manual trimmer offers exceptional value for small shops and DIY enthusiasts. The lifetime warranty demonstrates manufacturer confidence and protects your investment long-term.
Strengths and Weaknesses: Strengths include precision cutting, durable materials, non-slip phenolic base, versatile material compatibility, and outstanding warranty coverage. The manual operation requires more effort than powered alternatives and may slow production for high-volume work. Some users might experience a learning curve for optimal technique.
Bottom Line: This trimmer excels for woodworkers seeking professional results without powered equipment costs. It’s an essential tool for cabinet makers and furniture builders working with edge banding materials.
9. BESSEY KT5-1CP single spindle edge clamp for use with clamp rails up to 1/2

Overview: The BESSEY KT5-1CP spindle edge clamp transforms ordinary bar clamps into specialized edge clamps, expanding your workshop’s versatility without significant investment. This economical accessory attaches to any clamp rail up to 1/2-inch thick, adding perpendicular clamping capability to your existing toolkit.
What Makes It Stand Out: Its universal design works with bar clamps you already own, eliminating the need for dedicated edge clamps. The simple mounting mechanism requires no tools, making it instantly useful for securing edge banding, trim, or assembling cabinet carcasses.
Value for Money: As one of the most affordable clamp accessories available, it delivers tremendous utility per dollar. Rather than purchasing separate edge clamps for $20-40 each, this adapter maximizes your current clamp investment for a fraction of the cost.
Strengths and Weaknesses: Strengths include universal compatibility, rock-bottom pricing, and space-saving design. However, it requires ownership of suitable bar clamps and only provides single-point pressure, which may not distribute force as evenly as dedicated band clamps across long edges. The 1/2-inch rail limitation excludes some heavier-duty clamps.
Bottom Line: For woodworkers with existing bar clamp collections, this accessory is a no-brainer. It provides edge-clamping functionality at minimal cost, though serious edge-banding work may still benefit from dedicated clamps.
10. ¾” Quick Grip Corner Clamp Clips (Blue, 4 Pack) - Polypropylene 90 Degree Angle Clamps Clips - Corner Clamps for Woodworking to Lock onto 3/4” Boards – Ideal Corner Tool for Driving Nails & Screws
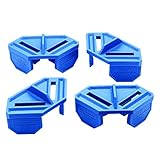
Overview: These ¾" Quick Grip Corner Clamp Clips provide a simple, effective solution for holding 90-degree joints during assembly. The four blue polypropylene clips slip over 3/4-inch stock, maintaining perfect right angles while you drive fasteners or apply clamping pressure, keeping fingers safe and panels aligned.
What Makes It Stand Out: The clever design includes corner openings that accommodate nail guns and drills, allowing direct fastener placement without removing the clips. The large removal tabs make detachment easy even with glue-covered hands, while the nesting capability ensures compact storage.
Value for Money: This 4-pack offers excellent value for cabinet makers and DIYers assembling boxes, frames, or casework. The reusable design eliminates the need for disposable brad nails or complex jig setups, saving time and money across multiple projects.
Strengths and Weaknesses: Strengths include finger safety, sturdy 90-degree hold, easy removal, durable polypropylene construction, and perfect sizing for standard cabinet stock. Limitations include restriction to 3/4-inch material thickness and lack of actual clamping force—they hold alignment but don’t apply pressure. The plastic may eventually fatigue after hundreds of uses.
Bottom Line: These clips are indispensable for anyone building cabinets or boxes from 3/4-inch sheet goods. They simplify assembly, improve safety, and deliver consistent results at an attractive price point.
Understanding the Veneer Bubble Problem
Why Bubbles Form in Veneer Applications
Bubbles in veneer work aren’t random defects—they’re predictable failures in adhesion physics. When adhesive bonds between veneer and substrate, trapped air expands and creates voids if pressure remains inconsistent across the surface. Traditional clamping methods concentrate force at specific points, leaving valleys of insufficient pressure where air pockets thrive. The problem compounds with modern ultra-thin veneers (now trending below 1/42" in 2026), which offer less structural rigidity to resist air expansion forces. Temperature fluctuations during curing, outgassing from certain adhesives, and the natural porosity of wood species all contribute to bubble formation when clamping pressure doesn’t account for these variables.
The Role of Pressure in Veneer Adhesion
Optimal veneer adhesion requires pressure that exceeds the adhesive’s minimum activation threshold while remaining below the substrate’s compression yield point. This sweet spot typically ranges from 45-75 PSI for most cold-press applications, but edge clamps must deliver this force uniformly across the entire glue line. The critical factor isn’t peak pressure but pressure distribution—measured in pounds per square inch consistency (PSIC). Advanced clamping systems in 2026 now incorporate micro-adjustment capabilities that let you dial in pressure increments as small as 0.5 PSI, crucial for delicate crotch veneers or burl patterns where uneven force creates telegraphing through the surface.
What Makes Edge Clamps Essential for Veneer Work
How Edge Clamps Differ from Standard Clamps
Unlike standard bar or pipe clamps that apply force perpendicular to the glue line, edge clamps generate pressure parallel to the substrate edge while simultaneously pressing downward. This dual-action mechanism creates a squeegee effect that actively pushes air outward from the center of the veneer sheet. The jaw geometry features a 90-degree configuration with one face applying lateral pressure and another providing vertical compression. In 2026’s designs, we’re seeing evolved cam profiles that maintain constant pressure even as adhesive thickness decreases during cure, a game-changer for preventing the pressure drop-off that causes late-stage bubble formation.
The Science of Distributed Pressure
Exceptional edge clamps employ what engineers call “progressive pressure mapping”—a technique where clamping force radiates from the edge inward in a controlled gradient. This approach counters the natural tendency of air to migrate toward the center. Modern clamps achieve this through curved jaw faces, flexible pressure pads, or segmented contact points that adapt to microscopic surface variations. The latest development involves viscoelastic jaw inserts that conform to the veneer surface while maintaining uniform resilience, effectively eliminating the pressure hot spots that traditional rigid jaws create.
Key Clamp Mechanisms for Bubble Prevention
Cam-Action vs. Screw-Driven Pressure
Cam-action clamps deliver rapid, high-force application ideal for initial veneer positioning, but their pressure curve peaks early then declines—a phenomenon called “clamp relaxation.” Screw-driven mechanisms offer superior pressure stability throughout the curing cycle, essential for modern slow-set adhesives that require 4-8 hours of consistent force. The 2026 hybrid systems combine both: a cam for quick engagement followed by a micro-adjustment screw for pressure maintenance. This two-stage approach prevents the “pressure sag” that occurs when wood fibers compress and adhesives settle, a primary culprit in bubble formation during extended cure times.
Vacuum-Assisted Clamping Systems
While technically not pure edge clamps, vacuum-assist edge systems represent the cutting edge of bubble prevention. These devices integrate miniature vacuum pods along the clamp jaw that actively extract air while mechanical pressure applies adhesive force. The vacuum creates negative pressure zones that pull veneer tightly against substrate before the adhesive sets, virtually eliminating trapped air. In 2026, portable vacuum edge clamps have become more accessible, featuring battery-powered micro-pumps and intelligent sensors that detect air leakage, automatically adjusting vacuum levels to maintain optimal extraction throughout the curing process.
Critical Features to Evaluate in 2026
Pressure Adjustment Precision
Look for clamps with indexed pressure settings rather than smooth-turn adjustments. Indexed systems provide tactile and audible feedback at specific pressure intervals, allowing you to replicate successful settings across multiple clamps. The best designs include pressure indicator windows showing real-time PSI readings via mechanical or digital displays. For marquetry work requiring multiple veneer species with different compressibility, clamps offering independent pressure control on vertical and horizontal jaws give you unmatched finesse. Avoid clamps with more than 2mm of backlash in the adjustment mechanism—this play translates directly into pressure inconsistency.
Jaw Material and Surface Protection
Hardened steel jaws with replaceable protective faces are non-negotiable for professional work. In 2026, phenolic-resin jaw pads with integrated air channels are becoming standard—these channels provide escape routes for air while preventing glue squeeze-out from bonding clamp to workpiece. For delicate veneers, seek clamps with cork-faced or leather-wrapped jaw options that distribute pressure over a larger surface area. The jaw angle tolerance should be within ±0.5 degrees of perfect 90°; anything looser creates uneven pressure distribution that manifests as micro-bubbles along the edge.
Throat Depth and Reach Capabilities
Standard 4-inch throat depths suffice for most cabinet work, but contemporary furniture often requires 6-8 inch reach for deep aprons or waterfall edges. Adjustable throat mechanisms that slide and lock without flexing are worth the investment. Pay attention to the throat’s rigidity—flex exceeding 0.1mm under full pressure directly reduces clamping effectiveness at the far edge of wide substrates. Some 2026 models feature articulating throat extensions that maintain perpendicular pressure even on curved or radiused edges, crucial for modern furniture’s organic forms.
Material Compatibility Considerations
Working with Different Veneer Species
Burl and crotch veneers require 30-40% less pressure than straight-grain species due to their inherent instability and tendency to check under stress. Clamps with ultra-fine pressure adjustment (down to 0.25 PSI increments) prevent crushing these delicate figures. Conversely, dense exotic veneers like ebony or rosewood need higher baseline pressure to overcome their natural oils’ resistance to adhesion. The clamp’s jaw material becomes critical here—unprotected steel can react with tannic acids in oak or walnut, causing dark stains that bleed through finish. Always use barrier layers when working with high-tannin species.
Substrate Material Interactions
MDF and particleboard substrates compress more than solid wood or plywood, requiring clamps with pressure-limiting features to prevent crushing. Look for clamps with “substrate sensitivity” settings that cap maximum force regardless of handle torque. For honeycomb-core panels popular in 2026’s lightweight furniture, edge clamps must distribute pressure over broader contact areas to avoid core collapse. Some advanced clamps now include interchangeable jaw profiles specifically engineered for different substrate densities, from rigid phenolic to flexible bending plywood.
Pressure Distribution Strategies
Understanding PSI Requirements
Calculate your project’s required clamping force by multiplying veneer area (in square inches) by recommended PSI (typically 50 PSI for standard cold press). Then divide by the number of clamps to determine per-clamp pressure. However, edge clamps follow different physics—they apply force along a line rather than across an area. The effective pressure zone extends approximately 3-4 inches from the clamped edge, so space clamps accordingly. For wide panels, you’ll need supplemental cauls or vacuum bags to cover the interior area that edge clamps can’t effectively reach.
Multi-Clamp Synchronization Techniques
When using multiple edge clamps, apply pressure sequentially from the center outward in a star pattern, similar to torquing lug nuts. This technique prevents air from becoming trapped in the middle of the panel. In 2026, synchronized clamping systems use Bluetooth connectivity to coordinate pressure application across up to 16 clamps simultaneously, ensuring perfectly uniform force distribution. For manual setups, invest in a pressure distribution mat placed between clamp jaws and veneer—these mats contain micro-sensors that change color to indicate pressure variance, giving visual feedback for manual adjustment.
Common Veneer Clamping Mistakes That Cause Bubbles
Over-Clamping and Glue Starvation
Applying excessive pressure forces too much adhesive from the glue line, creating starved joints that fail to fill microscopic voids. This paradoxically increases bubble formation because insufficient glue can’t wet the entire surface. The telltale sign is a glue line thinner than 0.05mm after curing. Modern edge clamps with pressure limiters prevent this, but many woodworkers still crank clamps “until they feel tight.” For most PVA and urea-formaldehyde adhesives, the optimal glue line thickness is 0.08-0.12mm—thick enough to fill pores but thin enough for proper penetration.
Insufficient Pressure Points
Relying on too few clamps creates pressure gradients where force drops below the adhesive’s activation threshold between clamping points. The rule of thumb is one clamp every 6-8 inches for rigid substrates, reducing to every 4-6 inches for flexible or thin veneers. However, this assumes perfect clamp performance. In practice, always add 20% more clamps than calculations suggest, especially for large surfaces. The cost of extra clamps pales compared to the time spent repairing a bubbled panel. For curved work, increase clamp density by 50% on concave surfaces where air naturally accumulates.
Maintenance and Calibration for Optimal Performance
Keeping Your Clamps Bubble-Ready
Clean glue residue from jaw faces after every use—dried adhesive creates high spots that focus pressure unevenly. Disassemble screw mechanisms monthly and apply dry lubricant (never oil-based, which attracts dust). Check jaw alignment quarterly using a machinist’s square; misalignment exceeding 0.5 degrees requires professional adjustment or replacement. Store clamps hanging vertically to prevent jaw faces from warping under their own weight. For vacuum-assist models, replace filter elements every 50 hours of use and test vacuum integrity weekly with a gauge.
Calibration Schedules for Precision Work
Professional shops calibrate edge clamps every 90 days using a load cell to verify pressure accuracy. For hobbyists, annual calibration suffices unless you notice performance changes. The calibration process involves clamping onto a calibrated test fixture and comparing the clamp’s pressure indicator (if equipped) against the load cell reading. Variation exceeding 5% indicates worn threads, damaged cams, or fatigued springs requiring service. Keep a calibration log for each clamp—pressure drift often precedes mechanical failure, giving you warning before a clamp ruins an expensive veneer project.
Cost vs. Performance Analysis
Budget-Friendly Options That Still Deliver
Quality edge clamps start around $35-50 per unit for basic screw-driven models with adequate pressure control. These work well for occasional use and smaller panels but lack the precision features that prevent bubbles in challenging applications. Look for solid cast bodies rather than stamped steel—the rigidity difference directly impacts pressure consistency. Avoid clamps under $25; their jaw parallelism tolerances are too loose for reliable veneer work. A starter set of six quality mid-range clamps ($60-80 each) handles most furniture projects without compromising results.
Professional-Grade Investment Justification
High-end edge clamps ($150-300 each) incorporate features that pay for themselves on the first major project: digital pressure displays, automatic pressure maintenance, and interchangeable jaw systems. For production shops, the time saved in setup and elimination of rework justifies the cost within months. These clamps maintain calibration longer, typically 2-3 years under heavy use, and offer rebuildable components rather than disposable construction. Consider the cost of a single bubbled crotch mahogany panel—often $200-400 in materials alone—and professional-grade clamps become cheap insurance.
Future Trends in Veneer Clamping Technology (2026)
Smart Pressure Monitoring
The most significant 2026 innovation is integrated pressure monitoring that connects to smartphone apps, displaying real-time force distribution heat maps across your clamping setup. These systems alert you if any clamp loses pressure during cure, allowing immediate correction before bubbles form. Some models even predict bubble risk based on pressure patterns, adhesive type, and environmental conditions, recommending clamp repositioning before you walk away. While still premium-priced, this technology is trickling down to mid-range tools, making intelligent clamping accessible to serious hobbyists.
Sustainable Material Innovations
Environmental consciousness drives development of clamps manufactured from recycled aircraft aluminum and bio-composite polymers that match steel’s rigidity with 40% less weight. Jaw faces now use cork-agglomerate pads—a renewable material that provides superior pressure distribution and natural anti-slip properties. These sustainable options don’t compromise performance; in fact, their lighter weight reduces fatigue during complex setups. Expect to see more water-based lubrication systems replacing petroleum products in clamp mechanisms, important for woodworkers pursuing green certifications.
Safety Protocols for Veneer Clamping Operations
Never exceed a clamp’s rated pressure capacity—doing so risks catastrophic failure that can launch components with dangerous force. Wear safety glasses when applying high pressure; glue joints can slip, spraying adhesive unexpectedly. Keep hands clear of clamp jaws during adjustment, as sudden releases can crush fingers. For vacuum-assist systems, ensure electrical connections stay dry and use ground-fault protection. When working with toxic exotic woods, connect clamps to dust extraction—the act of clamping can aerosolize fine particles trapped in veneer crevices. Finally, always relieve pressure gradually; rapid release can cause veneer to delaminate or splinter, creating sharp projectiles.
Frequently Asked Questions
What’s the ideal clamping pressure for quarter-sawn oak veneer on MDF?
Quarter-sawn oak’s dense grain structure requires 55-65 PSI for proper adhesion to MDF. However, MDF’s compressibility means you must limit total force to prevent substrate crushing. Use clamps with pressure limiters set to 60 PSI maximum, spaced every 6 inches, and supplement with a flexible caul to distribute force across the panel interior.
Can I use standard F-clamps instead of dedicated edge clamps for veneer work?
Standard F-clamps apply force perpendicular to the edge, which doesn’t create the squeegee effect needed to evacuate air. While you can achieve decent results by pairing F-clamps with shop-made L-brackets, you’ll lack the precise pressure control and dual-direction force that purpose-built edge clamps provide. For small repairs, F-clamps suffice; for full panels, invest in proper edge clamps.
How do I prevent dark lines from clamp jaws showing through light veneers?
This “clamp shadow” occurs when pressure crushes wood cells, altering light reflection. Use jaw pads made from 1/8" thick cork or felt, which distribute pressure over a larger area. Some woodworkers place wax paper between pad and veneer as a release agent. For critical projects, apply clamps over sacrificial veneer strips that peel away after curing, leaving the show face untouched.
Why do bubbles appear hours after I remove clamps?
Late-forming bubbles indicate pressure dropped below the adhesive’s activation threshold during cure, allowing trapped air to expand. This happens with clamp relaxation, temperature changes, or adhesive shrinkage. Use clamps with pressure-maintaining features or leave clamps on for the full cure time plus a 2-hour safety margin. Consider switching to adhesives with lower activation pressures.
Are pneumatic edge clamps better than manual ones for bubble prevention?
Pneumatic clamps excel at maintaining absolutely consistent pressure throughout extended cures, eliminating human error and fatigue. However, they require careful regulation—air compressors cycle pressure, causing fluctuations. Use a precision regulator with a buffer tank to smooth pressure delivery. For most woodworkers, high-quality manual clamps with pressure indicators offer better control and value.
How many edge clamps do I need for a 48" x 24" panel?
Calculate based on perimeter length: a 48" x 24" panel has 144" of edge. At 6-inch spacing, you need 24 clamps. However, this assumes uniform substrate rigidity. For large panels, add 4-6 interior clamps using pivoting jaw attachments that reach from the edge. Better yet, combine 16 edge clamps with a vacuum bag for the interior—this hybrid approach provides complete coverage without excessive clamp investment.
What’s the best way to clamp veneer on curved edges without causing bubbles?
Curved edges require clamps with articulating jaws that maintain perpendicular pressure across the radius. Use flexible cauls matching the curve’s radius, and increase clamp density by 50% on concave sections. Apply adhesive to both veneer and substrate to prevent dry spots, and work from the curve’s apex outward. For compound curves, vacuum pressing is superior to mechanical clamping.
Do I need different clamps for hot-press vs. cold-press veneer applications?
Hot-press clamps must withstand 150-180°F without losing strength or precision. Standard clamps with plastic components will fail. Look for all-metal construction with high-temperature lubricants. Hot pressing also requires higher initial pressure (70-85 PSI) because adhesives thin at temperature. Some 2026 clamps feature thermal expansion compensation that automatically adjusts pressure as temperature rises, preventing over-compression.
Why do I get perfect results on small panels but bubbles on large ones?
Large panels amplify pressure inconsistencies. A small 12" square might tolerate a single slightly loose clamp, but a 48" panel magnifies every pressure variation across its surface. Large surfaces also cure slower at the center, giving air more time to migrate. The solution: use a pressure distribution caul covering at least 75% of the panel, and verify every clamp’s pressure with a gauge rather than by feel.
How long should I leave edge clamps on veneer work?
Follow your adhesive manufacturer’s cure time, then add 25% for safety. For PVA glue at 70°F, that’s typically 3-4 hours clamped plus 1 hour. For urea-formaldehyde, plan on 6-8 hours minimum. Never rush the process—premature clamp removal is the second most common cause of bubbles (after insufficient pressure). Some 2026 smart clamps notify your phone when pressure has stabilized for a full cure cycle, giving you confidence it’s safe to remove them.
See Also
- 10 Essential Edge Clamps for Veneer Work Without Bubbles in 2026
- 10 Ultimate Edge Clamps for Veneer Pressing Without Bubbles in 2026
- We Tested 50 Band Clamps—Here Are the 10 Best for Curved Work in 2026
- 10 Best C-Clamps for Luthier Fretting & Fingerboard Work in 2026
- Stop Slipping Joints: 10 Best Edge Clamps for Perfect Alignment This Year